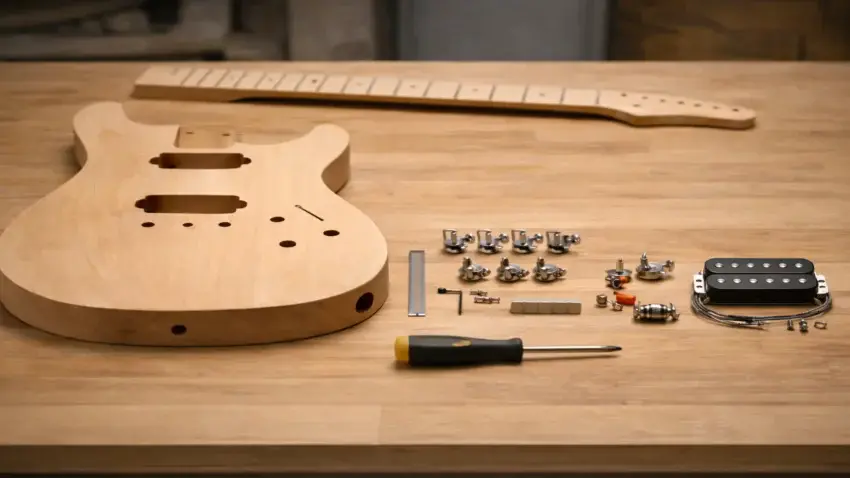
Most people don’t waste money upgrading budget guitar kits because they buy bad parts.
They waste money because they upgrade in the wrong order.
Swapping pickups before fixing tuning stability.
Chasing tone while the electronics are unreliable.
Upgrading cosmetic parts while playability problems remain.
The result is frustrating — and expensive.
This guide exists to prevent that.
If you follow the upgrade order below, you’ll spend less money, avoid redoing work,
and end up with a guitar that actually feels and sounds better at every step.
🧭 The Only Upgrade Order That Makes Sense for Budget Guitar Kits
If you’re building or upgrading a budget electric guitar kit,
this is the sequence that consistently works — and saves the most money.
1️⃣ Tuning Stability (Do This First — Always)
If the guitar won’t stay in tune, nothing else matters.
No pickup, pedal, or amp can fix that.
This step affects:
-
Playability
-
Setup accuracy
-
Every upgrade that comes after it
Skipping tuning stability is how builders end up upgrading the same guitar twice.
🔧 Step 1 Buying Decision: Tuning Stability
If you only upgrade one thing on a budget guitar kit, this is it.
A guitar that won’t stay in tune makes every other upgrade meaningless.
You can’t judge pickups.
You can’t set intonation correctly.
You can’t trust your setup.
Before spending money anywhere else,
make sure the guitar holds pitch under playing conditions.
What actually affects tuning stability (and what doesn’t)
For most budget guitar kits, tuning problems come from three places:
✔ Tuners
Cheap tuners slip, bind, or respond inconsistently.
Upgrading tuners improves:
-
Tuning accuracy
-
Tuning speed
-
Long-term stability
This is usually the highest-impact upgrade in Step 1.
✔ Nut material & slot quality
Poorly cut or soft nuts cause strings to bind — especially when tuning or bending.
A better nut:
-
Reduces tuning drift
-
Improves return-to-pitch
-
Makes tuning feel smoother and more predictable
This matters more than most beginners expect.
✔ String trees / break angle (where applicable)
On certain headstock designs, poor string angle causes instability even with good tuners.
This is a small part, but a big fix when needed.
What doesn’t fix tuning (yet)
-
Pickups
-
Pots and wiring
-
Bridges (unless defective)
-
Any cosmetic hardware
If the guitar won’t stay in tune, spending money on these first is how people get frustrated and quit.
The rule for Step 1
Do not move on until the guitar tunes smoothly, holds pitch, and returns to pitch after bends.
Once that’s true:
-
Setup becomes accurate
-
Tone upgrades become meaningful
-
Money stops getting wasted
🔧 Step 1 Product Guidance: Tuners & Nuts
When it comes to tuning stability, two components do almost all the work.
Get these right, and most budget kits stop fighting you.
🎯 Priority #1: Upgrade the Tuners
If the tuners slip, bind, or respond inconsistently, nothing else matters yet.
When choosing replacement tuners, look for:
-
Sealed gear tuners (not open, stamped-style)
-
Consistent gear ratio (smooth response matters more than high numbers)
-
Solid mounting fit for your headstock type
What better tuners actually improve:
-
Faster, more accurate tuning
-
Better return-to-pitch after bends
-
Long-term stability instead of constant tweaking
💡 This is usually the single most impactful upgrade you can make on a budget guitar kit.
If your guitar won’t stay in tune, start here.
🎯 Priority #2: Upgrade the Nut (or Fix the One You Have)
The nut is responsible for how smoothly strings move, not how the guitar sounds.
Common budget-kit nut problems:
-
Strings binding while tuning
-
Tuning jumps instead of smooth movement
-
Poor return-to-pitch after bends
When upgrading or replacing a nut, focus on:
-
Self-lubricating materials
-
Proper slot spacing and depth
-
Compatibility with your neck width and string gauge
A well-cut nut:
-
Makes tuning feel smooth instead of jerky
-
Reduces tuning drift
-
Often fixes problems people mistakenly blame on tuners
💡 In some cases, a properly cut nut matters more than the tuner upgrade itself.
⚠️ What to avoid in Step 1
-
Chasing “locking” hardware before basics are fixed
-
Upgrading bridges to solve tuning issues caused by the nut
-
Assuming pickups or electronics affect tuning
If the guitar doesn’t tune smoothly by hand, no hardware downstream will fix it.
Step 1 checkpoint (don’t skip this)
Before moving on, your guitar should:
-
Tune smoothly without binding
-
Hold pitch during normal playing
-
Return close to pitch after bends
If it does, Step 1 is complete.
2️⃣ Signal Reliability (Before Chasing Tone)
Once the guitar stays in tune, the next priority is making sure the signal is clean and dependable.
Scratchy pots, weak switches, and poor wiring don’t just cause noise —
they make tone upgrades pointless.
A reliable signal path ensures:
-
Consistent output
-
Predictable response
-
Accurate evaluation of later upgrades
🔧 Step 2 Buying Decision: Signal Reliability
Once the guitar stays in tune, the next priority is making sure the signal behaves predictably.
If the electronics are unreliable, you can’t accurately judge:
-
Tone changes
-
Pickup upgrades
-
Noise problems
Scratchy pots, weak switches, and inconsistent output don’t just sound bad —
they hide the real performance of the guitar.
What signal reliability actually means
A reliable signal path does three things:
-
Sends a consistent output to the amp
-
Responds the same way every time you touch the controls
-
Doesn’t introduce noise, dropouts, or crackling
If any of that is missing, tone upgrades become guesswork.
The parts that matter most in Step 2
✔ Pots (volume & tone)
Cheap potentiometers are one of the most common weak points in budget kits.
Problems they cause:
-
Scratchy noise when turning
-
Sudden volume jumps or dropouts
-
Inconsistent taper and response
Replacing them improves control feel and signal consistency, not just noise.
✔ Output jack
Loose or low-quality output jacks cause:
-
Intermittent signal loss
-
Crackling when the cable moves
-
Sudden cut-outs mid-play
This is a small, inexpensive part that causes outsized frustration when ignored.
✔ Pickup selector switch
Budget switches often fail early or behave inconsistently.
Symptoms include:
-
Dead pickup positions
-
Crackling during switching
-
Unreliable contact over time
A solid switch ensures the guitar behaves the same way every time you change settings.
What Step 2 is not about
-
Shielding (that’s Step 3)
-
Pickup swaps (that’s Step 4)
-
Tone chasing
This step is about making the guitar trustworthy, not changing how it sounds.
The rule for Step 2
If the signal crackles, cuts out, or behaves unpredictably, stop here and fix it before moving on.
Once the electronics are reliable:
-
Noise issues become easier to diagnose
-
Tone changes become obvious
-
Future upgrades actually pay off
🔧 Step 2 Product Guidance: Pots, Switch & Output Jack
Once tuning stability is locked in, unreliable electronics become the next bottleneck.
Most budget guitar kits ship with components that work — but not for long.
Crackle, sudden volume jumps, dead pickup positions, and intermittent signal loss are common.
This step fixes that.
🎯 Priority #1: Volume & Tone Pots
Low-quality pots are one of the most frequent failure points in budget kits.
Common problems they cause:
-
Scratchy noise when turning the knob
-
Sudden jumps in volume
-
Dead spots in the rotation
-
Inconsistent control response
When choosing replacement pots, look for:
-
Full-size housings rather than mini pots
-
Consistent taper (smooth, predictable control)
-
Proper shaft type and length for your control layout
Better pots don’t just feel nicer — they make the guitar behave predictably.
🎯 Priority #2: Output Jack
If the signal cuts out when the cable moves, this is almost always the culprit.
Common issues with cheap output jacks:
-
Loose grip on the cable plug
-
Crackling when touched
-
Intermittent signal loss
A solid output jack:
-
Holds the cable securely
-
Eliminates random dropouts
-
Prevents frustration that gets blamed on “bad wiring”
This is a small, inexpensive upgrade that prevents some of the most annoying failures.
🎯 Priority #3: Pickup Selector Switch
Budget selector switches often fail early or behave inconsistently.
Problems they cause:
-
Dead pickup positions
-
Crackling when switching
-
Unreliable contact over time
When upgrading a switch, focus on:
-
Firm mechanical action
-
Reliable contact across all positions
-
Compatibility with your pickup configuration
A dependable switch ensures the guitar responds the same way every time you change settings.
⚠️ What to avoid in Step 2
-
Replacing pickups to fix crackle or dropouts
-
Ignoring loose or poorly soldered connections
-
Chasing noise issues before electronics are stable
If the signal isn’t reliable, stop here and fix it before moving on.
Step 2 checkpoint (don’t skip this)
Before continuing, your guitar should:
-
Deliver consistent output
-
Switch cleanly between pickup positions
-
Respond smoothly to volume and tone changes
When that’s true, Step 2 is complete.
3️⃣ Noise Control & Shielding
Only after the guitar plays properly and the electronics behave should you worry about unwanted noise.
This step improves:
-
Usability at higher gain
-
Recording quality
-
Overall confidence in the build
🔧 Step 3 Buying Decision: Noise Control & Shielding
Once tuning stability and signal reliability are locked in,
any remaining hum or buzz can finally be diagnosed accurately.
At this stage, noise is no longer caused by slipping tuners or failing electronics —
it’s coming from electromagnetic interference, grounding, or environmental factors.
This is where noise control actually works.
What noise control is meant to fix
Noise control addresses:
-
Hum when you’re not touching the strings
-
Buzz that increases with gain
-
Interference from lights, screens, and nearby electronics
If these problems exist after Steps 1 and 2, shielding becomes effective instead of guesswork.
The upgrades that matter in Step 3
✔ Cavity shielding (control & pickup cavities)
Unshielded cavities act like antennas.
Shielding reduces:
-
Background hum
-
Environmental interference
-
Noise buildup at higher gain
This is one of the highest value-per-dollar fixes in a budget guitar.
✔ Grounding improvements
Poor grounding causes:
-
Noise when you release the strings
-
Inconsistent hum behavior
-
Unpredictable interference
Verifying and improving grounding ensures shielding actually does its job.
✔ Cable and environment awareness
At this stage, some noise comes from outside the guitar.
Understanding:
-
Cable quality
-
Room wiring
-
Nearby electronics
Prevents blaming the guitar for problems it isn’t causing.
What Step 3 is not about
-
Changing pickups
-
Chasing “vintage hum” myths
-
Fixing unstable electronics
If the guitar still crackles or cuts out, go back to Step 2.
The rule for Step 3
Do not swap pickups to fix noise until shielding and grounding are addressed.
Most noise problems in budget kits are solved here — not by buying new pickups.
Once noise is controlled:
-
Clean tones become clearer
-
High-gain tones become usable
-
Pickup upgrades finally make sense
4️⃣ Tone Shaping (Pickups, Caps, Fine Tweaks)
This is where most people start — and where they should actually wait.
Tone upgrades work best after the guitar is stable, quiet, and reliable.
At this point, changes are obvious, intentional, and worth the money.
🔧 Step 4 Buying Decision: Tone Shaping (Pickups & Fine Tweaks)
This is where most builders start — and where upgrades finally do what you expect
because everything before this is already right.
At this stage:
-
The guitar stays in tune
-
The signal is reliable
-
Noise is controlled
That means any tone change you hear is real, not masked by other problems.
What tone shaping actually means
Tone shaping is about intentional changes, not fixes.
Pickups don’t:
-
Fix tuning issues
-
Fix noise caused by bad wiring
-
Fix unreliable electronics
They shape:
-
Output level
-
Frequency balance
-
Dynamic response
When everything else is stable, pickup upgrades become predictable instead of disappointing.
The upgrades that matter in Step 4
✔ Pickups (matched to playing style)
This is the primary tone upgrade — but only when chosen correctly.
Pickups should be selected based on:
-
Music style
-
Output preference
-
Clean vs gain-heavy playing
At this point, even subtle differences are noticeable.
✔ Capacitor choices & control response
Once pickups are right, small electronic tweaks become meaningful.
Cap changes affect:
-
How the tone control rolls off highs
-
The usable range of the tone knob
-
Overall control feel
These are fine-tuning adjustments — not fixes.
✔ Pickup height and setup
Many “bad pickup” complaints come from improper setup.
Correct height affects:
-
Output balance
-
Clarity
-
String response
This costs nothing and often delivers more improvement than swapping parts.
What Step 4 is not about
-
Fixing hum or buzz (that was Step 3)
-
Fixing tuning or feel
-
Chasing hype or brand names
If tone still sounds inconsistent, revisit Steps 1–3 before buying anything else.
The rule for Step 4
Upgrade pickups only after the guitar is stable, quiet, and reliable — or you’ll misjudge the result.
When done in the right order:
-
Pickup upgrades feel dramatic
-
Tone changes are repeatable
-
Money spent actually sounds like money spent
5️⃣ Cosmetic & Comfort Upgrades (Last, Optional)
Knobs, covers, and visual mods are personal — and they should stay that way.
Do these when:
-
The guitar already plays well
-
You’re happy with the sound
-
You’re finishing the build, not fixing it
🔧 Step 5 Buying Decision: Cosmetic & Comfort Upgrades
Everything in this step is optional — and that’s exactly how it should be.
By the time you reach Step 5:
-
The guitar plays well
-
It stays in tune
-
The electronics are reliable
-
The tone is dialed in
Anything you change now is about feel, aesthetics, and personal connection, not fixing problems.
What cosmetic & comfort upgrades are actually for
These upgrades improve:
-
How the guitar feels in your hands
-
How it looks to you
-
How enjoyable it is to pick up and play
They do not make a bad guitar good — they make a good guitar yours.
Common Step 5 upgrades
✔ Knobs, switch tips, pickup covers
Purely visual and tactile.
Choose these when:
-
The guitar is finished
-
You want a specific look or feel
-
You’re no longer troubleshooting
✔ Strap buttons, control layout tweaks
Small comfort changes that improve usability.
These matter if:
-
The guitar feels awkward on a strap
-
Controls get in the way while playing
-
You want a more intuitive layout
✔ Neck feel adjustments
This includes:
-
Light fret polishing
-
Edge smoothing
-
Minor setup refinements
These upgrades improve comfort without changing the guitar’s core behavior.
What Step 5 is not about
-
Improving tone
-
Fixing tuning
-
Solving noise issues
If you’re still troubleshooting problems, Step 5 is too early.
The rule for Step 5
If the guitar already plays and sounds the way you want, Step 5 is where personalization belongs.
This is where:
-
The build feels complete
-
The guitar becomes inspiring instead of frustrating
-
Upgrades stop being “fixes” and start being choices
Final takeaway (this matters)
Following this upgrade order:
-
Prevents wasted money
-
Eliminates repeat upgrades
-
Makes every change intentional
Once you’ve reached Step 5, you’re no longer building a budget guitar —
you’re finishing a guitar you actually enjoy playing.
Why this order saves money (and frustration)
Upgrading in this sequence prevents:
-
Buying parts twice
-
Chasing symptoms instead of fixing causes
-
Misjudging upgrades that would have worked later
It also makes every dollar you spend actually count.
Quick Answer
For budget guitar kits, the most effective upgrade order is:
-
Setup first
-
Fix tuning stability issues
-
Address reliability problems
-
Upgrade tone-related parts (optional)
Skipping straight to tone upgrades before the guitar is stable usually leads to disappointment.
Step 1: Setup Before Any Upgrades
Before replacing a single part, the guitar needs a proper setup.
This includes:
-
Truss rod adjustment
-
Action height
-
Intonation
-
Pickup height
Why this comes first:
-
Many “tone problems” are actually setup problems
-
Poor setup hides the benefits of upgrades
-
You can’t evaluate changes accurately without a baseline
A well-set-up budget kit often plays far better than expected — even with stock parts.
Step 2: Fix Tuning Stability Issues First
Once setup is solid, the next priority is stability.
If the guitar won’t stay in tune, nothing else matters.
Common stability upgrades include:
-
Replacing slipping or rough tuners
-
Addressing nut binding issues
-
Fixing string seating problems
Why this step matters:
-
Stable tuning makes setup adjustments stick
-
Playing becomes more enjoyable
-
Future upgrades become easier to evaluate
This step often delivers the biggest “feel improvement” for the least effort.
Step 3: Address Reliability and Consistency
After stability, focus on parts that fail quietly over time.
These upgrades don’t always change sound — but they prevent frustration.
Common reliability fixes:
-
Scratchy volume or tone pots
-
Intermittent pickup selector switches
-
Loose or noisy output jacks
Why this step is important:
-
These issues tend to show up months later
-
Fixing them early avoids chasing phantom problems
-
The guitar becomes dependable instead of temperamental
These upgrades are often invisible — until they aren’t.
Step 4: Tone-Related Upgrades (Optional)
Only after the guitar:
-
Plays comfortably
-
Stays in tune
-
Works reliably
…does it make sense to upgrade for tone.
This can include:
-
Pickup changes
-
Fine-tuning electronics values
-
Small tone-shaping adjustments
Important perspective:
-
Tone upgrades are optional, not required
-
Many players are happy with stock tone after proper setup
-
Chasing tone before stability often leads to confusion
Tone upgrades should enhance a guitar you already enjoy playing — not try to fix one you don’t.
What to Skip Until Later
Some upgrades rarely deliver value early on.
These include:
-
Cosmetic hardware swaps
-
Overbuilt components on beginner kits
-
Upgrades that hide setup or stability issues
These can wait until:
-
The guitar is dialed in
-
You know exactly what you want to change
-
The upgrade solves a real problem
Patience saves money here.
Putting It All Together
A smart upgrade sequence looks like this:
-
Make the guitar playable
-
Make it stable
-
Make it reliable
-
Then improve tone if you want to
If you want a full breakdown of which upgrades actually make the biggest difference —
and which ones are worth skipping entirely —
this guide on the best upgrades for budget guitar kits walks through each option in detail.
Final Thoughts…
Upgrading a budget guitar kit isn’t about replacing everything —
it’s about solving problems in the right order.
When upgrades follow function instead of impulse:
-
Results feel obvious
-
Money goes further
-
The guitar becomes more enjoyable
A calm, step-by-step approach always wins.
Ready to Keep Improving Your Guitar?
Check out our other guides:
 If you’re new to guitar kits:
Start with Step-by-Step Guide To Building Your First Electric Guitar Kit and Essential Tools Every Electric Guitar Kit Builder Should Have.
If you already own a kit guitar:
Jump into How To Properly Set Up Your Electric Guitar Kit For Intonation or Fixing Common Problems: Buzzing And Dead Frets.
If you’re chasing better tone:
Head to Understanding Humbucker Vs Single Coil Pickups In Kits or Playing With Tone Controls: Tips For Electric Guitar Kits and start experimenting.
Your Guitar, Your Build, Your Sound
You don’t need a custom shop or a tech on speed dial.
All you need is a little guidance, some patience, and a place to go that shows you what to do next.
Come on man… You got this.
GuitarCrafts is here to help you along the way.
 Craft it. Play it. Own it!
Ready to take your guitar passion beyond the workbench?
See how I built GuitarCrafts.com using the training at Wealthy Affiliate — you can do the same.
Build Your First Website With Wealthy Affiliate (Free)
