Wiring your electric guitar kit is where the entire build finally comes to life.
In this guide to wiring your electric guitar kit for optimal performance, we’ll walk through exactly how
to connect your pickups, pots, switch, and output jack so your guitar sounds clean, powerful, and noise-free.
Whether you’re upgrading the electronics or building a kit from scratch, good wiring makes the biggest
difference in tone, clarity, and reliability.
👉 Quick Wiring Fix (Start Here)
If your guitar isn’t working properly after wiring,
check this first:
- No sound at all?
Check your output jack connections - Buzzing or humming?
Make sure all grounds are properly connected - Pickup not working?
Recheck your wiring diagram and solder joints - Crackling or cutting out?
Look for cold solder joints or loose wires
Fixing these common issues first can save hours of troubleshooting later.
This guide is part of my Electric Guitar Pickups & Wiring Guide, which explains
how pickups, wiring, and electronics shape your guitar’s tone and performance.

👉 If you’re still dealing with noise after wiring, check out:
How To Shield Your Guitar’s Electronics For Noise Reduction
to eliminate hum and interference.
👉 Recommended Tools For Guitar Wiring
Before you start wiring your guitar, having the right tools makes the process faster, cleaner,
and far less frustrating.
The tools below help you test connections, hold components steady, and create strong, reliable
solder joints for a professional-quality build.
Digital Multimeter Tester
A reliable multimeter is one of the most important tools you can use during guitar wiring.
It helps you confirm continuity, identify hot and ground wires, and instantly catch wiring mistakes
before they cause noise or total signal loss.
🌟 Amazon Product Suggestion:
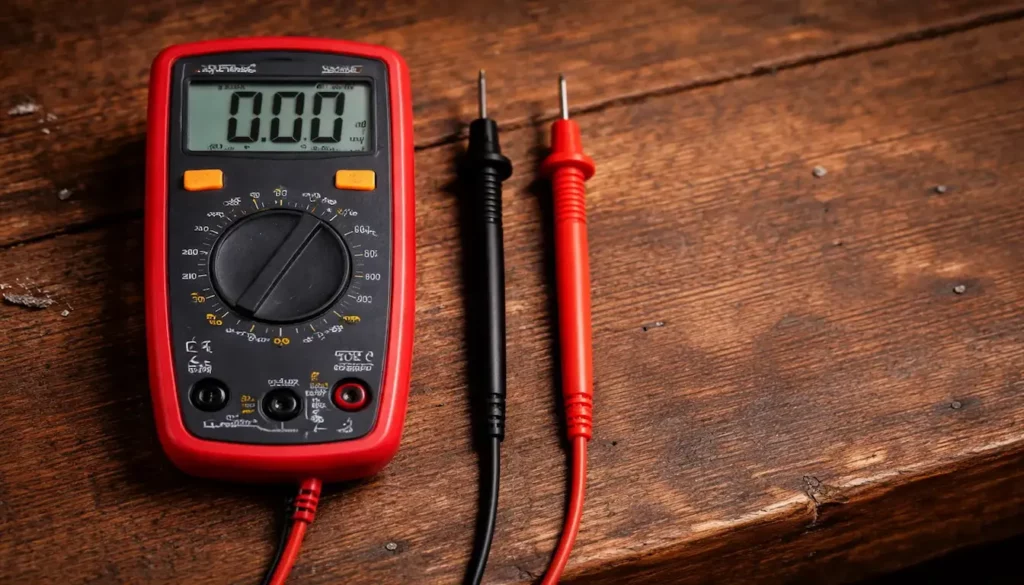
✔️AstroAI Digital Multimeter
Tester 2000 Counts
An affordable multimeter for checking
wiring, continuity, and voltage during guitar builds.
Simple controls and clear readings make
troubleshooting fast and easy.
Why It’s Great:
✔️Verifies wiring before power-up
✔️Checks pickup resistance and pot values
✔️Detects shorts and grounding issues
✔️Catches problems early
Adjustable Helping Hand
When you’re trying to solder tiny lugs on pots or switches, a helping-hands stand keeps
everything in place.
The alligator clips hold wires steady so you can make clean, accurate solder joints without
burning your fingers or fighting the component.
🌟 Amazon Product Suggestion:
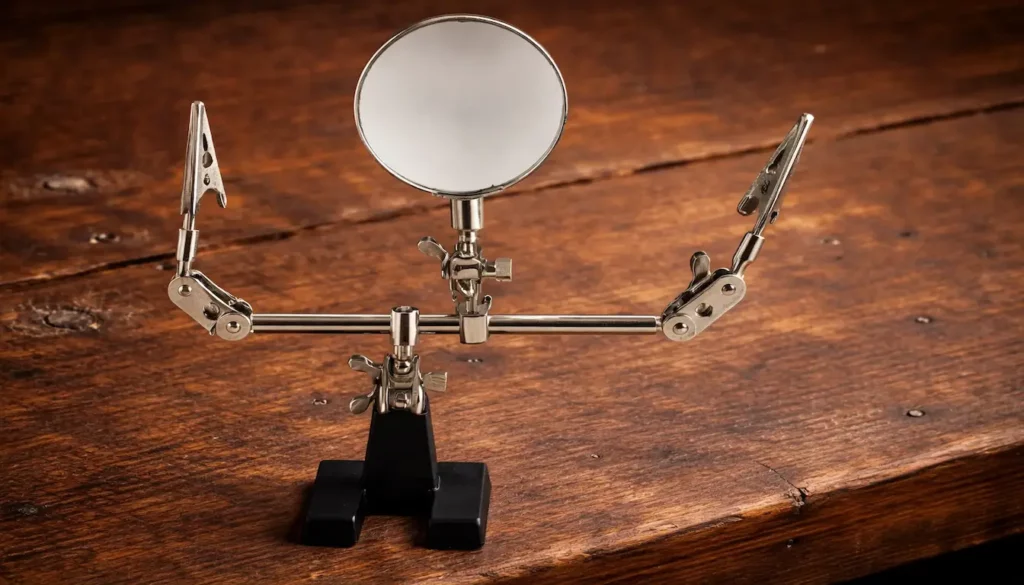
✔️NEIKO 01902
Adjustable Helping Hand
A stable third hand for
soldering in tight guitar cavities.
Clips hold parts in place so you can
work clean and precise.
Why It’s Great:
✔️Holds wires, pots, and switches steady
✔️Frees both hands for soldering
✔️Reduces cold joints and solder mess
✔️ Faster, easier wiring work
Digital Soldering Station Kit
A precision soldering iron is a must for clean guitar wiring.
The fine tip gives you control when working with small components, tight cavity spaces,
and delicate pot lugs.
A quality iron makes every connection smoother and more reliable.
🌟 Amazon Product Suggestion:
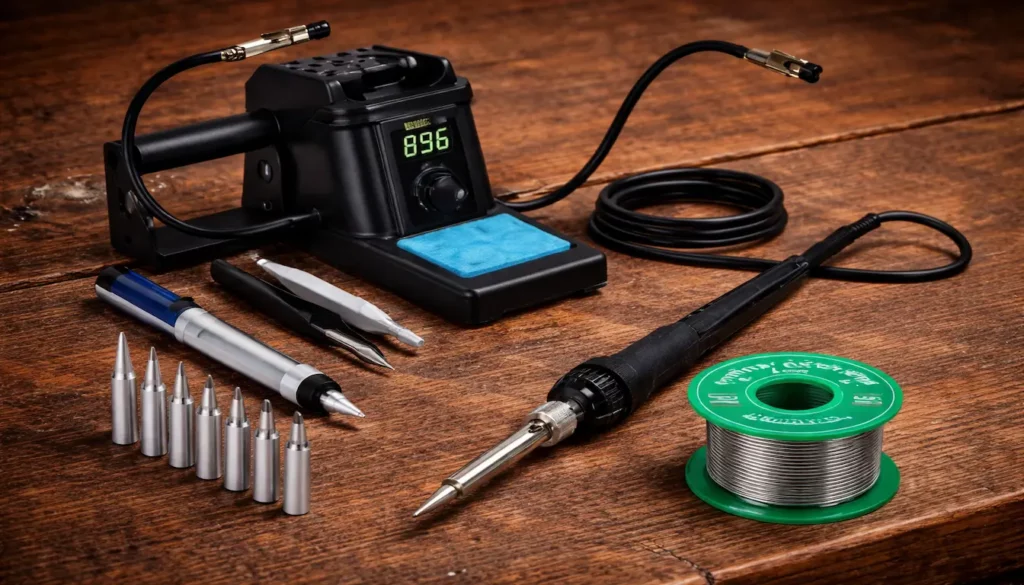
✔️ YIHUA 926 III 60W Digital Display
Soldering Iron Station Kit
A reliable soldering station
for wiring pickups, pots, and switches.
Fast heat-up and precise temperature control
give you clean, consistent results.
Why It’s Great:
✔️Fine tip for detailed soldering
✔️Heats fast, holds temperature
✔️Prevents overheating components
✔️Clean, reliable connections
🎸 Step-By-Step Guide to Wiring Your Electric Guitar Kit
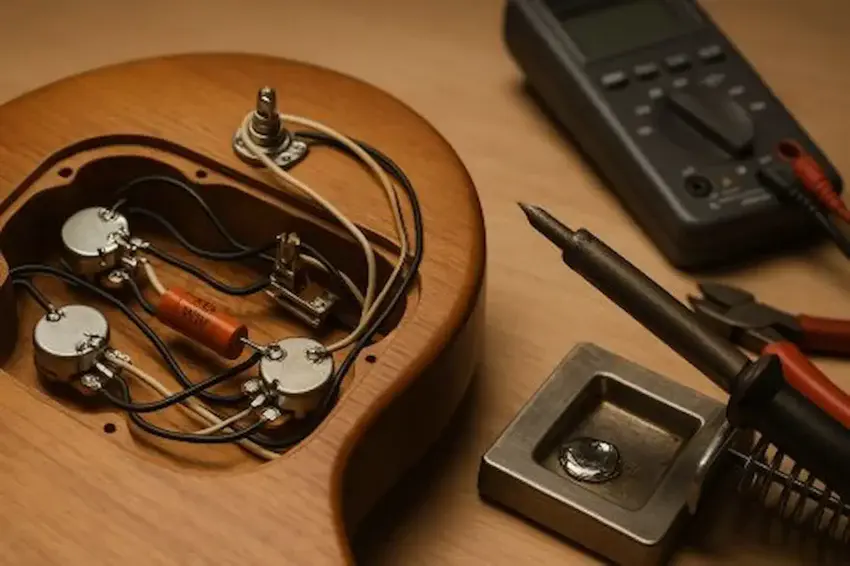
1. Open the Control Cavity and Identify Each Component
Start by removing the back plate or pickguard so you can access the pots, switch, and wiring channel.
Lay everything out where you can clearly see each connection point before you begin.
2. Test Pickup Leads With Your Multimeter
Before attaching anything, check each pickup wire for continuity and resistance.
This confirms the pickup is healthy and ensures you’re wiring it to the correct lug.
3. Tin Your Wires and Component Lugs
Use your precision soldering iron to pre-coat (tin) the ends of each wire and the lugs they’ll attach to.
This step makes your actual solder joints cleaner, stronger, and much easier to complete.
4. Solder Hot Leads to Their Correct Lugs
Follow your wiring diagram and connect the pickup hot wires to the appropriate lugs on the
selector switch or volume pot.
Keep your helping-hands stand in place to stabilize everything as you solder.
5. Connect Grounds to the Pot Casings
Group all ground wires — from the pickups, switch, and output jack — and attach them to the back
of a pot casing.
A properly grounded system eliminates unwanted hum and noise.
6. Wire the Output Jack
Solder the hot lead to the jack’s tip terminal and the ground wire to the sleeve.
Double-check that your leads aren’t touching each other before tightening the jack in place.
7. Use Your Multimeter to Verify Every Connection
Once the solder has cooled, test for continuity across all key points.
This step helps ensure you haven’t created any cold joints, shorts, or accidental disconnects.
8. Organize and Secure Your Wiring
Gently bundle and position your wires so they aren’t pressing against the cavity walls or interfering
with the pickguard or cover.
Neat wiring stays quieter and is easier to service later.
9. Close the Cavity and Do a Test Plug-In
Reconnect the pickguard or control plate, plug into your amp, and test all pickup positions,
tone controls, and volume sweeps.
Any issues here point directly back to your wiring layout.
10. Final Cleanup and Cable Management
If everything works correctly, secure the wire bundles, tighten all screws, and make any
final adjustments.
Smooth, well-managed wiring makes future mods faster and protects components long-term.
🏁 Final Thoughts…
Wiring your electric guitar kit doesn’t have to feel intimidating.
With a solid plan, the right tools, and a little patience, you can create a clean, reliable wiring
setup that brings out the best in your pickups and overall tone.
Take your time, Double-check each connection, and use your multimeter anytime something
seems off.
A well-wired guitar not only sounds better —
- It’s easier to upgrade,
- Easier to troubleshoot,
- And way more enjoyable to play.
 Ready to Start?
Here’s your next step —
pick one and go:
New to guitar kits?
Start with
Step-by-Step Guide To Building
Your First Electric Guitar Kit
and
Essential Tools Every Electric Guitar Kit
Builder Should Have.
Already built a kit?
Jump into
How To Properly Set Up Your
Electric Guitar Kit For Intonation
or
Fixing Common Problems:
Buzzing And Dead Frets.
Chasing better tone?
Head to
Understanding Humbucker
Vs Single Coil Pickups In Kits
or
Playing With Tone Controls:
Tips For Electric Guitar Kits
and start experimenting.
 Your Guitar, Your Build,
Your Sound
You don’t need a custom shop or a tech on speed dial.
All you need is a little guidance, some patience,
and a place to go that shows you what to do next.
Come on man… You got this.
Hey a great post you have here!
Though I currently do not own a guitar, I have been wanting to purchase one for a while. I had look at a few that tickle my fancy but not acted on it since I am not totally aware of the types of guitars as well as how they work, unlike a piano.
This post of yours provides a great detail about electric guitars.
Thanks again and have a great day!
Thanks so much for the kind words! I’m glad the post gave you a clearer picture of electric guitars and how they work. It’s always exciting when you’re at that “thinking about getting one” stage—there’s a whole world of sounds and styles waiting to be explored. Whether you go for your first guitar tomorrow or down the road, the more you learn now, the more confident you’ll feel when you pick the right one. Wishing you all the best on your guitar journey!
~Wayne
This guide is absolutely invaluable—getting the wiring right truly is the difference between just a guitar that looks good and one that sounds incredible and plays like it. I especially appreciate how you emphasize not just the technical side (clean solder joints, solid grounding, following wiring diagrams), but also the tonal benefits—like minimizing hum, preserving signal strength, and enhancing overall clarity. It’s clear that wiring is as central to performance as pickups or finish. Your writing always hits the perfect balance between friendly encouragement and experienced insight, which is why I keep coming back. For builders curious about advanced wiring down the road, do you find it’s easier to plan for options like coil-splitting or phase switching upfront, or wait and retrofit later as needs evolve? And have you noticed any particular part of the wiring process that seems simple but most beginners tend to overlook?
I really appreciate your kind words! You’re absolutely right, wiring can be the make-or-break difference between a guitar that just looks nice and one that really sings when you plug it in.
For the advanced stuff like coil-splitting or phase switching, I usually recommend planning for it upfront if you can. Even if you don’t add those features right away, picking parts that support them means you’re set up for an easy upgrade later without having to tear everything apart. Retrofitting is fine, but it can turn into more of a project than you expect.
One thing I see beginners overlook all the time is simple wire management. Keeping wires neat, trimmed to the right length, and secured so they don’t move around makes a huge difference. It not only keeps noise down but also makes future upgrades or repairs way less of a headache.