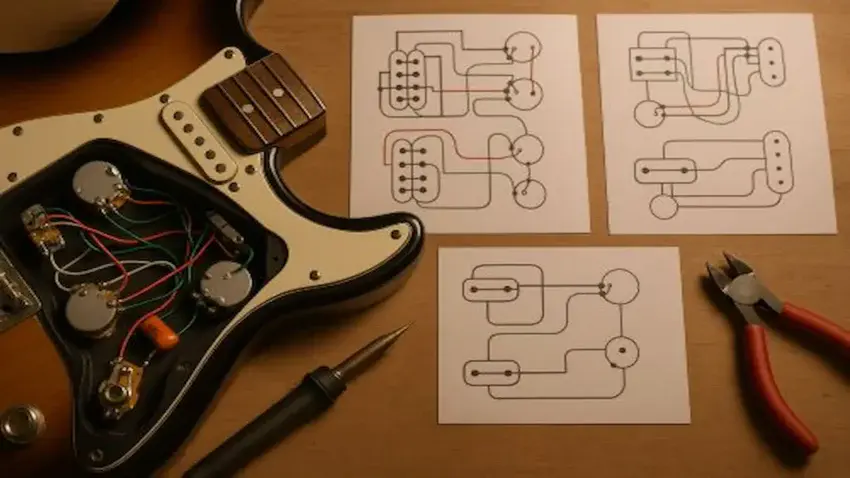
Custom wiring patterns can completely
transform the way your electric guitar
responds, feels, and sounds.
In this guide to guitar wiring patterns,
we’ll explore the most useful modifications
— from coil-splitting and series/parallel switching
to phase reversal and specialty tone circuits —
so, you can shape your guitar’s voice far beyond
the limits of a stock setup.
Whether you’re after tighter clarity,
thicker punch, or totally unique textures,
a few smart wiring changes can unlock tones
that make your guitar truly your own.
![]()
🛠️ Tools You’ll Need Before
Choosing a Wiring Pattern
Before you dive into wiring patterns,
make sure you’ve got the right tools ready.
These will make each modification cleaner,
easier, and way more reliable.
🎸Soldering Station
For clean, reliable wiring patterns,
a quality soldering station is the foundation
of your entire setup.
A stable iron with temperature control helps
you make strong joints that won’t fail later.
🌟 Amazon Product Suggestion:
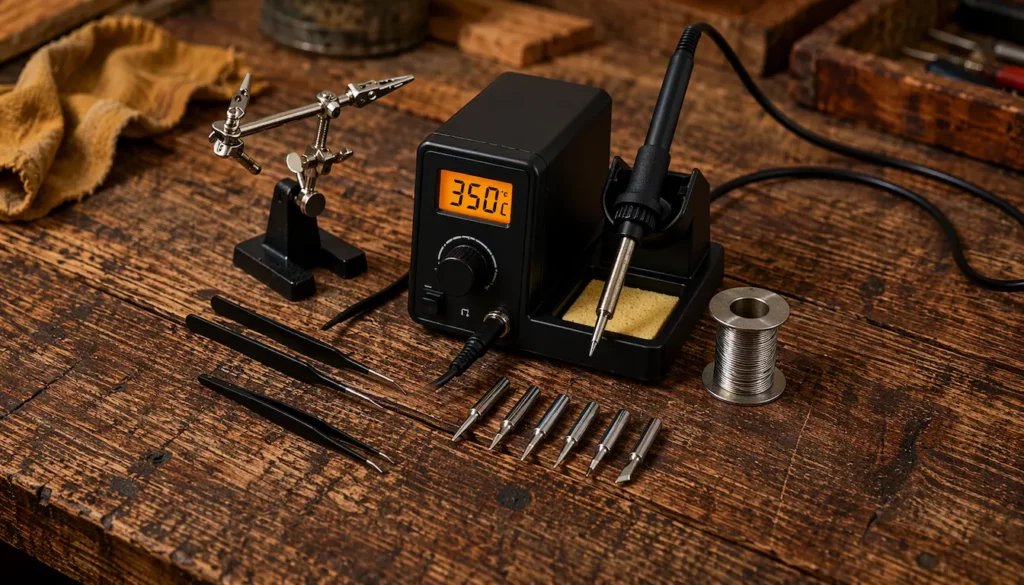
✔️ YIHUA 926 III
Digital Soldering Station
(60W)
This upgraded YIHUA station delivers
fast heating, stable temps, and way better
than those bargain-bin soldering pens..
It includes multiple tips, a solder sucker,
tweezers, helping hands, and a
smooth temperature dial —
everything you need for clean shielding,
wiring repairs, and pickup installs.
Why It’s Great:
✔ Digital temp control — stable, clean solder joints
✔ 60W fast heat — ready to work quickly
✔ 6 precision tips — perfect for tight wiring
✔ Full kit — stand, solder & accessories included
🎸Digital Multimeter
Before changing wiring layouts,
you’ll need a dependable multimeter to
confirm continuity, check grounds, and
diagnose any issues that pop up
during your mod.
🌟 Amazon Product Suggestion:
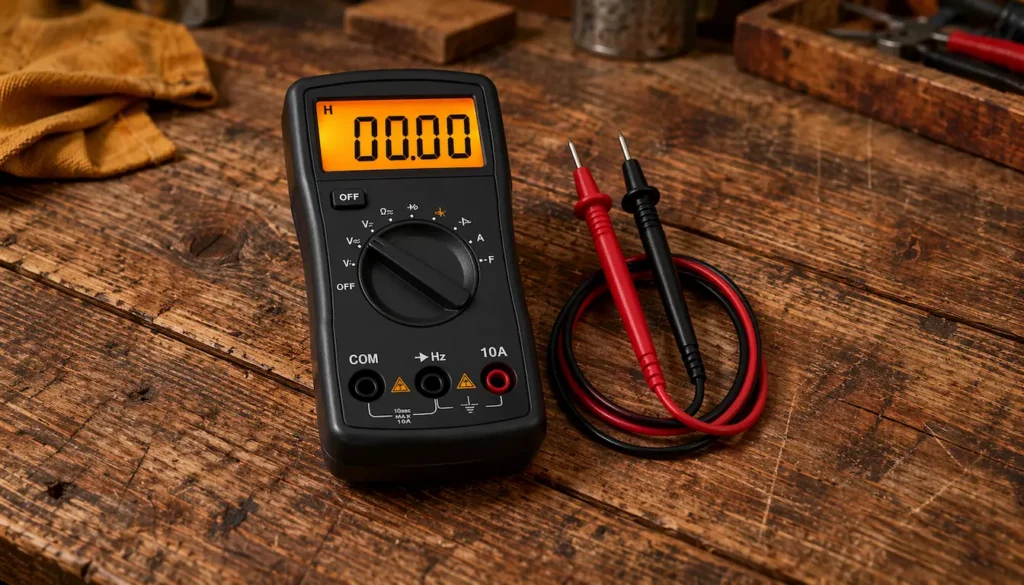
✔️ KAIWEETS 6000-Count
Digital Multimeter
This KAIWEETS multimeter is one
of the best budget-friendly meters
for guitar electronics.
With accurate auto-ranging, fast
continuity response, and the
ability to measure resistance down to
fine increments, it’s perfect for
checking whether your shielding
makes proper electrical contact — and for
diagnosing wiring issues inside your guitar kit.
Why It’s Great:
✔ Continuity check — verifies connections
✔ Resistance readings — checks grounds
✔ Auto-ranging — no guesswork
✔ Top-rated value — affordable and reliable
🎸Instrument Cable
Once your wiring pattern is complete,
a good instrument cable ensures your work pays off
with a clean, noise-free signal every time you plug in.
🌟 Amazon Product Suggestion:
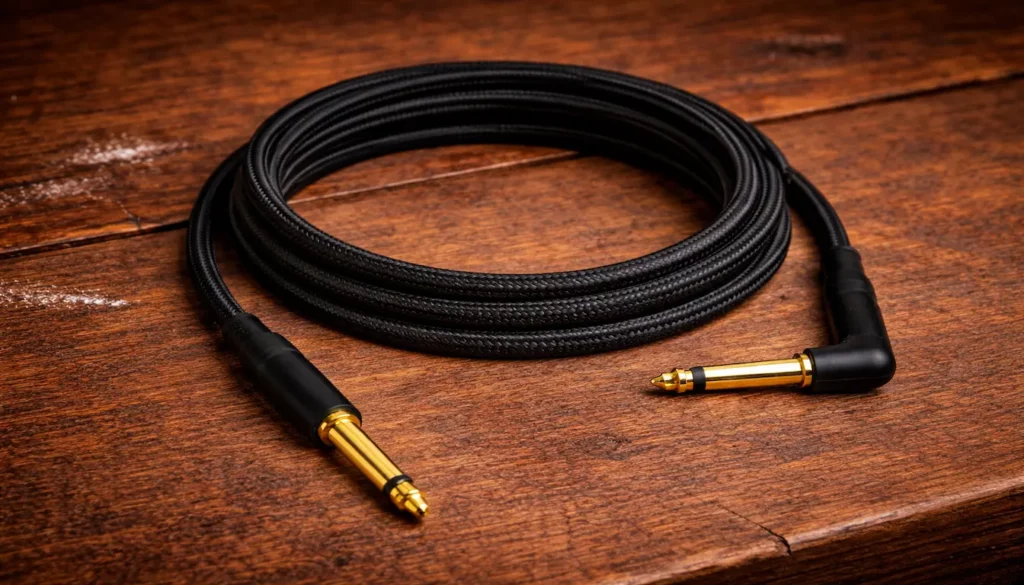
✔️ Ernie Ball Braided
Instrument Cable
(18ft – Straight/Angle)
This Ernie Ball cable gives you a
clean, quiet signal that actually shows
off your shielding work.
The braided jacket keeps it tangle-free
and durable, and the straight/angle plug
setup is perfect for most electric guitar jacks.
Why It’s Great:
✔ Noise-free dual shielding
✔ Ultra-durable braided jacket
✔ Straight + right-angle connectors
✔ Smooth, reliable signal for any guitar
🎯Understanding Guitar Wiring
Patterns Coil Split Wiring
Custom wiring patterns let you shape your guitar’s
voice in ways factory setups simply can’t match.
Whether you want more clarity, heavier punch,
or completely unique switching options,
each pattern below brings its own character and
function to your guitar kit.
These are the most useful and beginner-friendly
wiring mods you can try —
And every one of them can be done with the
tools you just saw above.
🎸 1. Coil-Split Wiring
Coil-splitting lets you turn a full humbucker
into a single-coil with the pull of a switch
(usually a push-pull pot).
It gives you brighter, sharper tones perfect
for clean picking, funk grooves, and classic
single-coil sparkle — without needing an
entirely different guitar.
Why players love it:
Adds versatility without extra pickups
Brighter highs and more articulation
Perfect for clean tones and rhythm playing
🎸 2. Series Wiring
Series wiring boosts your output by
running both pickup coils
one-after-the-other,
creating a louder, fatter sound
with more midrange push.
It’s a great mod for heavier tones,
thick leads, and punchier rhythm parts.
Tone character:
Higher output
Fuller mids
Strong, aggressive response
🎸 3. Parallel Wiring
Parallel wiring is the opposite of series —
the coils run side-by-side instead of stacked.
The result is a cleaner, clearer humbucker tone
with less output but WAY more articulation.
What you get:
Brighter tone
Glassy clarity
Lower noise than single coils
Great for players who want clarity
without losing hum-cancelling
performance.
🎸 4. Phase Reversal
Phase reversal flips one pickup’s electrical
phase when both pickups are active.
The two signals cancel certain frequencies,
giving you a thin, funky, “out-of-phase”
sound used by legends like Peter Green.
Where it shines:
Blues
Funk
Experimental tones
Sharp, hollow quack
It’s one of the coolest mods you can
add with just a simple DPDT switch.
🎸 5. Kill Switch Wiring
A kill switch instantly cuts your signal,
letting you create stutter-style effects
made famous by Tom Morello and
Buckethead.
It’s simple to wire and adds a ton
of stage personality.
What it does:
Cuts your signal at the
press of a button
Creates rhythmic stutters and
machine-gun effects
Requires only one switch and
two solder joints
Easy, fun, and wild.
🎸 6. Treble Bleed Circuit
The treble-bleed mod keeps your high-end
from disappearing when you lower your
guitar’s volume knob.
It’s a tiny circuit
(one capacitor + one resistor)
that makes your volume control
WAY more usable.
Why it’s a must-have:
Volume knob stays clear instead of muddy
Great for smooth swells
Perfect for players who ride the volume
for clean/crunch transitions
One of the cheapest upgrades
with the biggest payoff.
🎸 7. Optional: Blend-Pot Mod
A blend pot lets you “mix” your pickups
instead of running one or the other.
This gives you tones you can’t get from a
standard 3-way or 5-way switch.
Benefits:
Smoothly fade between neck and bridge
Create unique mid-position tones
Excellent for studio and session work
A killer mod for players wanting
more subtle tone control.
⭐ Final Thoughts…
Wiring patterns aren’t just for pros —
they’re one of the easiest ways to unlock
a completely new palette of tones in
your guitar kit.
With the right tools and a clear wiring plan,
you can customize your sound in ways that
store- bought guitars can’t match.
Take your time, follow your diagram,
And always check each connection with your
multimeter before buttoning up the cavity.
A few smart wiring choices can transform
your guitar from “stock” to
seriously expressive.
 Ready to Start?
Here’s your next step —
pick one and go:
 New to guitar kits?
Start with
Step-by-Step Guide To Building
Your First Electric Guitar Kit
and
Essential Tools Every Electric Guitar Kit
Builder Should Have.
Already built a kit?
Jump into
How To Properly Set Up Your
Electric Guitar Kit For Intonation
or
Fixing Common Problems:
Buzzing And Dead Frets.
Chasing better tone?
Head to
Understanding Humbucker
Vs Single Coil Pickups In Kits
or
Playing With Tone Controls:
Tips For Electric Guitar Kits
and start experimenting.
 Your Guitar, Your Build,
Your Sound
You don’t need a custom shop or a tech on speed dial.
All you need is a little guidance, some patience,
and a place to go that shows you what to do next.
Come on man… You got this.
GuitarCrafts
is here to help you along the way.
Craft it. Play it. Own it!
This guide does an excellent job showing how custom wiring can transform your guitar’s voice—going well beyond the basics. I especially appreciate the clear breakdown of tonal wiring techniques—from coil-splitting and series vs. parallel setups to phase switching—highlighting how each configuration can dramatically shape your sound. The emphasis on understanding Seymour Duncan’s color code, neat wiring practices, and choosing the right wire type for durability and tone really sets this apart—a perfect mix of DIY practicality and tonal creativity. It’s empowering to see that simple wiring tweaks can open up entirely new sonic possibilities. For someone experimenting with these mods, is there a particular wiring technique—like coil-splitting or phase switching—that tends to surprise players the most when they try it for the first time?
Thank you so much! I’m glad the guide resonated! It’s amazing how much creative flexibility proper wiring can unlock.
For many players experimenting with these mods, phase switching tends to be the biggest surprise. The scooped, slightly nasal tone it produces can be quite different from what people expect, and it often sparks a whole new approach to using their pickups. Coil-splitting is also popular, but because it mostly mimics single-coil tones, it usually feels more familiar. Phase switching can really make someone rethink what’s possible from the same set of pickups.
It’s always rewarding to see builders discover these sonic possibilities and start experimenting, They quickly realize just how transformative wiring tweaks can be!
Thanks again,
~Wayne
Thanks for this! I’ve helped with a few basic rewires before, but I never fully understood how much series vs. parallel wiring or phase reversal could completely change the tone. Your explanations make a lot of sense, and I like that you highlight both the practical steps and the tonal impact. I’m curious—have you experimented with combining coil-splitting and phase reversal in the same guitar? I wonder how dramatic the difference would be in real playing situations. Thanks again. This is an informative guide!
Thanks so much! I’m glad the guide helped clarify how series, parallel, and phase changes affect tone. They really do make a noticeable difference. I have experimented with combining coil-splitting and phase reversal in the same guitar, and the results can be quite dramatic, especially when switching between pickups. It gives you some unique, almost quirky tones that can really make certain riffs or chord voicings stand out. It’s a fun way to explore creative sounds without adding more pickups.
Definitely worth experimenting with on a DIY build!
Thanks again,
~Wayne