
Wiring your electric guitar kit is one of those steps that looks simple on the surface —
until a small mistake sends you chasing hum, buzz, weak output, or a completely dead signal.
In Common Wiring Mistakes And How To Fix Your Electric Guitar Kit, we break down the errors builders make most often and show you exactly how to fix them with confidence.
Whether your kit won’t make a sound or your tone just feels “off,” the solutions are usually much simpler than you think.
Proper wiring is the backbone of clean, reliable guitar tone.
Once you know what to look for —
bad grounds, reversed wires, cold solder joints, miswired switches, and more —
troubleshooting becomes fast, logical, and almost automatic.
This guide walks you through the most common issues, how they happen, and the exact steps to correct them so your guitar sounds the way it should.

⭐ Products That Make Fixing Wiring Mistakes Much Easier
1. Kirecoo Copper Tape
When you’re fixing wiring issues, proper grounding is everything.
Copper tape makes it easy to eliminate hum caused by poor cavity shielding or incomplete ground paths.
🌟 Amazon Product Suggestion:

✔️ Kirecoo Copper Tape
(2in × 33 FT) – Conductive Adhesive Shielding Tape
This high-quality Kirecoo copper foil tape is one of the most trusted options for shielding electric guitar cavities. With a fully conductive adhesive and a wide 2-inch roll, it applies smoothly, overlaps easily, and ensures strong electrical continuity — exactly what you want for reducing hum, buzz, and 60-cycle noise in guitar kits or custom builds.
Ideal for pickguards, control cavities, switch cavities, and grounding pathways.
Why it’s great:
✔ Fully conductive adhesive for complete electrical continuity
✔ 2-inch width covers cavities faster with fewer seams
✔ Strong adhesion sticks securely inside tight curves
✔ Easy peel backing for fast and clean installation
✔ Perfect for guitar shielding, pedal builds, and grounding repairs
✔ Affordable, top-rated, and beginner-friendly
2. Conductive Shielding Paint
If your wiring problems come from noise bleeding into the circuit, shielding paint offers a fast, ultra-clean way to seal the cavity and improve your signal-to-noise ratio.
🌟 Amazon Product Suggestion:

✔️ Conductive Shielding Paint
High-Conductivity Nanotech Formula
(1 fl oz)
This nanotechnology-based conductive paint is ideal for shielding curved, uneven, or hard-to-reach control cavities where copper tape is difficult to apply. It brushes on easily, dries quickly, and creates a continuous conductive barrier to help eliminate hum, interference, and 60-cycle noise.
With strong electrical conductivity and excellent coverage per ounce, it’s a go-to choice for builders who want a clean, sleek shielding layer without overlapping tape seams.
Why It’s Great:
✔ Brush-on convenience — no cutting or layering
✔ Nanotech conductive formula for strong EMI protection
✔ Perfect for uneven/curved surfaces (where tape fails)
✔ Dries quickly for faster project turnaround
✔ Great for guitars, pedals, synths, shielding boxes, and electronics
✔ Clean, seamless finish — no seams, wrinkles, or lifting edges
3. KAIWEETS Digital Multimeter
A multimeter is your truth detector. When a wire is dead, reversed, shorted, or improperly grounded,
this tool tells you instantly.
🌟 Amazon Product Suggestion:
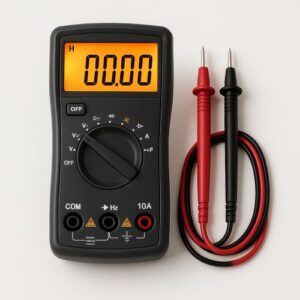
✔️ KAIWEETS 6000-Count Digital Multimeter
This KAIWEETS multimeter is one of the best budget-friendly meters for guitar electronics. With accurate auto-ranging, fast continuity response, and the ability to measure resistance down to fine increments, it’s perfect for checking whether your shielding makes proper electrical contact — and for diagnosing wiring issues inside your guitar kit.
It includes durable test leads, a bright backlit display, and reliable build quality that makes it ideal for beginners and experienced builders alike.
Why It’s Great:
✔ Continuity check — instantly verifies connections
✔ Resistance readings — confirms grounds & wiring health
✔ Auto-ranging — no guessing which setting to use
✔ Bright backlit screen — easy to read inside control cavities
✔ Safety-rated, sturdy design — great for workshop use
✔ Top-rated & affordable — excellent value for guitar builders
4. YIHUA 926 III Soldering Station
Most wiring mistakes start with bad solder joints.
A steady, temperature-controlled iron gives you clean, solid connections every time.
🌟 Amazon Product Suggestion:
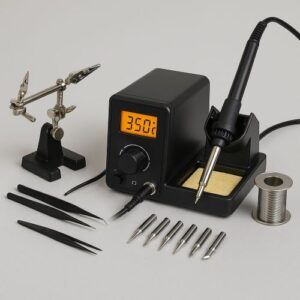
✔️ YIHUA 926 III Digital Soldering Station
Precision Temp Control + Full Accessory Kit
(60W)
This upgraded YIHUA station delivers fast heating, stable temps, and way more control than the cheap “best-seller” soldering kits. It includes multiple tips, a solder sucker, tweezers, helping hands, and a smooth temperature dial — everything you need for clean shielding, wiring repairs, and pickup installs.
Why It’s Great:
✔ Digital temperature control — stable heat = cleaner, stronger solder joints
✔ 60W fast-heating element — reaches set temp quickly for efficient work
✔ Includes 6 precision tips — ideal for tight cavities and detailed guitar wiring
✔ Helping hands + stand — keeps parts steady while you solder
✔ Lead-free solder included — everything you need in one kit
✔ Auto sleep + safety features — runs cooler & safer in a home workshop
✔ Much higher quality than typical “best seller” soldering pens
5. Ernie Ball Instrument Cable
Not all wiring issues are inside the guitar — sometimes it’s your cable.
A high-quality instrument cable ensures your fixes aren’t being ruined by a noisy connection.
🌟 Amazon Product Suggestion:
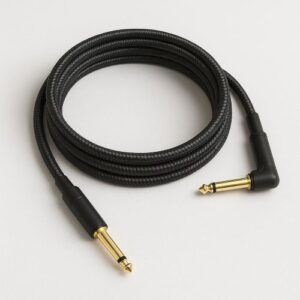
✔️ Ernie Ball Braided Instrument Cable
(18ft – Straight/Angle)
This Ernie Ball cable gives you a clean, quiet signal that actually shows off your shielding work. The braided jacket keeps it tangle-free and durable, and the straight/angle plug setup is perfect for most electric guitar jacks.
Why It’s Great:
✔ Noise-free dual shielding
✔ Ultra-durable braided jacket
✔ Straight + right-angle connectors
✔ Gold-plated plugs for better contact
✔ Smooth, reliable signal for any guitar
⭐ Step-By-Step: Fixing Common Wiring Mistakes
1. Check for Loose or Missing Ground Connections
A bad ground is the #1 cause of hum, buzz, or complete signal failure.
Make sure every ground point — pots, switch casing, bridge ground, and output jack —
has a solid, shiny solder joint.
If a wire barely touches the casing, reflow it with a proper bond.
2. Look for Reversed Hot and Ground Wires
This one happens more often than you think.
If your guitar is silent or extremely weak, check that the hot lead is truly going to the input lug
and the ground isn’t accidentally reversed.
Swap them and your signal usually snaps back instantly.
3. Inspect for Cold Solder Joints
Dull, lumpy, or cracked solder joints create unstable tone, crackling, and intermittent dropouts.
Heat the joint until the solder flows like liquid chrome, then let it cool naturally.
A temperature-controlled soldering station helps prevent re-melting nearby connections.
4. Confirm the Switch Is Wired Correctly
Selector switches are easy to misread since different kit brands use different lug layouts.
Compare your wiring to the correct diagram for your switch style — import, CRL, blade, or toggle —
And make sure each pickup lead is on the correct lug.
5. Fix Crossed or Touching Wires
If two hot wires are pressed together or touching exposed shielding, you can accidentally short the circuit and kill your output.
Spread the wires neatly, trim excess lead length, and use heat-shrink tubing where needed.
6. Test All Pot Lugs for Proper Soldering
Volume or tone pots that don’t respond correctly often come down to lugs that weren’t fully soldered or accidentally bridged. Make sure no stray solder blob is connecting two lugs that shouldn’t touch.
Resolder and clean up any excess.
7. Verify the Output Jack Wiring
This is one of the easiest mistakes to overlook — and the easiest to fix.
The tip connection is your hot. The sleeve is ground. If they’re reversed or touching, you’ll get popping, buzzing, or no sound at all.
Clean it up and secure the leads.
8. Use a Multimeter to Test Continuity
A multimeter removes the guesswork.
Test the hot path from the pickups to the jack.
Check every ground point.
If the meter doesn’t beep, you’ve found your break.
This step alone solves half of all wiring problems.
9. Evaluate Shielding Issues That Cause Noise
Improper shielding — like tape that doesn’t make full contact or paint that isn’t thick enough —
creates grounding gaps that let noise into the circuit.
Ensure all shielding connects back to the master ground, and that the walls, base, and cover are continuous.
10. Perform a Final Signal Test Before Closing the Guitar
Plug in, tap the pickups with a screwdriver, roll the knobs, and toggle the switch.
If everything behaves correctly, you’re good to button up the cavity.
If something still feels off, go back to steps 1–8 —
The problem will reveal itself.
⭐ Final Thoughts…
Fixing wiring mistakes in your electric guitar kit doesn’t have to be frustrating.
Once you know what to look for —
Bad grounds
Reversed wires
Cold solder joints
Miswired switches
And shielding gaps
Troubleshooting becomes a simple, step-by-step process.
With a few reliable tools and a systematic approach, you can turn a noisy, weak,
or silent guitar into a clean-sounding instrument that performs exactly the way it should.
Dialing in your wiring is one of the smartest upgrades you can make during your build.
Take your time, double-check each connection, and you’ll end up with a guitar that’s quiet,
consistent, and ready to rock.
Ready to Start Adjusting Your Tone?
Check out our other guides:
👉 If you’re new to guitar kits:
Start with Step-by-Step Guide To Building Your First Electric Guitar Kit and Essential Tools Every Electric Guitar Kit Builder Should Have.
👉 If you already own a kit guitar:
Jump into How To Properly Set Up Your Electric Guitar Kit For Intonation or Fixing Common Problems: Buzzing And Dead Frets.
👉 If you’re chasing better tone:
Head to Understanding Humbucker Vs Single Coil Pickups In Kits or Playing With Tone Controls: Tips For Electric Guitar Kits and start experimenting.
Your Guitar, Your Build, Your Sound
You don’t need a custom shop or a tech on speed dial.
All you need is a little guidance, some patience, and a place to go that shows you what to do next.
Come on man… You got this.
GuitarCrafts is here to help you along the way.
 Craft it. Play it. Own it!
Ready to take your guitar passion beyond the workbench?
See how I built GuitarCrafts.com using the training at Wealthy Affiliate — you can do the same.
 Build Your First Website With Wealthy Affiliate (Free)

This is such a clear and encouraging guide—especially for anyone tackling their first guitar kit wiring. I really appreciate how you demystify common pitfalls like cold solder joints, incorrect wiring, poor grounding, and excess-length wires, showing how these issues often translate into buzzing, hum, or complete dead spots. It’s empowering to know that most of these problems are easily fixable with just a few tools and a steady hand.
I love how you emphasize the importance of using wiring diagrams, testing wiring early before closing up the cavity, and keeping connections neat and tidy—not just for functionality but for future upgrades as well. It’s a reminder that building a guitar is as much about care and precision as it is about creativity.
If there’s one thing beginners tend to underestimate, I bet it’s grounding: that single poor connection can introduce hum and frustration out of nowhere. What other small wiring steps do you find builders frequently overlook, that might later cause weird noises or inconsistencies?
Thank you so much! I’m glad the guide made wiring feel approachable! Getting those basics right really sets the stage for a smooth build and clean tone.
You’re absolutely right that grounding is one of the biggest things beginners underestimate. Another small step that often gets overlooked is tidying up wire lengths and securing loose leads inside the cavity. Wires that shift or touch the wrong points can create intermittent noise that’s tricky to trace later. Also, double-checking solder joints for a clean, shiny connection. Even a joint that looks fine at first can sometimes cause scratchy signals or hum if it’s slightly cold.
Those little details may seem minor at the time, but taking care of them early can save a lot of frustration and really pay off when testing and playing your build.
Thanks again,
~Wayne
This is a really helpful guide. I’ve helped with a couple of beginner kits, and the wiring issues you describe are exactly the problems we ran into. The step-by-step instructions and troubleshooting tips are on time. I’m curious about shielding the control cavity: in your experience, does tape generally work as well as shielding paint, or does it depend on the guitar and pickups? Just wondering before there is another build. Thanks for all the great info here!
Thanks so much! I’m glad the guide resonated and that the troubleshooting tips were on point. Regarding shielding, both copper tape and conductive shielding paint can work well, but there are some nuances. Copper tape is usually easier for beginners, gives consistent coverage, and is great for irregular shapes in the control cavity. Shielding paint can be faster for larger areas and offers good continuity, but it sometimes requires multiple coats and careful grounding. Ultimately, it can depend on the guitar and pickups. Tape often provides a bit more flexibility, especially for smaller DIY kits.
Either method, when grounded properly, can significantly reduce buzz and hum.
Thanks again,
~Wayne