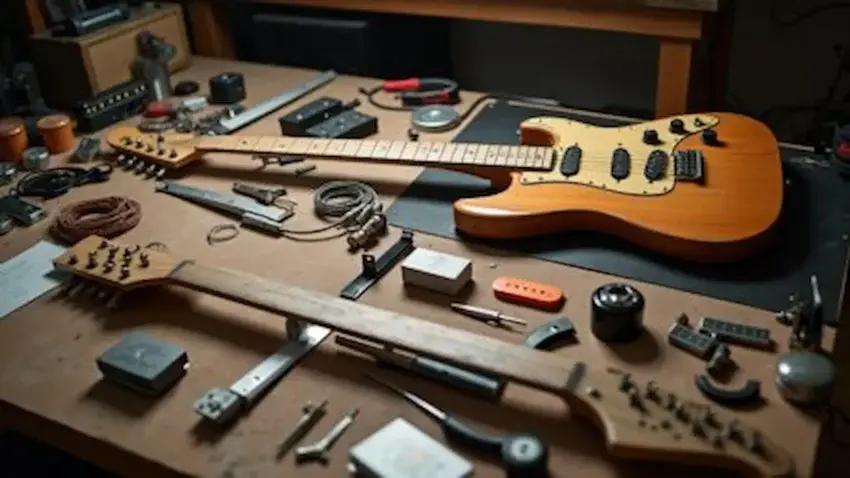
Assembling an electric guitar kit is one of the most rewarding projects you can take on —
But even the best kits come with challenges.
Buzzing frets, noisy electronics, stiff controls, neck alignment issues,
and odd rattles are all part of the journey.
The key is knowing that these problems aren’t signs of failure…
They’re simply part of the build process.
This guide walks through the most common issues that show up during guitar kit assembly
and gives you clear, practical fixes for each one.
With the right steps, a few essential tools, and a methodical approach,
you can turn any rough moment into a smooth, playable, great-sounding final instrument.
 This guide is part of my Electric Guitar Build Guides,
where I walk through the step-by-step process of assembling and finishing an electric guitar kit.

🛠️ Products Used in This Troubleshooting Guide
These three Amazon tools will save time and your sanity when diagnosing kit problems:
1. MusicNomad MN602 Precision Setup Gauge Set
The ultimate “builder’s cheat sheet.”
These gauges make it easier to diagnose action issues, neck relief,
and string height problems with accuracy — not guesswork.
 Amazon Product Suggestion:
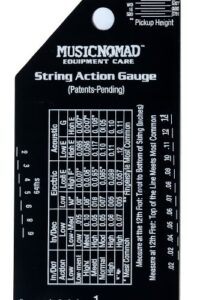
 MusicNomad Precision String Action Gauge Ruler
for String Height- Metric, SAE, 64ths
(MN602)
The MusicNomad MN602 String Action Gauge is a precision stainless-steel ruler
designed to help you dial in perfect string height on electric, acoustic, and bass guitars.
With easy-to-read etched markings in metric, SAE, and 64ths, it takes the guesswork out of
action setup and ensures repeatable, pro-level results every time.
Why It’s Great:
Ultra-precise etched measurements — no fading, no guessing
Works for all guitars — electric, acoustic, and bass
Includes action charts for fast, reliable setup targets
Black-on-white contrast makes numbers easy to see under shop lighting
Pocket-size stainless steel design is durable for life
Perfect for accurate 12th-fret action checks on every setup you do
2. Mutt Tools 2-Piece Feeler Gauge Set
If your neck doesn’t feel right, this is how you measure what’s actually happening.
Perfect for dialing in truss rod relief and spotting uneven frets.
Amazon Product Suggestion:
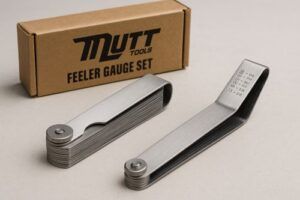
✔️ Mutt Tools 2-Piece Feeler Gauge Set
(Straight & Angled — Inch + Metric)
This dual-set feeler gauge combo is perfect for precise guitar setup work —
checking nut slot depth, dialing in pickup height tolerances, verifying tremolo knife-edge spacing,
or confirming fret clearance on tricky spots.
With both straight and angled blades, you can get into tight areas
without fighting your tool.
If you want clean, accurate measurements you can trust,
this set belongs on your bench.
Why It’s Great:
✔️ Includes 32 blades in both inch (.001″–.040″) and metric sizes
✔️ The angled gauge makes it easy to reach nut slots and bridge components
✔️ Clearly marked, laser-etched blades for easy reading
✔️ Perfect for nut slotting, pickup height verification, and general setup precision
✔️ Strong, smooth-folding design — built to hold up in a workshop setting
3. KAIWEETS 6000 – Count Digital Multimeter
Weak output? Dead pickup? Ground hum?
This little unit tells you instantly where the issue lives inside your electronics.
Amazon Product Suggestion:
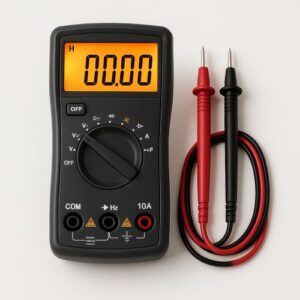
KAIWEETS 6000-Count Digital Multimeter
This KAIWEETS multimeter is one of the best budget-friendly meters for guitar electronics. With accurate auto-ranging, fast continuity response, and the ability to measure resistance down to fine increments, it’s perfect for checking whether your shielding makes proper electrical contact —
and for diagnosing wiring issues inside your guitar kit.
It includes durable test leads, a bright backlit display, and reliable build quality that makes it ideal for beginners and experienced builders alike.
Why It’s Great:
Continuity check — instantly verifies connections
Resistance readings — confirms grounds & wiring health
Auto-ranging — no guessing which setting to use
Bright backlit screen — easy to read inside control cavities
Safety-rated, sturdy design — great for workshop use
Top-rated & affordable — excellent value for guitar builders
🔧 Troubleshooting Steps
Before you grab the soldering iron or reach for the truss rod wrench,
walk through each problem methodically.
Most guitar kit issues have simple causes —
and even simpler fixes —
once you know where to look.
🔥 10-Step Troubleshooting Guide
1. Check Neck Relief
Too much bow or backbow will cause buzzing, dead notes, or high action.
👉 Fix: Use a feeler gauge and make a ⅛ turn at a time on the truss rod.
2. Inspect Fret Leveling
Uneven frets = buzzing, choking notes, poor playability.
👉 Fix: Rock a straightedge across groups of three frets to find and address high spots.
3. Verify Bridge Alignment
A misaligned bridge throws intonation off instantly.
👉 Fix: Ensure both E strings run parallel to the fretboard edges before tightening screws.
4. Check Nut Slot Depth
If your open strings buzz or go sharp when fretted, the nut is telling you it needs work.
👉 Fix: Use nut files or sandpaper to bring the slots to the correct depth.
5. Tighten All Hardware
Loose tuners, jacks, and strap buttons cause mystery rattles and intermittent signal issues.
👉 Fix: Tighten every screw and nut before moving on.
6. Diagnose No-Sound Problems
Before you panic: 90% of the time, it’s a loose ground or cold solder joint.
👉 Fix: Use a multimeter to check continuity from pots to output jack.
7. Fix a Scratchy or Noisy Pot
Static, pops, or grinding sounds usually mean debris inside the pot.
👉 Fix: Spray with contact cleaner and work the knob back and forth.
8. Identify Weak or Dead Pickups
A dead pickup isn’t always dead — sometimes it’s the wiring.
👉 Fix: Check solder joints, then measure the pickup’s resistance with a multimeter.
9. Troubleshoot String Buzz
Buzzing can come from multiple causes —
relief, saddle height, nut issues, or uneven frets.
👉 Fix: Eliminate variables one at a time starting from the neck.
10. Final Intonation Check
A perfect setup can still play out of tune if the saddles aren’t dialed in.
👉 Fix: Match the 12th fret fretted note to the harmonic using a tuner.
🤘 Double-Finger Pro Tips (It’s What I Do…)
👉👉Always diagnose before adjusting anything. Random tweaking only creates new problems.
👉👉Use painter’s tape to label wires during assembly. Saves hours of backtracking later.
👉👉If you’re frustrated, walk away for 10 minutes. Fresh eyes fix guitars faster.
👉👉Never overtighten the truss rod. When in doubt — lefty loosey.
👉👉Take pictures as you go. If something goes wrong, you can retrace your steps instantly.
🎸 Final Thoughts…
Troubleshooting is where good builders become great builders.
Every issue you fix makes your next kit faster, cleaner,
and more professional.
Stick with the process, trust your eyes and tools, and remember —
Even seasoned luthiers deal with the same exact problems.
And now?
Your kit is officially on its way to becoming a fully dialed-in, stage-ready guitar.
Ready to Start Adjusting Your Tone?
Check out our other guides:
If you’re new to guitar kits:
Start with Step-by-Step Guide To Building Your First Electric Guitar Kit
and Essential Tools Every Electric Guitar Kit Builder Should Have.
If you already own a kit guitar:
Jump into How To Properly Set Up Your Electric Guitar Kit For Intonation
or Fixing Common Problems: Buzzing And Dead Frets.
If you’re chasing better tone:
Head to Understanding Humbucker Vs Single Coil Pickups In Kits
or Playing With Tone Controls: Tips For Electric Guitar Kits and start experimenting.
Your Guitar, Your Build, Your Sound
You don’t need a custom shop or a tech on speed dial.
All you need is a little guidance, some patience,
and a place to go that shows you what to do next.
Come on man… You got this.
 Craft it. Play it. Own it!
This troubleshooting guide is fantastic—it’s one of the most practical and reassuring breakdowns I’ve seen for anyone building their first electric guitar kit. I appreciate how clearly you outline the common pain points: everything from weak solder joints and wiring shorts to neck alignment woes, bridge setup challenges, fretwork discomfort, and finishing mishaps. Your advice on testing wiring early—by plugging in and tapping pickups before sealing everything—feels like a real lifesaver. Emphasizing patience, verification at each stage, and tidy wiring as keys to avoiding later headaches shows how even small steps can make a huge difference in playability and sound.
If you were to highlight one issue that builders consistently underestimate—something that seems simple but often causes major headaches—which one do you think deserves more attention?
Thank you so much! I’m glad the guide resonated! It’s always rewarding to hear that builders feel more confident tackling their first kit.
One issue that often gets underestimated is neck alignment and relief checks. It might seem simple, but even a slightly misaligned neck or overlooked truss rod adjustment can cause buzzing, dead frets, or action issues that feel much more complicated to fix later. Another small but commonly overlooked step is testing the wiring before sealing the cavity—catching a cold joint or reversed connection early can save a ton of frustration.
Those “minor” details really do make a huge difference in the final playability and tone of a kit, and paying attention to them early helps keep the build enjoyable and stress-free.
Thanks again,
~Wayne
This article is an excellent and practical guide for anyone attempting to build an electric guitar from a kit. Breaking down the troubleshooting process into specific sections like wiring, neck alignment, and fretwork makes the information digestible and highly useful for beginners. The emphasis on patience and research is also a great piece of advice. The article could be even more helpful by including photos or diagrams for each troubleshooting section, particularly for the wiring and fretwork issues, as these can be difficult to visualize from text alone.
What are some of the most overlooked or counterintuitive steps in the final setup of a guitar (neck relief, string height, intonation) that can make a big difference in playability?
Thanks so much for the thoughtful feedback! You’re absolutely right—photos and diagrams would really help bring the troubleshooting steps to life, especially for wiring and fretwork. That’s something I plan to add in future updates.
As for overlooked steps in the final setup, a couple really stand out:
Neck relief adjustments – Many beginners either skip this or over-tighten the truss rod. A touch too much bow or back-bow can drastically affect how comfortable the guitar feels.
Nut slot height – This is often missed, but even if everything else is perfect, nut slots that are too high make the first few frets hard to play cleanly, while too low leads to buzzing.
Pickup height – People tend to set them too close to the strings. Backing them off slightly can actually open up the tone and balance volume between strings.
Intonation check under playing conditions – Adjusting intonation with the guitar laying flat is common, but standing and playing in your normal position sometimes reveals subtle differences worth dialing in.
Little details like these make the guitar feel far more “finished” and rewarding to play.
Thanks again,
~Wayne