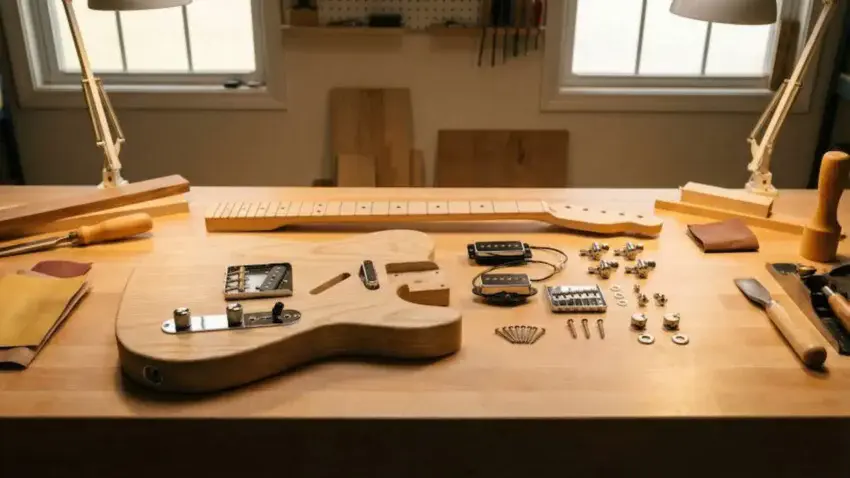
Customizing your guitar kit’s fretboard can feel
intimidating, but D.I.Y. Fretboard Customization
(Inlays, Radius & Leveling) becomes much easier
once you have the right tools.
Whether you’re installing new inlays,
reshaping the radius, or leveling for
smooth playability, these essential fretboard tools
will help you work accurately and confidently
on any guitar kit.
👉 This guide is part of
Guitar Fretboard Inlays Explained,
where I break down different inlay styles,
materials, and customization options.

🛠️ Essential Fretboard
Customization Tools
Whether you’re leveling frets,
shaping a radius, or installing new inlays,
these are the most reliable tools for
clean, accurate fretboard work.
Each tool helps you get pro-level results
on any DIY guitar kit.
⭐Frautron 16″ Fret
Leveling Beam
This aluminum fret leveling beam gives you
a long, perfectly straight surface for dialing in
fret heights with precision.
Ideal for new kits, refrets, and full setup work.
 Amazon Product Suggestion:
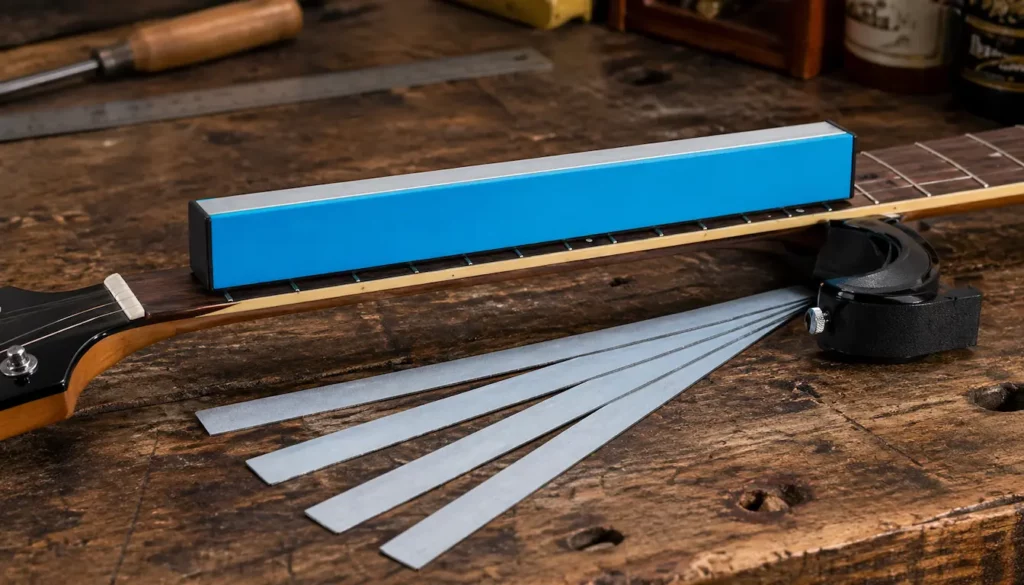
✔️ Frautron 16″Fret
Leveling Beam
(With Sandpaper Set)
A dependable leveling beam is a must for
clean, buzz-free frets, and this Frautron
16″ Aluminum Beam delivers.
Its long, rigid design keeps everything
perfectly flat, and the included
120–1000 grit strips cover every stage
from rough leveling to final smoothing.
Why It’s Great:
✔️ 16″ length covers more frets for smoother, more accurate leveling
✔️ Rigid aluminum build — no flex, no bowing, no uneven sanding
✔️ Comes with 12 sandpaper strips (120–1000 grit)
✔️ Great for kit builds and repair work
✔️ Straight edges make it easy to guide across frets without slipping
⭐ KAISH 12″
Radius Sanding Block
This 12″ KAISH radius block is ideal for smoothing
fretboards, cleaning up after inlay work,
and prepping the surface before leveling frets.
The solid beech construction keeps the
radius consistent, and the 12″ profile matches
most modern guitar kits.
Amazon Product Suggestion:

✔ KAISH 12″ Radius
Sanding Block
(Beech Wood)
A 12″ radius block is a must-have
when sanding a fingerboard or prepping frets.
The KAISH block gives you a clean,
consistent radius every time.
Made from solid beech wood
and machined accurately,
it keeps your sanding even and
prevents flat spots or uneven shaping.
Why It’s Great:
✓ Accurate 12″ radius for consistent fretboard shaping
✓ Solid beech wood stays rigid and stable
✓ Perfect for leveling frets and smoothing fingerboards
✓ Comfortable shape for controlled sanding passes
⭐ StewMac Refret Saw
& Slot Cleaning Tool Set
When working with inlays or replacing frets,
this toolset helps you deepen or clean fret slots
with precision and control — truly a
pro-grade addition to your kit tools.
Amazon Product Suggestion:
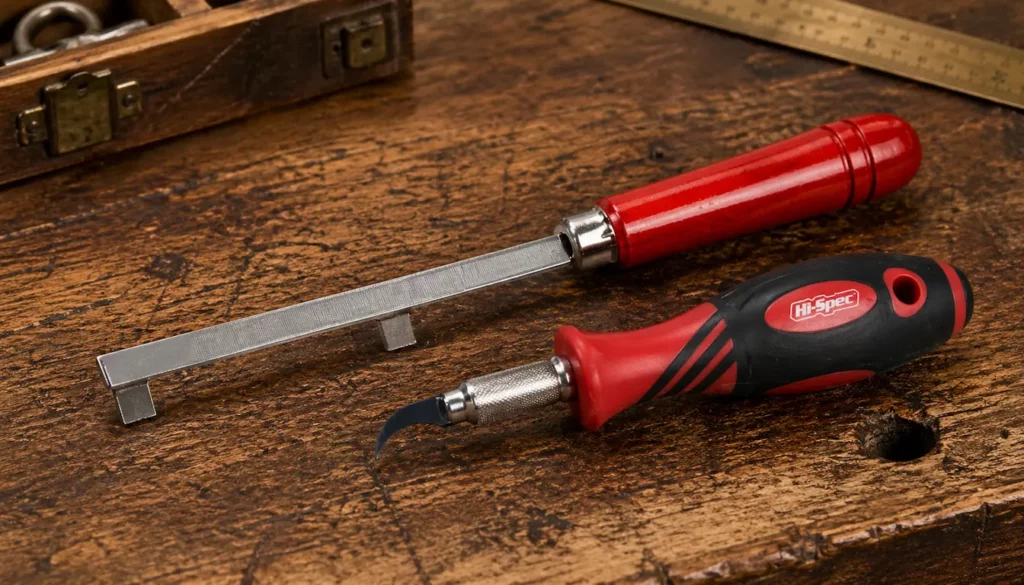
✔ StewMac Refret Saw &
Fret Slot Cleaning Tool Set
Clean fret slots are the key to a smooth, buzz-free refret.
This StewMac set gives you pro-grade tools that deepen slots cleanly
and remove old glue or debris without widening the cut.
If you want tight-fitting frets and consistent results,
this kit keeps the whole process fast, accurate, and hassle-free.
Why It’s Great:
✔️ Fine-kerf refret saw keeps slot width precise
✔️ Hooked cleaning blade removes glue and debris safely
✔️ Ideal for refrets, repairs, and deepening shallow slots
✔️ StewMac quality built for serious luthiers
✔️ Comfortable handles for longer work sessions
🔧 Step-By-Step:
How to Customize
a Fretboard
Before you start sanding, leveling,
or installing inlays, it helps to follow
a simple workflow.
These steps keep your fretboard clean,
accurate, and ready for pro-level results.
1. Clean and Prep the Fretboard
Remove dust and oils, wipe the board down,
and make sure the surface is smooth
and ready for masking.
2. Mask the Board and
Mark Your Work Area
Use painter’s tape to protect the wood and
clearly mark where you’ll be routing,
sanding, or leveling.
3. Install or Route Inlays
Carefully cut or clean the inlay pockets,
glue your inlays in place,
and level them flush with the board.
4. Shape or Correct the Radius
Use a radius block to maintain or
correct the fretboard radius so everything
feels consistent from nut to heel.
5. Level and Polish the Frets
Finish with a leveling beam, crown the frets
(if needed), then polish them for a
smooth, buzz-free playing surface.
🎵 Final Thoughts…
Fretboard customization might look intimidating,
but with the right tools and a simple workflow,
you can get clean, professional results at home.
Whether you’re installing inlays,
reshaping your radius, or leveling frets,
each upgrade adds precision and personality
to your guitar kit.
Take your time, check your work often,
and enjoy the process.
Your guitar will feel better every step of the way.
👉 For an overview of fretboard inlay
types and customization approaches,
see Guitar Fretboard Inlays Explained.
 Ready to Start?
Here’s your next step —
pick one and go:
 New to guitar kits?
Start with
Step-by-Step Guide To Building
Your First Electric Guitar Kit
and
Essential Tools Every Electric Guitar Kit
Builder Should Have.
Already built a kit?
Jump into
How To Properly Set Up Your
Electric Guitar Kit For Intonation
or
Fixing Common Problems:
Buzzing And Dead Frets.
Chasing better tone?
Head to
Understanding Humbucker
Vs Single Coil Pickups In Kits
or
Playing With Tone Controls:
Tips For Electric Guitar Kits
and start experimenting.
 Your Guitar, Your Build,
Your Sound
You don’t need a custom shop or a tech on speed dial.
All you need is a little guidance, some patience,
and a place to go that shows you what to do next.
Come on man… You got this.
GuitarCrafts
is here to help you along the way.
Craft it. Play it. Own it!
This is a wonderfully insightful guide—customizing fretboards truly elevates both the look and feel of a guitar kit in meaningful ways. I especially appreciate how you emphasize that the fretboard isn’t just aesthetic—it directly shapes playability through inlays, radius, and fret refinement. The breakdown of each customization step is especially useful: choosing or crafting custom inlays to infuse personal style; adjusting the fretboard radius to align with one’s playing preferences and goals; and leveling, crowning, and polishing frets to ensure clean tone and smooth action. It’s clear how even small tweaks can dramatically enhance the experience of playing the instrument.
One thought that stood out to me is how satisfying these customizations are—not only do they refine tone and comfort, but they also deepen your connection with the instrument. Kudos for balancing technical guidance with the creative spirit of guitar building—this could inspire both first-time builders and seasoned tinkerers.
Thank you so much! I’m really glad the guide resonated with you. You’re absolutely right! Customizing the fretboard isn’t just about looks; it has a huge impact on playability and feel, and those small tweaks can make a big difference in tone and comfort.
It’s especially rewarding to see builders connect with their instruments through these personal touches. Whether it’s crafting inlays, refining the radius, or perfecting the frets, each step adds a sense of ownership and creativity that really elevates the experience.
I appreciate your thoughtful feedback, and I hope it inspires more builders, both new and experienced, to experiment and make their guitars truly their own!
Thanks again,
~Wayne
Customizing fretboards is one of those details that separates a standard kit build from a truly personal instrument. I really like how this post highlights not just the visual upgrades, like custom inlays, but also the functional improvements such as radius adjustment and fret leveling. These refinements have a massive impact on playability—whether you prefer a rounder radius for smooth chord work or a flatter one for effortless bends and leads. The step-by-step breakdown makes the process feel approachable, even for builders tackling their first kit. I especially appreciate the reminder that precision and patience are key—tools like radius blocks and crowning files may seem small, but they ensure professional results. In the end, customizing your fretboard isn’t just about looks; it’s about building a guitar that feels and sounds exactly right for you. Excellent guide for any DIY luthier!
Thank you so much for the thoughtful comment! I’m glad the guide highlighted both the visual and functional aspects of fretboard customization! Those small refinements really do make a huge difference in playability. You’re absolutely right: radius adjustment, fret leveling, and careful use of tools like crowning files are what turn a kit into a guitar that feels and plays like it was made just for you. I’m thrilled to hear the step-by-step breakdown felt approachable, even for first-time builders.
I really appreciate you taking the time to share your thoughts!
~Wayne