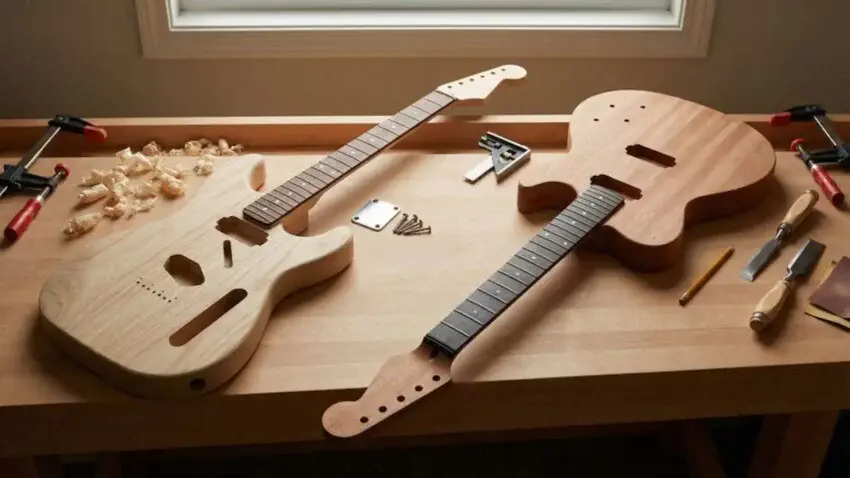
If you’re building your own electric guitar kit, comparing bolt-on vs set neck electric guitar kits for tone is one of the smartest decisions you can make early in the process.
The neck joint you choose doesn’t just change how the guitar looks —
It shapes resonance, sustain, attack, feel, and even how the instrument responds under your fingers.
Bolt-on builds tend to give you that crisp, snappy punch perfect for funk, pop, and classic rock.
Set necks, on the other hand, are all about smooth warmth, rich mids, and long, singing sustain straight out of the blues and hard-rock playbook. In this guide, I’ll break down how each style works, how they’re built, and most importantly, how each one can shape the final tonal personality of your guitar.

🔧 Essential Tools for Accurate Neck Fitting
Dialing in a guitar neck fit is all about precision — small inaccuracies can lead to alignment issues, poor sustain, or setup headaches later on.
Using the right tools from the start makes neck fitting cleaner, more controlled, and far easier to fine-tune.
Irwin Tools IRWIN Marples Forstner Bit
If you’re dialing in neck pockets or cleaning up a rough heel fit, having the right cutting tools makes the whole job smoother and way more accurate.
Here’s one I always keep within arm’s reach in the shop:
 Amazon Product Suggestion:

 Irwin Tools IRWIN Marples Forstner Bit
(8-Piece Set)
The Irwin Marples Forstner Bit Set is a dependable, high-quality choice for anyone who needs clean, precise holes in hardwood or softwood. These bits cut flat-bottom holes with minimal tear-out, making them perfect for guitar builders shaping control cavities, drilling tuner holes, crafting jigs, and installing hardware. The sharp cutting edges track straight, stay accurate, and deliver smooth results even in tough woods like maple, mahogany, or ash.
Why it’s great:
Cuts clean, flat-bottom holes with minimal tear-out
Ideal for tuner holes, control cavities, and jig building
Stays accurate in hardwoods like maple & mahogany
Guided rim helps prevent wandering and ensures clean entry
Durable Marples steel construction for long service life
Includes eight commonly used sizes in a compact storage case
BOSCH PR20EVS Colt 1.0 HP
When you need clean pocket walls, smooth tenon adjustments, or precise depth control, a reliable palm router becomes your best friend in the shop.
This one delivers pro-level results without the bulk:
Amazon Product Suggestion:
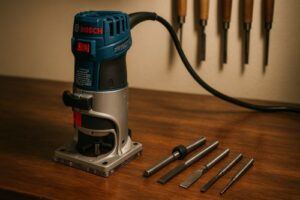
BOSCH PR20EVS Colt 1.0 HP
(Variable-Speed Palm Router)
The Bosch Colt PR20EVS is one of the most trusted compact routers for luthiers, DIY builders, and precision woodworking. Its variable-speed 1.0 HP motor delivers smooth, controlled cuts whether you’re routing inlay cavities, shaping edges, or cleaning up tight areas on a guitar body or neck. The ergonomic grip, soft-start function, and rugged aluminum base make it incredibly stable and comfortable to use —
even during delicate detail work.
Why it’s great:
Variable-speed control for precise cutting
Soft-start motor prevents sudden jumps or gouges
Rugged aluminum base for stability and durability
Compact, ergonomic design perfect for fine detail routing
Quick-clamp system allows fast depth and bit changes
Ideal for fretboard inlays, pickup cavities, and tight-spot carving
Jivarry Digital Caliper
When you’re fitting necks—bolt-on or set-neck—precise measurements make or break the build.
A good digital caliper keeps everything accurate down to the thousandth:
Amazon Product Suggestion:
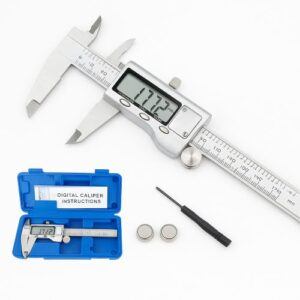
Jivarry Digital Caliper
(Stainless Steel, Large LCD, 6-Inch)
The Jivarry Digital Caliper is an affordable, accurate measuring tool every woodworker should have. Its smooth stainless-steel slide and large LCD make precise measurements quick and frustration-free, with instant switching between inches, millimeters, and fractions. Ideal for checking thickness, dimensions, hardware sizing, and fine joinery adjustments.
Why it’s great:
Large, clear digital display
Switch between inch/mm/fractions instantly
Stainless steel body for smooth, accurate travel
Measures inside, outside, depth & step values
Perfect for tight-tolerance woodworking and tool setup
Comes with case, batteries & mini screwdriver
🪛 Step-By-Step: Getting a Perfect Neck Fit (Bolt-On & Set-Neck)
These steps show exactly where each tool helps you dial in tone, sustain, and build quality.
1. Measure the Neck & Pocket Fit
Before touching wood, grab the digital caliper and check three things:
-
pocket width
-
heel/tenon thickness
-
depth of the pocket or mortise
This tells you instantly whether you’ve got a tight, tone-friendly fit or if adjustments are needed.
2. Clean Up the Pocket or Mortise Floor
If the pocket bottom is uneven or too shallow, use the Irwin Forstner bits to shave just enough material to level it out.
A smooth pocket floor = better resonance transfer.
3. Refine the Walls for Proper Tightness
If the sides of the pocket or mortise are slightly tight or rough, the Bosch PR20EVS palm router with a trim bit will clean the walls perfectly straight.
This prevents twist, gaps, or poor contact — all of which kill tone.
4. Check Your Centerline Again
After adjustments, re-measure the alignment with the digital caliper and a straightedge.
Bolt-on builds need perfect side alignment.
Set-necks need perfect angle alignment.
5. Dry Fit and Test Resonance
Before installing screws or glue:
-
Insert the neck
-
Press it firmly into place
-
Tap the heel and listen for vibration
A clean, crisp ring means you nailed the fit.
6. Install the Neck (Bolt-On)
For bolt-on builds, pre-drill the pilot holes using the caliper to match screw depth, then install the plate and screws.
Waxing the screws helps prevent chipping and gives smoother pulling force.
7. Glue the Neck (Set-Neck)
For set-necks, apply wood glue to the tenon, seat it firmly, and clamp.
Use the caliper again to ensure you didn’t shift the neck angle under clamp pressure.
8. Let the Joint Settle
Bolt-on: ready immediately.
Set-neck: give it a full 24 hours.
Good wood-to-wood contact always rewards you with better tone.
9. String Up and Check Feel
Now you’ll hear the magic:
-
Bolt-ons → bright attack and snap
-
Set-necks → warm mids and long sustain
Your tool work directly shapes how the guitar responds.
✌️ DOUBLE-FINGER PRO TIPS
That’s kinda my thing…
👉 👉 For Bolt-On Builds:
-
Use your digital caliper to match screw depth so you don’t accidentally punch through the fretboard.
-
If the pocket floor isn’t perfectly flat, hit it lightly with the Irwin Forstner bit —
Just enough to remove high spots without widening the pocket. -
A tiny shim can fix neck angle fast, but only after you’ve checked all your measurements.
👉👉 For Set-Neck Builds:
-
Always dry-fit the tenon, then use the Bosch palm router to kiss the mortise walls for a perfect,
no-slop fit. -
Check the neck angle twice: once before glue, once after clamping, using the digital caliper to confirm consistent depth front-to-back.
-
Slow-setting glue gives you precious wiggle room — never rush a set-neck job.
👉👉 For Both Build Styles:
-
Measure everything with the caliper before making cuts. Guessing equals headaches.
-
Clean cuts = clean tone.
Use the Forstner bits and router to eliminate gaps, chatter, and loose fit that kills sustain. -
When in doubt, stop, re-measure, and adjust.
Precision is the cheapest upgrade you’ll ever make.
🎯 Final Thoughts…
Choosing between a bolt-on and a set-neck electric guitar kit really comes down to the tone and feel you want from your build. Bolt-ons deliver that crisp, snappy attack with tons of clarity, while set-necks bring warmth, midrange depth, and long, singing sustain.
Both styles can sound incredible —
The real magic comes from how precisely the neck and body connect.
That’s why tools like a digital caliper, a Bosch palm router, and a solid set of Forstner bits make such a huge difference. When your pockets are level, your angles are right, and your fit is tight, the guitar resonates better, plays better, and ends up feeling like a custom-built instrument instead of a kit.
At the end of the day, whether you choose the punch of a bolt-on or the smooth character of a set-neck, getting the fit right is what unlocks the tone you’re chasing.
Build it clean, measure everything, and let the guitar reward you every time you pick it up.
Ready to Start Adjusting Your Tone?
Check out our other guides:
 If you’re new to guitar kits:
Start with Step-by-Step Guide To Building Your First Electric Guitar Kit and Essential Tools Every Electric Guitar Kit Builder Should Have.
If you already own a kit guitar:
Jump into How To Properly Set Up Your Electric Guitar Kit For Intonation or Fixing Common Problems: Buzzing And Dead Frets.
If you’re chasing better tone:
Head to Understanding Humbucker Vs Single Coil Pickups In Kits or Playing With Tone Controls: Tips For Electric Guitar Kits and start experimenting.
Your Guitar, Your Build, Your Sound
You don’t need a custom shop or a tech on speed dial.
All you need is a little guidance, some patience, and a place to go that shows you what to do next.
Come on man… You got this.
GuitarCrafts is here to help you along the way.
 Craft it. Play it. Own it!
Ready to take your guitar passion beyond the workbench?
See how I built GuitarCrafts.com using the training at Wealthy Affiliate — you can do the same. Build Your First Website With Wealthy Affiliate (Free)

Doesn’t this go right up there with the “tone wood” theory? 🤷🏻♂️
Great question — and it’s a fair comparison to bring up 👍
The key difference is what’s actually being discussed.
“Tone wood” arguments usually claim that body wood alone dramatically changes amplified tone.
That’s where things get exaggerated.
Neck joints are a little different.
In this case, we’re talking about mechanical coupling — how securely the neck and body connect, how vibration transfers,
and how that affects attack, sustain, and feel before pickups ever come into play.
Even builders who disagree on tone wood generally agree on a few things:
A tighter neck joint = better energy transfer
Bolt-on vs set-neck changes attack and decay behavior
Feel under the hands is often more noticeable than EQ differences
That’s why the article focuses less on “magic tone” and more on fit, contact, and build precision.
A sloppy bolt-on will sound dead. A poorly fitted set-neck won’t magically sustain forever either.
So yeah — skepticism is healthy 👌
This isn’t about myths, it’s about physics, fit, and player feel.
Appreciate you reading and chiming in 🤘