Skip to content
Electric Guitar Kits Logo
Menu
  • Home
  • Customization & Mods
    • Adding A Tremolo System To Your Electric Guitar Kit
    • D.I.Y. Fretboard Customization (Inlays, Radius & Leveling)
    • D.I.Y. Fretboard Inlays For Guitar Kits (Creative Upgrade Guide)
    • DIY Semi-hollow Guitar Kit Internal Chambers
    • D.I.Y. Custom Guitar Inlays (Step-By-Step Guide)
    • Electric Guitar Customization & Mods Guide
    • Guitar Fretboard Inlays Explained
  • Neck & Setup
    • Adjust Guitar Neck Truss Rod
    • Adjusting Action On An Electric Guitar
    • Adjusting Action And Intonation On Your Newly Built Guitar Kit
    • Comparing Bolt-on Vs Set Neck Electric Guitar Kits For Tone
    • How To Adjust Truss Rod For Neck Relief In Guitar Kits
    • How To Choose Between Neck-Through And Bolt-On Necks In Kits
    • How To Choose The Perfect Nut Material For Your Electric Guitar
    • How To Properly Set Up Your Electric Guitar Kit For Intonation
    • Refretting Your Electric Guitar Kit: When And How To Do It
    • How To Fix Buzzing Frets And Dead Notes On Your DIY Guitar Kit
    • Setting Up The Bridge And Neck On Your Electric Guitar Kit
  • Pickups & Wiring
    • Guitar Pickups Guide: Choosing the Right Tone
    • Choosing Capacitors And Pots For Your Electric Guitar Wiring
    • Common Wiring Mistakes And How To Fix Your Electric Guitar Kit
    • Custom Wiring Patterns For Unique Guitar Sounds
    • Guide To Wiring Your Electric Guitar Kit For Optimal Performance
    • How To Adjust Pickup Height On Electric Guitar
    • How Pickup Position Affects Electric Guitar Tone In Kits
    • How To Shield Your Guitar’s Electronics For Noise Reduction
    • Installing Pickups In Your Electric Guitar Kit: A Complete Guide
    • How To Upgrade Your Guitar Kit With Seymour Duncan & Fender Pickups
    • Step-by-step Soldering Guide For Your DIY Electric Guitar Kit
    • Top Affordable Pickups To Upgrade Your Electric Guitar Kit Tone
    • Understanding Humbucker Vs Single Coil Pickups In Kits
    • Ultimate Guide To Upgrading Pickups And Electronics In Guitar Kits
    • Using Tone Pots And Capacitors To Sculpt Your Sound
  • Tone & Playability
    • Adjusting Pickup Height For Optimal Sound On Your Guitar
    • Best Bluetooth Speakers for Music Lovers Who Care About Sound Quality
    • Effects Of Different Wood Types On Electric Guitar Tone
    • How Pickup Height Affects Electric Guitar Tone
    • Mastering Tone Controls on Your Electric Guitar Kit (Beginner-Friendly Guide)
    • Top DIY Electric Guitar Kits For Custom Tone
    • Wood Choices For Electric Guitar Kits: Expert Recommendations
  • Build Guides
    • Best Pro-level Electric Guitar Kit Build Guide
    • Budget Vs Premium Electric Guitar Kits: Which One To Choose?
    • Essential Tools Every Electric Guitar Kit Builder Should Have
    • Tools Needed For Building An Electric Guitar Kit
    • Beginner’s Guide: Building Your First Electric Guitar Kit Step-by-Step
    • String Changing Techniques To Protect Your Guitar
    • Best DIY Electric Guitar Kits for Custom Tone (2025 Guide)
    • Top Customizable Electric Guitar Kits For Modern Tone
    • Troubleshooting Common Issues During Electric Guitar Kit Assembly
  • Make Money Online
  • Solo Guitar Kits
    • Best Solo Guitar Kits (Complete 2025 Buying Guide)
    • Best Solo Strat-Style DIY Guitar Kits (Buying Guide)
    • Best Solo Tele-Style DIY Guitar Kits (Buying Guide)
    • Best Solo LP-Style DIY Guitar Kits (Beginner-Friendly Guide)
    • Best Solo SG-Style DIY Guitar Kits (Beginner Guide)
    • Best Solo Hollow Body Guitar Kits (Buying Guide)
    • Solo Tele Semi-Hollow DIY Kits
    • Best Solo Offset-Style DIY Guitar Kits (Buying Guide)
    • Solo Explorer & Fire-Style Guitar Kits — EXK, FBK & FVK
Menu
Choosing guitar capacitors and pots with electronic components and tools laid out on a workbench.

Choosing Capacitors And Pots For Your Electric Guitar Wiring

Posted on August 20, 2025January 5, 2026 by Wayne

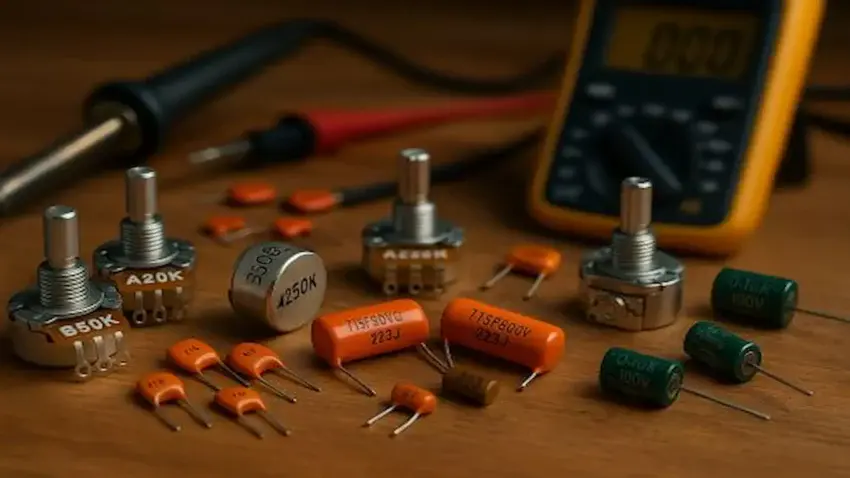
Understanding how to choose the right capacitors and pots is one of the most important parts of
dialing in your guitar’s tone. In Choosing Capacitors And Pots For Your Electric Guitar Wiring, we break down exactly what each component does, how different values affect your sound, and which parts make the biggest improvement in a kit build.
Whether you’re chasing a warmer roll-off, a brighter bite, or smoother volume control, the right combination of pots and caps makes a huge difference in how your guitar responds.

Most beginners stick with whatever came in the kit, but upgrading these components is one of the easiest ways to elevate your tone without spending a lot.
This guide shows you how to understand the options, match values to your pickups, and select reliable parts that make your wiring feel and sound more professional.


👉 This guide is part of my Electric Guitar Pickups & Wiring Guide,
which explains how pickups, wiring, and electronics shape your guitar’s tone and performance.


Affiliate transparency notice for GuitarCrafts.com with guitar icon, explaining that some posts contain affiliate links and that the site may earn a small commission at no extra cost to the reader.


⭐ Products That Help You Get Better Tone From Your Pots and Capacitors


1. Kirecoo Copper Tape — Lead-In

Clean grounding and proper shielding help your pots and caps perform the way they’re supposed to. Copper tape keeps outside noise from creeping into your tone circuit.


🌟 Amazon Product Suggestion:

Clean studio photo of a copper shielding tape roll with conductive adhesive, partially unrolled on a white background with a soft shadow.

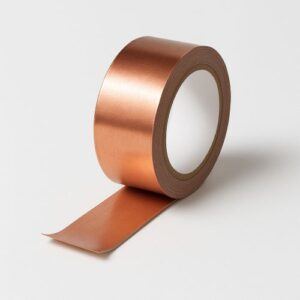
✔️ Kirecoo Copper Tape
(2in × 33 FT) – Conductive Adhesive Shielding Tape

This high-quality Kirecoo copper foil tape is one of the most trusted options for shielding electric guitar cavities. With a fully conductive adhesive and a wide 2-inch roll, it applies smoothly, overlaps easily, and ensures strong electrical continuity — exactly what you want for reducing hum, buzz, and 60-cycle noise in guitar kits or custom builds.

Ideal for pickguards, control cavities, switch cavities, and grounding pathways.

Why it’s great:

✔️Fully conductive adhesive for complete electrical continuity
✔️2-inch width covers cavities faster with fewer seams
✔️Strong adhesion sticks securely inside tight curves
✔️Easy peel backing for fast and clean installation
✔️Perfect for guitar shielding, pedal builds, and grounding repairs
✔️ Affordable, top-rated, and beginner-friendly


2. Conductive Shielding Paint — Lead-In

If you want the smoothest, quietest response from your tone and volume controls, shielding the cavity with conductive paint reduces unwanted interference.


🌟 Amazon Product Suggestion:

Studio-style photo of a black jar labeled “Conductive Paint – Nanotechnology” on a white background with a soft shadow.

✔️ Conductive Shielding Paint
High-Conductivity Nanotech Formula
(1 fl oz)

This nanotechnology-based conductive paint is ideal for shielding curved, uneven, or hard-to-reach control cavities where copper tape is difficult to apply. It brushes on easily, dries quickly, and creates a continuous conductive barrier to help eliminate hum, interference, and 60-cycle noise.

With strong electrical conductivity and excellent coverage per ounce, it’s a go-to choice for builders who want a clean, sleek shielding layer without overlapping tape seams.

Why It’s Great:

✔️Brush-on convenience — no cutting or layering
✔️Nanotech conductive formula for strong EMI protection
✔️Perfect for uneven/curved surfaces (where tape fails)
✔️Dries quickly for faster project turnaround
✔️Great for guitars, pedals, synths, shielding boxes, and electronics
✔️ Clean, seamless finish — no seams, wrinkles, or lifting edges


3. KAIWEETS Digital Multimeter — Lead-In

A multimeter is essential when testing pot values, confirming capacitor ratings, and verifying clean connections during wiring upgrades.


🌟 Amazon Product Suggestion:

Clean studio photo of a digital multimeter with a bright backlit display and red/black test leads neatly placed beside it on a white background with a soft shadow.

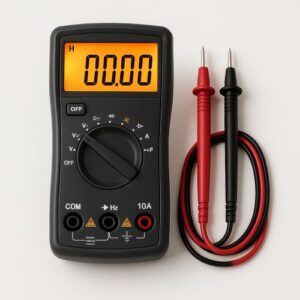
✔️ KAIWEETS 6000-Count Digital Multimeter

This KAIWEETS multimeter is one of the best budget-friendly meters for guitar electronics. With accurate auto-ranging, fast continuity response, and the ability to measure resistance down to fine increments, it’s perfect for checking whether your shielding makes proper electrical contact — and for diagnosing wiring issues inside your guitar kit.

It includes durable test leads, a bright backlit display, and reliable build quality that makes it ideal for beginners and experienced builders alike.

Why It’s Great:

✔️Continuity check — instantly verifies connections
✔️Resistance readings — confirms grounds & wiring health
✔️Auto-ranging — no guessing which setting to use
✔️Bright backlit screen — easy to read inside control cavities
✔️Safety-rated, sturdy design — great for workshop use
✔️Top-rated & affordable — excellent value for guitar builders


4. YIHUA 926 III Soldering Station — Lead-In

Upgrading pots and caps demands clean, precise solder joints. A stable temperature-controlled station ensures everything flows perfectly.


🌟 Amazon Product Suggestion:

Studio-style photo of a digital soldering station with temperature display, soldering iron in its stand, soldering tips, tweezers, helping hands, and a roll of solder on a neutral light-gray background with a soft shadow.

✔️ YIHUA 926 III Digital Soldering Station  
Precision Temp Control + Full Accessory Kit
(60W)

This upgraded YIHUA station delivers fast heating, stable temps, and way more control than the cheap “best-seller” soldering kits. It includes multiple tips, a solder sucker, tweezers, helping hands, and a smooth temperature dial — everything you need for clean shielding, wiring repairs, and pickup installs.

Why It’s Great:

✔️Digital temperature control — stable heat = cleaner, stronger solder joints
✔️60W fast-heating element — reaches set temp quickly for efficient work
✔️Includes 6 precision tips — ideal for tight cavities and detailed guitar wiring
✔️Helping hands + stand — keeps parts steady while you solder
✔️Lead-free solder included — everything you need in one kit
✔️Auto sleep + safety features — runs cooler & safer in a home workshop
✔️Much higher quality than typical “best seller” soldering pens


5. Ernie Ball Instrument Cable — Lead-In

Great pots and caps mean nothing if your cable introduces noise. A reliable, well-shielded cable keeps your upgraded electronics sounding clear.


🌟 Amazon Product Suggestion:

Studio-style photo of a premium braided guitar cable with one straight plug and one right-angle plug, gold-plated connectors, neatly coiled on a clean white background with soft shadows.

✔️ Ernie Ball Braided Instrument Cable
(18ft – Straight/Angle)

This Ernie Ball cable gives you a clean, quiet signal that actually shows off your shielding work. The braided jacket keeps it tangle-free and durable, and the straight/angle plug setup is perfect for most electric guitar jacks.

Why It’s Great:

✔️Noise-free dual shielding
✔️Ultra-durable braided jacket
✔️Straight + right-angle connectors
✔️Gold-plated plugs for better contact
✔️Smooth, reliable signal for any guitar


⭐ Step-By-Step: Choosing & Upgrading Pots and Capacitors

1. Start by Identifying Your Pickup Type

Pickup type determines your pot value.
Single-coils typically use 250k pots for a warmer, smoother top end.
Humbuckers usually pair with 500k pots to keep the tone bright and open.

Matching pots to pickups gives your guitar a balanced foundation.


2. Choose the Right Pot Values for Your Tone Goals

Pot resistance directly shapes your high-end response.

  • 250k = warmer, less treble
  • 500k = brighter, more treble
  • 1M = ultra-bright, high presence

If your guitar feels too muddy or too sharp, changing pot values is one of the simplest fixes.


3. Select a Capacitor Based on Tone Roll-Off Style

Capacitors decide how your tone knob shaves off high frequencies.

  • .022µF – Best for humbuckers; smooth & balanced roll-off
  • .047µF – Better for single-coils; deeper treble cut
  • .033µF – Great “middle ground” value

The value matters far more than the brand or style—
Though film caps like “Orange Drops” tend to give a smoother sweep.


4. Choose Your Capacitor Type for Durability and Feel

The tone is shaped by value first, but type does influence consistency.

  • Film/Poly (Orange Drop) – Reliable, smooth response
  • Ceramic – Classic sound, slightly harsher roll-off
  • Paper-in-Oil – Vintage feel, very smooth sweep

Any of them work, but film caps are the most stable and predictable for beginners.


5. Test Pot and Cap Values With a Multimeter

Before soldering, verify values. Pots can vary by ±20%, and caps aren’t always exact.
A quick multimeter check ensures your components match your expectations and prevents tone surprises later.


6. Remove the Stock Components From the Kit

Most kit pots and caps are low-cost components with inconsistent sweeps.
Desolder the stock parts carefully, keeping your leads tidy and avoiding heat damage to the switch or jack wiring.


7. Install the New Pots and Capacitors Cleanly

Mount the new pots in the cavity, solder the cap between the correct lugs, and verify all grounds are solid.

Use heat-shrink tubing or neatly bent leads to prevent shorts.


8. Verify the Wiring Diagram Before Closing the Cavity

Double-check the layout for your specific configuration — Strat, Tele, LP, or custom.
Make sure the tone caps are connected to the correct pot lugs and the output jack wiring is clean and secure.


9. Test the Tone Sweep Before Final Assembly

Plug the guitar in and test the volume and tone controls.
The sweep should be smooth, predictable, and responsive.
If the tone is too dark or too bright, revisit your pot/cap values.


10. Seal the Cavity for the Quietest Performance

This is where shielding comes in. Copper tape or shielding paint ties everything together and reduces noise.

Your pots and caps perform better when the circuit is quiet and grounded properly.


Final Thoughts…

Upgrading the pots and capacitors in your electric guitar kit is one of the easiest ways to shape your tone and get more control over your sound. Once you understand how pot values affect brightness and how capacitor ratings change your tone roll-off, choosing the right components becomes simple.
A few small upgrades can take a basic kit from “good enough” to smooth, responsive, and far more professional.

Take your time when selecting and installing these parts, and don’t be afraid to experiment with different values. With a solid wiring layout and clean solder work, your guitar will feel more dynamic and will sound better across the entire range of your controls.


Ready to Start Adjusting Your Tone?

Check out our other guides:

👉 If you’re new to guitar kits:
Start with Step-by-Step Guide To Building Your First Electric Guitar Kit and Essential Tools Every Electric Guitar Kit Builder Should Have.

👉 If you already own a kit guitar:
Jump into How To Properly Set Up Your Electric Guitar Kit For Intonation or Fixing Common Problems: Buzzing And Dead Frets.

👉 If you’re chasing better tone:
Head to Understanding Humbucker Vs Single Coil Pickups In Kits or Playing With Tone Controls: Tips For Electric Guitar Kits and start experimenting.


Your Guitar, Your Build, Your Sound

You don’t need a custom shop or a tech on speed dial.
All you need is a little guidance, some patience, and a place to go that shows you what to do next.
Come on man… You got this.

GuitarCrafts is here to help you along the way.


🎸Craft it. Play it. Own it! 🎸


Ready to take your guitar passion beyond the workbench?

See how I built GuitarCrafts.com using the training at Wealthy Affiliate — you can do the same.
👉👉 Build Your First Website With Wealthy Affiliate (Free)

Wealthy Affiliate Internet Marketing University Banner


2 thoughts on “Choosing Capacitors And Pots For Your Electric Guitar Wiring”

  1. Sharon says:
    August 21, 2025 at 12:31 am

    This was such an informative breakdown of pots and capacitors. Thank you for explaining it so clearly! I don’t play the electric guitar myself, but my nephew does, and I’ll definitely be sharing this with him. The way you explained how different values pair with single-coils vs. humbuckers makes it much easier to follow, even for someone like me.

    Quick question: Do you think these kinds of upgrades make the most difference for beginners learning to shape their tone, or are they more noticeable for experienced players who already know their sound?

    Reply
    1. admin says:
      August 21, 2025 at 7:43 pm

      Thank you so much for your kind words! I’m glad the breakdown was easy to follow, even if you’re not playing yourself — it’s always great when the info can be shared with someone learning, like your nephew.

      As for your question: these upgrades can make a noticeable difference for both beginners and experienced players, but in slightly different ways. For beginners, changing pots and capacitors can open up new tonal possibilities and help them start understanding how tone shaping works, even if they’re still finding their own sound. For more experienced players, the difference is often more subtle and nuanced — they’ll notice the way certain values emphasize or smooth out frequencies, which can really refine their signature tone. 

      Either way, it’s a fun way to explore and experiment with sound.

      Thanks again,

      ~Wayne

      Reply

Leave a Reply Cancel reply

Your email address will not be published. Required fields are marked *

Learn to make money in the comfort of your own home!

  • Facebook
  • Pinterest
  • YouTube

Recent Posts

  • Solo Guitar Kits
  • Electric Guitar Build Guides: Step-by-Step Help for Guitar Kit Builders
  • Tone & Playability: Dialing In the Feel and Sound of Your Electric Guitar Kit
  • Electric Guitar Pickups & Wiring Guide
  • Electric Guitar Neck & Setup Guide
  • About Me...
  • Affiliate Disclosure
  • Best Solo Guitar Kits (Complete 2025 Buying Guide)
  • Best Solo Hollow Body Guitar Kits (Buying Guide)
  • Best Solo LP-Style DIY Guitar Kits (Beginner-Friendly Guide)
  • Best Solo Offset-Style DIY Guitar Kits (Buying Guide)
  • Best Solo SG-Style DIY Guitar Kits (Beginner Guide)
  • Best Solo Strat-Style DIY Guitar Kits (Buying Guide)
  • Best Solo Tele-Style DIY Guitar Kits (Buying Guide)
  • Build Your Own Dream Guitar Kit (Without Feeling Overwhelmed)
  • GuitarCrafts Homepage
  • How I Started Making Money Online With Wealthy Affiliate
  • Privacy Policy
  • Solo Explorer & Fire-Style Guitar Kits — EXK, FBK & FVK
  • Solo Guitars Review (2025): Are Their DIY Guitar Kits Worth It?
  • Solo Tele Semi-Hollow DIY Kits

Archives

  • January 2026
  • December 2025
  • November 2025
  • September 2025
  • August 2025
  • July 2025

Categories

  • Build Guides
  • Customization & Mods
  • Neck & Setup
  • Pickups & Wiring
  • Tone & Playability
  • Uncategorized
© 2026 My Electric Guitar Kits Site | Powered by Superbs Personal Blog theme