
Dialing in your guitar’s tone starts long before amps, pedals, or fancy pickups —
it begins with adjusting pickup height for optimal sound on your guitar.
Even a small tweak to how close your pickups sit under the strings
can completely change your clarity, sustain, output, and overall feel.
If your guitar sounds muddy, too harsh, uneven from string to string,
or just doesn’t “breathe” the way it should,
pickup height is almost always the first place to look.
The good news?
It’s easy to adjust, and with just a few simple steps you can unlock
richer tone, better balance, and the kind of response that
makes your guitar feel alive.
👉 Quick Pickup Height Fix (Start Here)
If your guitar doesn’t sound quite right,
try this first:
- Too muddy or boomy?
Lower your pickups slightly - Too thin or weak?
Raise your pickups closer to the strings - Harsh or uneven tone?
Adjust bass and treble sides separately
Small changes make a big difference —
even a turn of a screw can transform your tone.
👉 This guide is part of my Tone & Playability Guide, where I cover the setup
and adjustments that make an electric guitar kit sound better and feel easier to play.

⭐ Tools & Materials You’ll Need
Before you start adjusting your pickup height,
it helps to have a few reliable setup tools on hand.
Precise measurements make all the difference when you’re trying to
balance output, dial in clarity, or eliminate muddy or uneven tone.
The tools below are the same ones guitar techs use every day,
and they’ll make your adjustments faster, easier, and far more consistent —
Especially if you’re working on multiple guitars or dialing in a brand-new kit build.
👉 If you’re upgrading your pickups or still deciding what to install, check out
Best Pickups For Your Electric Guitar Kit: Choosing The Right Tone
to find the right set for your build.
👉 25Pcs Guitar Repairing Tools Kit Setup Kit (with Carry Bag)
If you want a simple way to get all the essentials in one shot,
this all-in-one setup kit is the easiest place to start.
It keeps every tool you need —
screwdrivers, gauges, rulers, files, hex keys, and more —
organized in one compact case so you’re never hunting for
the right piece mid-adjustment.
For beginners or anyone building their own guitar kits,
this is a solid, affordable option.
🌟 Amazon Product Suggestion:

✔️25Pcs Guitar Repairing Tools Kit Setup Kit
(with Carry Bag)
This 25-piece guitar repair and setup kit gives you all the essential tools needed for
adjusting action, filing frets, setting intonation, and performing
basic maintenance on electric, acoustic, bass, or ukulele.
Compact, organized, and ideal for beginners or experienced DIY guitar techs.
Why It’s Great:
✔️ All-in-one setup kit with essential tools
✔️ Ideal for pickup, nut, and bridge adjustments
✔️ Great for electric and acoustic guitar maintenance
✔️ Compact case with affordable, beginner-friendly value
👉 MusicNomad Precision String Action Gauge Ruler
Accurate pickup adjustments start with knowing your string height,
and this little gauge makes that process effortless.
It shows you the exact distance between your strings and the frets,
so you always know how close your pickups should be
for balanced output and clean tone.
With etched markings and simple reference targets,
it removes the guesswork and helps you dial in a consistent setup every time.
🌟 Amazon Product Suggestion:
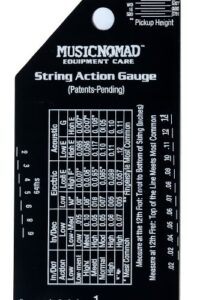
✔️MusicNomad Precision String Action Gauge Ruler
for String Height- Metric, SAE, 64ths
(MN602)
The MusicNomad MN602 String Action Gauge is a precision stainless-steel ruler
designed to help you dial in perfect string height on electric, acoustic, and bass guitars.
With easy-to-read etched markings in metric, SAE, and 64ths,
it takes the guesswork out of action setup and ensures
repeatable, pro-level results every time.
Why It’s Great:
✔️ Ultra-precise etched measurements for accurate setup
✔️ Works for electric, acoustic, and bass guitars
✔️ High-contrast design for easy reading in any lighting
✔️Durable stainless steel build for long-term use
👉 Jivarrry Digital Caliper (Stainless Steel, Large LCD, 6-Inch)
When you’re dialing in pickup height,
a digital caliper gives you the precision a standard ruler can’t match.
It lets guitar builders measure exact string-to-pickup distance
down to fractions of a millimeter,
making setups more consistent and repeatable across every build.
🌟 Amazon Product Suggestion:
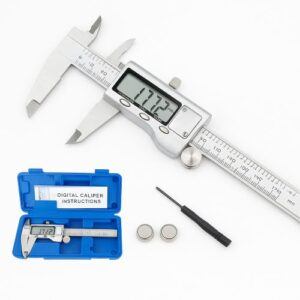
✔️ Jivarry Digital Caliper
(Stainless Steel, Large LCD, 6-Inch)
The Jivarry Digital Caliper is an essential tool for guitar builders,
giving you fast, accurate measurements for pickup height, string action, and hardware setup.
With a clear LCD display and easy switching between units,
it makes dialing in precise adjustments simple and consistent every time.
Why it’s great:
✔️ Large, easy-to-read display for precise setup work
✔️ Instantly switch between inch, mm, and fractions
✔️ Measures pickup height, string action, and hardware spacing
✔️ Accurate, reliable tool for dialing in consistent guitar setups
🎸 How to Adjust Your Pickup Height (Step-By-Step)
Now that you’ve got the right tools,
it’s time to dial in your guitar’s pickup height for the
best tone, clarity, and output.
These steps work for any electric guitar —
Strat, Les Paul, Tele, offset, kit builds, humbuckers, or single coils.
Take your time, make small adjustments, and listen carefully.
Even tiny changes of ⅛ turn can make a noticeable difference.
Step 1: Tune Your Guitar to Pitch
Your pickups respond to how the strings vibrate under tension,
so always adjust them with the guitar fully tuned to your normal playing pitch.
🤘🤘 Pro Tip:
If you use alternate tunings,
tune to your main tuning before measuring or adjusting.
Step 2: Hold Down the Last Fret
Press the last fret (highest fret) on the neck.
This sets the correct string height for measuring pickup distance —
The same height the strings reach during real playing.
🤘🤘 Pro Tip:
Use a capo on the last fret to free both hands for measuring.
Step 3: Measure the Bass-Side Gap
Use your string action gauge or calipers
to measure the distance from the
top of the pickup polepiece to the
bottom of the low E string.
Typical starting points:
-
Humbuckers: 2.0–2.5mm
-
Single Coils: 2.5–3.0mm
-
Hot pickups: slightly lower to avoid magnetic pull
These aren’t rules — just solid starting points.
🤘🤘 Pro Tip:
If the bass side is boomy or muddy, lower it by ¼ turn.
Step 4: Measure the Treble-Side Gap
Now measure the treble side (high E string).
Treble strings are lighter,
so they usually sit closer to the pickup.
Typical starting gap:
-
Humbuckers: 1.5–2.0mm
-
Single Coils: 2.0–2.5mm
🤘🤘 Pro Tip:
If your high strings sound harsh or ice-pick’y,
lower the treble side slightly.
Step 5: Adjust Pickup Height Evenly
Use the pickup height screws on each side
and make small, controlled adjustments.
Turn ¼ turns at a time — small changes go a long way.
🤘🤘 Pro Tip:
Always adjust both sides gradually
so you keep the pickup level and avoid tilting it too far.
Step 6: Play-Test With a Clean Tone
Switch to your clean channel (or no pedals).
Listen for:
-
clarity
-
note separation
-
volume balance across strings
🤘🤘 Pro Tip:
Strum chords and play single-note lines —
both reveal different things.
Step 7: Check Volume Balance Between Strings
Play across all six strings:
-
If the wound strings overpower the plain strings → lower bass side
-
If the treble strings spike or pierce → lower treble side
-
If notes sound dull or weak → raise the side you need more clarity from
🤘🤘 Pro Tip:
Use palm-muted power chords —
imbalance shows up instantly.
Step 8: Check Neck vs Bridge Pickup Levels
Switch back and forth between pickups.
You want them balanced in output,
not drastically different in volume.
As a rule:
-
Neck pickup is naturally warmer and louder → sits slightly lower
-
Bridge pickup is naturally brighter → sits slightly higher
🤘🤘 Pro Tip:
Match output by ear —
this matters more than numbers.
Step 9: Fine-Tune for Your Playing Style
Your ideal height depends on:
-
Pick attack
-
Genre
-
Gain levels
-
String gauge
Metal players often lower pickups slightly to avoid mush.
Blues players sometimes raise them for more bite and detail.
🤘🤘 Pro Tip:
Do a final play-test at your normal gain level —
pickup height reacts VERY differently under distortion.
Step 10: Recheck Everything After Playing for a Bit
After 10–20 minutes of playing,
pickups often “settle” into place.
Re-measure, re-listen, and make any final ⅛-turn tweaks.
🤘🤘 Pro Tip:
Write down your final measurements —
this saves HOURS next time you change strings or build a new kit.
🎚 What Happens If Your Pickup Height Is Too High or Too Low?
Pickup height has a huge impact on
tone, output, and the way your guitar responds.
Here’s a quick comparison to help you
instantly spot if something’s off:

| Pickup Height | Resulting Sound |
|---|---|
| Too High | Harsh attack, reduced sustain, string “wolf tones,” magnetic pull causing strange overtones |
| Too Low | Thin or weak tone, reduced output, soft bass/mids, lack of punch |
| Balanced | Clear, dynamic tone with healthy sustain, proper response, and even volume across strings |
The graphic above makes it easy to see the difference —
balanced height gives your guitar a smoother, more musical waveform.
🎛 Recommended Pickup Height Settings for Electric Guitars
Getting your pickup height dialed in is the secret to
unlocking balanced tone, sustain, and output.
Here are reliable, time-tested numbers that
work for most guitars:
Fender-Style Single Coils
(measured with strings pressed at the last fret)
-
Bass side: 2.0 mm (5/64″)
-
Treble side: 1.6 mm (4/64″)
Humbuckers
-
Bass side: 2.4 mm (3/32″)
-
Treble side: 1.6 mm (4/64″)
P90s
-
Bass side: 2.0–2.4 mm
-
Treble side: 1.6–2.0 mm
Active Pickups (EMG, Fishman, etc.)
-
Both sides: 3.0 mm (1/8″) minimum
Actives don’t rely on magnetic pull,
so they usually sit lower than passive pickups.
🎧 How Pickup Height Affects Your Tone
Pickup height is one of the biggest “hidden” factors
in your guitar’s overall sound.
Even a small tweak — like a quarter turn of a screw —
can completely change clarity, output, warmth, and sustain.
Here’s how it affects what you actually hear:
• Output & Volume
Higher pickups = more output and a hotter signal.
Lower pickups = smoother, cleaner, more dynamic tone.
• Sustain
Pickups that are too close can choke your sustain
because the magnets pull on the strings.
Lowering them frees the string to vibrate longer.
• Clarity & Definition
Close pickups can muddy up chords and exaggerate harsh highs.
Lower pickups often open the tone, adding clarity and balance.
• Bass vs Treble Balance
Even one side being too high can shift the entire EQ of your guitar.
Raising the bass side fattens things up — sometimes too much.
Raising the treble side adds brightness — sometimes too sharp.
This is why finding the “sweet spot” changes everything.
🚫 Common Pickup Height Mistakes (and How to Avoid Them)
Even experienced players get tripped up by pickup height.
Here are the most common mistakes — and how to fix them fast:
• Setting Pickups the Same Height on Both Sides
Your bass and treble strings don’t vibrate the same way.
Keeping the pickup “perfectly level” often causes imbalance.
The Fix:
Adjust each side separately until the volume evens out.
• Adjusting With the Guitar Unplugged
You can’t hear subtle differences acoustically — only through an amp.
The Fix:
Always make adjustments while plugged into a clean tone.
• Raising Pickups Too Close to the Strings
This causes harshness, weird overtones, and choked sustain.
The Fix:
Back off the height until the tone smooths out and sustain returns.
• Ignoring Magnetic Pull
Strong magnets (like ceramic pickups or high-output humbuckers)
can physically pull the strings sharp.
The Fix:
Lower the pickup until the pitch stays stable during bends and vibrato.
• Only Adjusting One Pickup
If your neck and bridge aren’t balanced,
switching pickups will feel like switching guitars.
The Fix:
Dial in each pickup for volume AND character, not just numbers.
• Making Huge Adjustments All at Once
Pickup height is extremely sensitive — even ⅛ turn can change everything.
The Fix:
Adjust slowly, test often, and listen more than you measure.
• Forgetting to Recheck After Playing
Pickups can settle. Screws shift. Wood moves.
The Fix:
Always recheck your height after 10–20 minutes of playing.
🎯 How to Know When Your Pickup Height Is “Just Right”
There’s no single perfect number —
the sweet spot depends on
your guitar, your pickups, and your playing style.
But here’s how to know you’ve nailed it:
• Balanced Volume Across All Strings
No single string jumps out or gets buried.
Chords sound even.
Single-note lines feel smooth and controlled.
• Clear, Open Tone With No Harshness
If the highs sound ice-pick’y → you’re too close.
If everything sounds muddy or congested → lower the pickups.
• Strong Sustain Without Warble
If notes wobble or “warble” (especially on the G and B strings) →
magnetic pull is too strong → lower the pickup.
• Good Dynamics and Touch Response
When it’s right:
-
Soft picking sounds soft
-
Hard picking opens up
-
Everything feels natural and expressive
• Neck & Bridge Are Balanced in Output
Switch between pickups — you shouldn’t hear a massive volume jump.
• Your Guitar Reacts the Way YOU Want
This is the real test.
If your tone fits your style —
that’s your sweet spot.
🧰 Final Thoughts…
Adjusting your pickup height is one of the simplest upgrades you can make —
But it delivers some of the biggest improvements in tone, clarity, and overall feel.
With just a screwdriver and a few careful measurements,
you can completely transform how your guitar responds under your fingers.
The key is to:
-
Make small adjustments
-
Test often
-
Trust your ears
-
Aim for balance, not perfection
Every guitar, every pickup, and every player is different.
Your numbers might end up slightly higher or lower than
the “standard,” and that’s totally normal —
What matters is how your guitar sounds and feels when “you” play it.
Dial it in, lock it in, and enjoy the tone that fits your style.
Your guitar will thank you every time you plug in. 🎸🔥
Ready to Start Adjusting Your Tone?
Check out our other guides:
👉 If you’re new to guitar kits:
Start with Step-by-Step Guide To Building Your First Electric Guitar Kit
and Essential Tools Every Electric Guitar Kit Builder Should Have.
👉 If you already own a kit guitar:
Jump into How To Properly Set Up Your Electric Guitar Kit For Intonation
or Fixing Common Problems: Buzzing And Dead Frets.
👉 If you’re chasing better tone:
Head to Understanding Humbucker Vs Single Coil Pickups In Kits
or Playing With Tone Controls: Tips For Electric Guitar Kits and start experimenting.
Your Guitar, Your Build, Your Sound
You don’t need a custom shop or a tech on speed dial.
All you need is a little guidance, some patience, and a place to go that shows you what to do next.
Come on man… You got this.
GuitarCrafts is here to help you along the way.
 Craft it. Play it. Own it!
The quarter/dime measurement trick for pickup height is brilliant—finally a clear starting point for balancing output and clarity. Your warning about over-tightening screws and warping pickup rings shows real bench experience.
The tonal difference you described between 1/8″ and 3/16″ on humbuckers is spot-on. Have you found certain genres (like jazz vs. metal) consistently benefit from taller or shorter setups?
This demystifies what most players guess at. That “recheck after 24 hours” note just saved my next setup.
Really appreciate your detailed feedback, sounds like you’ve spent some serious time at the workbench too! The coin trick is simple but surprisingly effective, especially for dialing in that sweet spot between output and articulation. And yes, pickup ring warping is one of those “learn once, remember forever” lessons.
Great question on genre preferences. In general, I’ve found jazz players often lean toward a slightly lower pickup height for warmth and clarity, while metal players push things a bit higher for bite and compression, though it always comes down to the player’s touch and rig.
Glad the 24-hour recheck tip helped! Setup always benefits from patience.
Appreciate you dropping such a thoughtful comment.
This guide really nails it—adjusting your pickup height truly is the unsung hero of shaping guitar tone and feel. I love how clearly you break down the trade-offs: get the pickups too close, and you’ll deal with harsh overtones, reduced sustain, or even warbling; adjust them too far away, and the sound becomes thin and weak. Those industry-standard starting points for different pickup types are such a practical baseline to begin dialing things in. Plus, I appreciate how you pair technical tips with the emphasis on trusting your ears—because tone is personal, after all. Have you found that your ideal pickup height preferences shift depending on whether you’re playing clean or using more gain, or do you generally favor one setting that balances both well?
Thanks! I’m glad the guide hit the mark for you! Pickup height is one of those small adjustments that can completely change how a guitar feels and sounds. For me, I do tweak things depending on the style I’m playing. If I know I’ll be using a lot of gain, I might back the pickups off just a hair to keep the low end from getting muddy and to let the notes breathe more. For clean tones, I sometimes bring them a little closer for extra clarity and presence. That said, I usually aim for a sweet spot that works decently for both, so I’m not constantly reaching for a screwdriver mid-set!
Thank you again,
~Wayne
Great article! I really appreciate how you broke down not just the tonal effects of pickup height but also the way it ties into action and overall playability — something a lot of guides overlook. The step-by-step approach makes it super approachable for someone working on their first kit build.
One question: when fine-tuning pickup height by ear, do you recommend starting with clean tones only, or is it better to test with both clean and driven sounds right from the start to get a more realistic sense of how the guitar will be used?
Thanks for the thoughtful feedback! I’m glad the step-by-step approach hit the mark! Great question, too. I usually recommend starting with clean tones first, since they reveal the most detail in balance and dynamics between strings without extra coloration. Once things feel even and responsive there, it’s a good idea to switch over to your usual driven or effected tones to see how the pickups react in a “real-world” context. That way you get the precision of clean setup plus the practicality of how you’ll actually be playing.
It’s kind of like dialing in the foundation before adding the flavor.
Thanks again!
~Wayne