
Installing pickups in your electric guitar kit is one of the most rewarding parts of any DIY build —
and it’s also the moment your instrument finally starts to come alive.
In this guide, Installing Pickups In Your Electric Guitar Kit: A Complete Guide,
I’ll walk you through everything you need to know to
mount your pickups correctly, wire them cleanly,
and get your tone dialed in from the very first plug-in.
Whether you’re upgrading the pickups that came with your kit or
dropping in your favorite brand-name set,
this step-by-step breakdown will help you avoid common mistakes
and get pro-level results right at your workbench.
 This guide is part of my Electric Guitar Pickups & Wiring Guide,
which explains how pickups, wiring, and electronics shape your guitar’s tone and performance.

🛠️ Weller WE1010NA Digital Soldering Station
(for Clean, Pro-Level Joints)
If you’re upgrading pickups or doing any wiring work, a dependable soldering station is a must —
and the Weller WE1010NA gives you pro-level consistency without the guesswork.
It heats quickly, stays stable, and makes every connection cleaner and safer.
🌟 Amazon Product Suggestion:
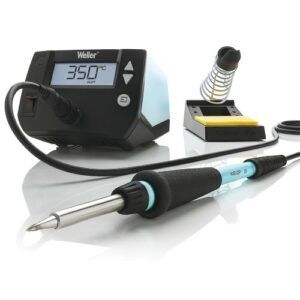
✔️ Weller WE1010NA Digital Soldering Station
If you’re installing pickups, you need clean, reliable solder joints—and the Weller WE1010NA delivers pro-level temperature control without the frustration of cheap iron tips. This station heats fast, holds temp rock-solid, and makes wiring your guitar kit smoother and safer.
Why It’s Great:
✔️ Precise temperature control for clean, repeatable solder joints
✔️ Fast heat-up time so you’re never waiting on your tool
✔️ Comfortable ergonomic handle for better control while soldering lugs and grounds
✔️ Trusted brand used by DIY builders and pros alike
✔️ Perfect match for any pickup upgrade or full rewire
🎸 Seymour Duncan JB/Jazz Set
(Legendary Tone Upgrade)
If you want a true “night and day” upgrade for your guitar kit, the Seymour Duncan JB/Jazz set is the fastest way to get it.
This iconic combo delivers crisp cleans, snarling crunch, and pro-level clarity the moment you drop it in.
🌟 Amazon Product Suggestion:
✔️Seymour Duncan JB/Jazz Humbucker Set
One of the most iconic humbucker pairings ever made,
the JB/Jazz combo gives your guitar kit a massive tonal upgrade.
From smooth cleans to full growl, this set drops into most kit routes
and instantly transforms your build into a stage-ready machine.
Why It’s Great:
✔️ Legendary tone—versatile for rock, blues, metal, and everything in between
✔️ Perfect balance between warm neck tones and aggressive bridge bite
✔️ Direct replacement for most kit humbuckers
✔️ High-quality build with wax potting, tight windings, and durable hardware
✔️ Huge upgrade in clarity and dynamics compared to stock pickups
🧵 Fermerry 22 AWG Silicone Hookup Wire Kit
Good wiring makes your whole guitar kit run smoother, and this Fermerry 22AWG silicone wire kit gives you flexible, heat-resistant wire that’s perfect for clean, reliable soldering.
It bends easily in tight cavities and keeps your wiring neat and easy to troubleshoot.
🌟 Amazon Product Suggestion:

✔️Fermerry 22 AWG Silicone Hookup Wire Kit
Clean wiring makes your guitar quieter, safer, and easier to troubleshoot. This 22AWG silicone wire kit gives you flexible, heat-resistant wire in multiple colors—ideal for soldering your pickups, selector switch, and output jack without fighting stiff plastic insulation.
Why It’s Great:
✔️ Flexible silicone insulation bends easily inside tight cavities
✔️ Multiple colors included for clean, organized wiring
✔️ Heat-resistant—won’t melt or burn when soldering
✔️ Perfect gauge (22AWG) for guitar electronics
✔️ Great value for any DIY builder stocking up on wiring supplies
🔧 Now That You’ve Got the Right Gear…
With solid pickups, clean wiring, and a reliable soldering setup,
you’ve got everything you need to upgrade your guitar kit the right way.
The tools above make each step smoother, cleaner, and way more predictable —
So now it’s time to walk through the process and get those new pickups dialed in.
Let’s break it down step-by-step.
🪛 Before You Start: Prep Your Workspace
A clean, organized workspace makes the entire pickup upgrade go smoother.
Lay out your tools, clear some room to work, and make sure you’ve got good lighting.
This keeps you from fumbling around during soldering and
helps prevent mistakes once you start swapping components.
When your bench is prepped and your tools are ready, you’re all set for Step 1.
Step 1: Remove the Strings and Open the Control Cavity
Start by loosening and removing your guitar strings so you can
access the pickup routes and wiring cleanly.
Once the strings are off, flip the guitar over and remove the control cavity cover
(or pickguard, on certain styles).
This gives you full access to the existing wiring so
you can disconnect the old pickups without fighting cramped space.
This gives you full access to the wiring so you can disconnect the old pickups easily.
Step 2: Desolder and Remove the Old Pickups
With the cavity open,
locate the pickup leads connected to the selector switch, volume pot, and tone pot.
Heat each solder joint with your iron and gently pull the wires free —
Don’t force them.
Once the wiring is disconnected,
remove the pickup mounting screws and lift the old pickups out of the guitar.
Keep track of any springs or height-adjustment hardware —
you’ll reuse them with your new pickups.
Step 3: Install the New Pickups Into the Guitar
Set each new pickup into its cavity and secure it with the mounting screws.
Be sure the JB goes in the bridge position and the Jazz goes in the neck —
That’s the classic hot-rodded pairing.
Tighten the screws just enough to hold the pickups in place
while still allowing height adjustments later.
Run the new leads through the pickup routes and into the control cavity
so they’re ready for wiring.
Step 4: Strip, Prep, and Route Your Wiring
Before soldering, strip a small amount of insulation from the pickup leads
and twist the wire ends clean.
Route each wire neatly through the cavity,
keeping the hot leads separated from the grounds to avoid any messy overlaps.
Neat routing now makes soldering easier and troubleshooting way less painful later.
Once everything is positioned cleanly, you’re ready to start connecting the new pickups.
Step 5: Solder the Pickup Leads to the Controls
Match each pickup wire to its correct solder point —
Hot leads to the selector switch or volume pot, and grounds to the back of the pot.
Heat each joint just long enough for the solder to flow smoothly and bond.
You want shiny, solid connections, not lumpy cold joints.
Double-check your wiring against the Seymour Duncan diagram before moving on.
Step 6: Test the Connections Before Closing Up
Before you button everything back together,
plug the guitar into an amp and lightly tap each pickup pole with a screwdriver.
You should hear a clear click from the speaker —
this confirms the pickups are wired correctly and the selector switch is doing its job.
If anything sounds weak or silent,
recheck your solder joints now while everything is still open.
Once both pickups respond the way they should, you’re ready to move on.
Step 7: Reassemble the Guitar and Restring It
Once everything tests correctly, start putting the guitar back together.
Replace the control cavity cover or pickguard,
making sure no wires are being pinched underneath.
Then flip the guitar over and install a fresh set of strings.
Bring them up to tension slowly
so the pickups, wiring, and hardware all settle in naturally.
With the guitar restrung, you’re ready to dial in the final setup.
Step 8: Set Your Initial Pickup Height
With the strings under full tension,
adjust each pickup so it sits close enough for strong output
but not so close that the magnets pull on the strings.
A good starting point is about 3/32″ on the bass side and
2/32″ on the treble side for both pickups.
These numbers aren’t carved in stone —
they just give you a solid baseline before fine-tuning.
Once both pickups are roughly balanced,
you’re ready to dial in the tone to your taste.
Step 9: Fine-Tune the Pickup Balance
Now play through clean and gain tones while slowly raising or lowering each pickup.
If the bridge sounds too harsh or thin, lower it a touch.
If the neck feels too boomy, drop it slightly.
Your goal is to balance output so switching between pickups feels smooth and natural,
without big jumps in volume or EQ.
Take your time here — tiny adjustments make a massive difference in the final tone.
Step 10: Do a Final Tone Check and Lock In Your Setup
Run through your favorite riffs, chords, and lead lines on both clean and distorted settings.
Listen for clarity, sustain, and how well the pickups respond to your picking dynamics.
If everything feels right,
tighten the pickup mounting screws just enough to
lock in your height settings — Do not overtighten.
Once you’re satisfied,
you’ve officially completed your pickup upgrade and dialed in a pro-level sound.
Final Thoughts…
Upgrading to the Seymour Duncan JB/Jazz set is one of the fastest ways to
transform any guitar kit into a stage-ready instrument.
With clean wiring, solid solder joints, and carefully dialed-in pickup heights,
you’re not just swapping parts —
You’re unlocking a whole new level of clarity, punch, and expression in your playing.
Take your time with the setup,
trust your ears,
and don’t be afraid to tweak things as you play.
Every guitar reacts a little differently and
finding that sweet spot is what makes the upgrade truly yours.
When you’re ready for the next build, mod, or tone experiment…
You know where to find me. 🎸🔥
Ready to Start Adjusting Your Tone?
Check out our other guides:
👉 If you’re new to guitar kits:
Start with Step-by-Step Guide To Building Your First Electric Guitar Kit
and Essential Tools Every Electric Guitar Kit Builder Should Have.
👉 If you already own a kit guitar:
Jump into How To Properly Set Up Your Electric Guitar Kit For Intonation
or Fixing Common Problems: Buzzing And Dead Frets.
👉 If you’re chasing better tone:
Head to Understanding Humbucker Vs Single Coil Pickups In Kits
or Playing With Tone Controls: Tips For Electric Guitar Kits and start experimenting.
Your Guitar, Your Build, Your Sound
You don’t need a custom shop or a tech on speed dial.
All you need is a little guidance, some patience, and a place to go that shows you what to do next.
Come on man… You got this.
GuitarCrafts is here to help you along the way.
 Craft it. Play it. Own it!
Ready to take your guitar passion beyond the workbench?
See how I built GuitarCrafts.com using the training at Wealthy Affiliate — you can do the same.
👉👉 Build Your First Website With Wealthy Affiliate (Free)

Love this. I’ve been playing since I was 12 and I’m 52 now, but I’ve never actually worked on my own guitar. This makes me want to finally give it a shot. My go-to electric is a toss-up between a Dean and an Ibanez — both have killer action. Reading this just reminds me how much more connected you probably feel to your guitar when you’ve actually done the work yourself. I’ve always wanted to shred like Dave Mustaine but that guy is on another level. A little of my topic her but Who is your absolute favorite guitar player?
That’s awesome to hear, and I can tell you, once you turn your own wrench on a guitar, it’s a whole new kind of connection. You start hearing and feeling the instrument differently, almost like you’ve put a bit of yourself into it. Dean and Ibanez both make some seriously fun players, so you’re already in good company! As for my favorite guitar player… tough question. I’ve always admired players who balance technical skill with feel—people like David Gilmour for emotion, or Eddie Van Halen for innovation. Mustaine is a beast, though, so if you’re aiming for that level of shred, you’re setting the bar high in the best way. There are also several Jazz players out there that have influenced my playing through the years. Lee Ritenour and Joe Bonamassa are a couple, just to name a few.
Keep it rockin’,
~Wayne
This guide is fantastic—full of clarity, practical insights, and the kind of encouragement that makes pickup installation feel both manageable and rewarding. I love how you emphasize planning ahead with wiring diagrams or color-code charts, as that foundation can really save a lot of trial-and-error later on. Starting with clean cuts, good soldering habits, and testing everything before sealing up the cavity is truly bread-and-butter for a smooth build. Having built a few instruments myself, I can attest that the care you put into wiring and layout often pays off tenfold in tone, routing flexibility, and even future upgrades. A couple of questions that came to mind as I read:
When it comes to soldering new pickups, do you find certain brands or kits tend to come with clearer wiring color codes than others, helping reduce mistakes?
And for someone planning to experiment with tone options down the road—like coil splitting or phase switching—would you recommend setting up space and wiring now, or adding it later when the need arises?
Thanks so much! I’m really glad the guide resonated with you. It’s true that a little planning and careful soldering upfront can save a ton of headaches later, and it’s great to hear it’s paying off in your builds.
Regarding your first question, yes — some brands definitely make life easier with clearer color codes and well-documented wiring. Generally, American-made pickups and kits from reputable builders tend to have consistent, easy-to-follow colors. Some overseas or budget kits can be a bit more variable, so it’s always good to double-check the diagram before soldering anything.
For experimenting with tone options like coil splitting or phase switching, I usually recommend planning for it upfront if possible. Even if you don’t install the switches right away, leaving room in the cavity and using compatible pots and wiring can make future upgrades much smoother. Retro-fitting later works, but it usually means a bit more rework than most builders expect.
Thanks again,
~Wayne