
Choosing the right nut material is one of the simplest upgrades you can make to boost tone, tuning stability, and overall playability on your electric guitar kit.
In this guide, we’ll break down the most common nut materials, how they affect your sound,
and how to pick the perfect option for your build.

🎸 Choosing the Right Nut Material: What You Need to Know
Before you swap or upgrade your guitar nut, it helps to understand what each material actually does for your tone and performance.
Different nuts change the way vibrations transfer from the strings into the neck, which affects sustain, clarity, tuning stability, and overall feel.
Below, we’ll break down the most common nut materials and what makes each one a good
(or not-so-good) fit for your electric guitar kit.
🛠️ Recommended Nut Materials & Tools
Before you decide which nut is right for your guitar kit,
here are a few reliable options and must-have tools that make the job easier.
A great nut upgrade starts with choosing the right material and having the right tools on hand.
These are the essentials I trust when shaping, fitting, and dialing in a new nut on any electric guitar kit.
A replacement nut almost always falls into one of these three materials, and each one changes your guitar’s tone and performance in its own way.
Here are the three main nut materials you’ll find on most electric guitars:
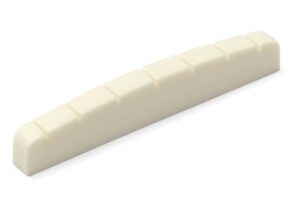
1️⃣ Bone — Classic feel, bright tone
The traditional choice. Bone nuts offer excellent sustain, solid tuning stability, and a slightly brighter sound with strong note definition.
2️⃣ TUSQ / Synthetic — Consistent, clean, modern
Man-made materials like TUSQ are super consistent with no soft spots.
They deliver clear tone, smooth tuning, and excellent performance for the price.
3️⃣ Brass — Bright, punchy, and extremely durable
Brass brings more brightness, more sustain, and a snappier attack.
Not for everyone but loved by players who want maximum clarity and bite.
💡 A Quick Note About Tool Costs
Some of these nut-shaping tools can seem pricey, especially if you’re new to guitar building.
But the good news is they’re almost always a one-time purchase.
Quality nut files, gauges, and setup tools last for years and can be used on every guitar you own —
or build in the future.
If you plan to work on more than one instrument, these tools more than pay for themselves.
Now that you know the differences between the materials,
here are my top recommended upgrades and tools to use with them.
✅ 1. TUSQ XL Replacement Nut (Pre-Sized)
A high-quality synthetic nut that offers excellent tuning stability, great sustain, and consistent performance across all strings. Perfect for players who want an upgrade without extra shaping.
🌟 Amazon Product Suggestion:
✔️ Graph Tech PQL-5010-00 TUSQ XL Nut
A smooth-tuning, drop-in upgrade for Fender-style kits. TUSQ XL’s PTFE infusion keeps strings from binding, giving you stable tuning and clearer tone. Pre-slotted for a fast install and engineered for consistency across every string.
Why It’s Great:
✔️Self-lubricating for smoother tuning
✔️Pre-slotted for quick installation
✔️More consistent tone string-to-string
✔️ Reduces binding and tuning hang-ups
✅ 2. MusicNomad Precision Nut Files (Gauged Set)
If you ever plan to fine-tune your nut slots or shape a new nut from scratch, this set gives you clean, accurate cuts that make setup work far easier.
🌟 Amazon Product Suggestion:
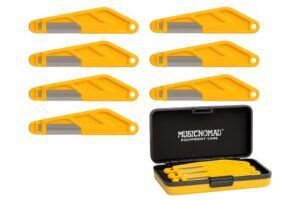
✔️ MusicNomad 6-pc Diamond Nut File Set
A pro-level set of diamond-coated nut files that cut clean, precise slots every time. Each file is matched to common light/medium string gauges, giving you accurate sizing without overcutting. Comfortable handles and a sturdy storage case make this a killer upgrade for any setup bench.
Why It’s Great:
✔️Diamond-coated for smooth, controlled cutting
✔️Six gauges for perfect nut-slot sizing
✔️Comfortable grip handles
✔️ Tough storage case included
✅ 3. Hosco Nut Slotting Gauge
A simple but critical tool that helps you dial in the perfect string height at the nut for smooth playing, clean fretting, and stable tuning.
🌟 Amazon Product Suggestion:

✔️ StewMac Digital Nut Slotting Gauge
(Digital Nut Action Gauge)
This digital gauge gives you pinpoint nut slot accuracy down to 0.001″ / 0.01mm. The brass base sits solid on the fretboard while the digital plunger shows your exact string height in real time. Perfect for cutting smooth, buzz-free nut slots with pro-level precision.
Why it’s great:
✔️Ultra-precise 0.001″/0.01mm accuracy for perfect nut slot height
✔️Digital readout makes measurements fast, clear, and repeatable
✔️Solid brass base sits flat and stable on the fretboard
✔️Ideal for pro-level nut cutting with buzz-free, low-action results
🪚 Step-By-Step: How To Choose the Right Nut Material for Your Electric Guitar Kit
1️⃣ Decide What Tone You’re After
Start by thinking about the sound you want.
-
Bone = warm, bright, great sustain
-
TUSQ/synthetic = consistent, clean, modern
-
Brass = bright, punchy, lots of clarity
If you’re unsure, TUSQ is the safest all-around option for most players.
2️⃣ Check Your Guitar Kit’s Nut Slot Size
Not all nuts are the same size. Measure your kit’s nut slot or compare the stock nut against the specs of the replacement.
A pre-sized nut (like TUSQ XL) is perfect if you want an easy drop-in fit.
3️⃣ Consider How Much Shaping You Want to Do
If you’re comfortable adjusting nut slots or sanding the nut to fit, bone or brass blanks work great.
If you’d rather keep things simple, go with a pre-cut synthetic nut.
4️⃣ Think About Tuning Stability
If you use tremolo systems, big bends, or heavy playing styles, choose a nut material with low friction.
TUSQ XL and similar synthetics stay smooth and help prevent binding at the nut.
5️⃣ Check Your String Gauge
Make sure the nut slots match the string gauge you plan to use.
Too tight = tuning issues
Too loose = buzzing
You can always fine-tune with nut files if needed.
6️⃣ Test the Fit Before Gluing
Slide the nut into place and check for rocking, gaps, or unwanted movement.
If the nut is too tight, sand lightly.
If it’s loose, a tiny drop of wood glue (not super glue) holds it without locking it forever.
7️⃣ Set Your String Height at the Nut
Use your nut gauge to make sure the strings sit at a comfortable height.
This affects both playability and tuning stability.
Lower is generally better—but not so low that it buzzes.
8️⃣ Bring it All Together and Tune Up
Once everything fits, string the guitar, tune up, and make small adjustments:
-
Check for binding
-
Listen for open-string buzz
-
Feel for better sustain and clarity
A well-chosen nut makes a huge difference in how your guitar plays and sounds.
🎸 Final Thoughts…
Upgrading the nut on your electric guitar kit is one of those small changes that delivers a surprisingly big payoff. The right material can improve sustain, clarity, tuning stability, and the overall feel of your build — and once you understand the differences between bone, TUSQ, and brass, choosing the right one becomes easy.
Whether you go for a simple drop-in synthetic nut or a fully custom-shaped bone or brass upgrade, take your time with the fit and setup. A well-cut nut transforms how your guitar plays, and it’s a skill you’ll use on every build you take on in the future.
Rock on and choose your nuts wisely.
Ready to Start Adjusting Your Tone?
Check out our other guides:
👉 If you’re new to guitar kits:
Start with Step-by-Step Guide To Building Your First Electric Guitar Kit and Essential Tools Every Electric Guitar Kit Builder Should Have.
👉 If you already own a kit guitar:
Jump into How To Properly Set Up Your Electric Guitar Kit For Intonation or Fixing Common Problems: Buzzing And Dead Frets.
👉 If you’re chasing better tone:
Head to Understanding Humbucker Vs Single Coil Pickups In Kits or Playing With Tone Controls: Tips For Electric Guitar Kits and start experimenting.
Your Guitar, Your Build, Your Sound
You don’t need a custom shop or a tech on speed dial.
All you need is a little guidance, some patience, and a place to go that shows you what to do next.
Come on man… You got this.
GuitarCrafts is here to help you along the way.
Craft it. Play it. Own it! 🎸
Ready to take your guitar passion beyond the workbench?
See how I built GuitarCrafts.com using the training at Wealthy Affiliate — you can do the same.
👉👉 Build Your First Website With Wealthy Affiliate (Free)

This is such a detailed and insightful guide on guitar nut materials! It’s fascinating how something so small can influence tone and playability in subtle but important ways. I especially appreciate the clear pros and cons breakdown—it really helps clarify whether to go with traditional bone or a synthetic like TUSQ.
I’m curious—do you find certain nut materials work better for specific genres or playing styles beyond what you mentioned? Also, for DIY builders, how tricky is it to swap out a nut material once the guitar is assembled?
Thank you so much! I’m really glad the breakdown helped! It’s wild how much that tiny piece at the top of the neck can shape the whole playing experience. Great questions! I do think certain materials pair better with specific styles… for example, bone tends to suit blues and classic rock players who want that natural, slightly gritty resonance, while TUSQ or Graph Tech options are great for metal or fast lead playing where consistency and tuning stability matter. As for swapping nuts post-assembly… it’s definitely doable, but it takes some care. I just changed one out on one of my personal guitars recently. Scoring around the edges and gently tapping it out works but fitting and filing the replacement properly is key. A nut file set is a good investment if you’re doing it more than once!
Great read — I never realized how much impact the nut material can have on open string tone and tuning stability. I like how you broke down the pros and cons so clearly, especially the comparison between bone and TUSQ.
Quick question: for a beginner upgrading from a stock plastic nut, would you recommend jumping straight to bone for tone, or starting with TUSQ for the easier consistency?
Thanks so much! I’m glad the breakdown made nut materials easier to understand. For a beginner upgrading from a stock plastic nut, TUSQ is often the easiest choice. It offers consistent performance, smooth tuning, and still improves tone noticeably. Bone can give slightly richer tone, but it’s a bit less forgiving when it comes to shaping and installation.
Starting with TUSQ lets you enjoy the upgrade without extra hassle, and you can always experiment with bone later once you’re more comfortable with setup.
Thanks again,
~Wayne
Up until now I never gave the type of material used for a nut any thought. I have replaced nuts on 2 of my acoustics but I’ve always used bone. I think I’ll at least give the graphite a try, the music store is less than a mile away!
I learned something! Great article!
That’s awesome to hear! Bone is a solid choice and has been the go-to for a long time, but graphite is definitely worth trying! It can really help with tuning stability, especially if you do a lot of bending or use a tremolo. Since your music store is so close, it sounds like the perfect opportunity to experiment. Glad the article gave you something new to think about!
Enjoy the upgrade and have fun hearing the difference!
Thanks,
~Wayne
Hello, those nut materials have effectivenest only for open strings sounds, haven’t it?
Great question 👍
Yes, nut material mostly affects open strings,
since that’s when the string is actually sitting on the nut.
Once you fret a note, the fret takes over.
That said, it still helps with tuning stability and consistency,
so a better nut (like bone or TUSQ) can make the guitar feel better overall —
not just sound better.
~ Wayne