
Electric guitars are more than just tools for making music — they’re canvases for self-expression.
If you’re looking to make your instrument truly your own, customizing your electric guitar kit with unique fretboard inlays is one of the coolest ways to combine artistry with functionality.
Whether you’re dropping in classic dot markers, sleek blocks, or a wild custom design that means something to you personally, fretboard inlays can:
-
Make the neck easier to navigate on dark stages
-
Highlight your personal style and taste
-
Turn a budget-friendly kit into a “custom shop”-feeling instrument
In this upgraded guide, we’ll walk through what fretboard inlays actually do, how to plan a design that fits your skills and tools, different ways to install them, and a practical step-by-step process you can follow on a typical kit neck.
 This guide is part of Guitar Fretboard Inlays Explained, where I break down different inlay styles, materials, and customization options.

🔥The Tools And Supplies You Need for Clean, Professional Inlays
If you’re getting serious about custom fretboard inlays, the right materials and tools make all the difference. Below are three must-have items that cover every step of the inlay process — from selecting quality shell blanks, to shaping your designs, to carving clean, precise cavities in the fretboard. Whether you’re adding simple dots or designing full custom artwork, these essentials will give you the control, accuracy, and clean results every luthier aims for.
World of Shell Inlay Supplies – 1 oz White Mother of Pearl Blanks
If you need reliable, consistent shell material for clean custom fretboard inlays, these White Mother of Pearl blanks are a solid choice. They’re easy to cut, durable, and ideal for everything from simple dots to detailed custom designs.
 Amazon Product Suggestion:

 World of Shell Inlay Supplies – 1 oz White Mother of Pearl Blanks
(.040″ Thickness)
A premium pack of bright, shimmering Mother of Pearl pieces — perfect for creating custom fretboard inlays on electric guitars, acoustics, mandolins, and more. These blanks are hand-selected, clean, and ready to cut into almost any shape you need.
Why it’s great:
Ideal thickness (.040″) for guitar fretboard inlays
Clean white pearl with strong shimmer and visual pop
Hand-selected pieces — no dull or muddy shells
Assorted shapes give you creative freedom for designs
Works beautifully with hobby knives, micro saws, and needle files
Perfect for beginners and experienced builders alike
Flat Shell Pieces for Custom Fretboard Work
If you want deeper color and eye-catching patterns in your inlay designs,
these abalone shell pieces deliver bold, vibrant texture that really stands out on a fretboard.
Amazon Product Suggestion:

10Pcs Guitar Abalone Inlay Material
Flat Shell Pieces for Custom Fretboard Work
A vibrant set of polished abalone blanks with dramatic color shifts — perfect for creating bold, eye-catching inlays on electric guitars, acoustics, mandolins, and more. Each piece is flat, smooth on at least one side, and ready to shape into custom patterns.
Why it’s great:
Beautiful iridescent colors that pop under stage lighting
Flat, workable pieces that are easy to cut and shape
Perfect size for fretboard dots, symbols, vines, initials, and custom artwork
Each blank has unique natural patterns — no two look the same
Affordable option for beginners wanting a custom-shop look
Great contrast on rosewood, ebony, and maple fretboards
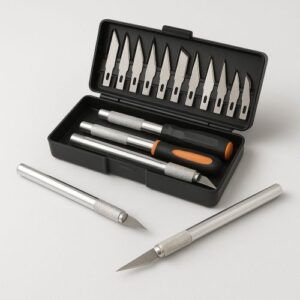
Jetmore 16-Piece Precision Craft Knife Set
For cutting shell cleanly and shaping precise inlay designs, this precision craft knife set gives you the control and sharpness needed for detailed fretboard work.
Amazon Product Suggestion:
Jetmore 16-Piece Precision Craft Knife Set
Perfect for trimming copper tape, cutting shielding templates, and making clean cavity lines
This 16-piece Jetmore hobby knife kit gives you sharp, clean control for any detailed electric-guitar work. Whether you’re trimming copper foil inside a tight control cavity or shaping a clean edge around a pickguard shield, this set delivers the accuracy and stability cheap “best-seller” knives just can’t touch.
With 3 craft handles and 13 SK5 steel blades, you always have the right blade for the job — and the protective case keeps everything organized for fast swaps during wiring or shielding.
Why It’s Great:
✓ Ultra-sharp SK5 steel blades — perfect for cutting copper tape cleanly
✓ Multiple handles — better grip and better control inside tight guitar cavities
✓ Great for pickguards, templates, & shielding masks
✓ Precision cuts — reduces wrinkles, gaps, and lifting edges
✓ Compact case — keeps blades safe and organized in your toolkit
✓ Low cost, high value — ideal upgrade from budget knife sets
1. Understanding Electric Guitar Fretboard Inlays
Before you start routing or cutting, it helps to know what you’re working with.
What Fretboard Inlays Actually Do
Fretboard inlays are:
-
Position markers – to help you quickly see 3rd, 5th, 7th, 9th, 12th fret, etc.
-
Design elements – they frame the look of the neck and often set a guitar’s “identity.”
-
Functional details – good contrast between the inlay and fretboard wood makes playing in low light a lot easier.
Typical locations:
-
Face inlays – on the top surface of the fretboard
-
Side dots – along the edge, crucial when you’re actually playing
-
12th fret feature – often a larger, more decorative marker
Common Inlay Materials
You’ll see a few repeat players:
-
Plastic/pearloid – easy to shape, affordable, classic look
-
Abalone or mother-of-pearl – shimmery, high-end feel, great on darker boards
-
Wood inlays – subtle contrast, great for minimalist or “natural” builds
-
Metal or epoxy – fun for logos or highly custom shapes
👉👉 Pro tip: If this is your first inlay project, start simple.
Pre-cut dots or blocks are much easier than trying to hand-cut a dragon on your first go.
2. Planning Your Custom Inlays: Where Art Meets Functionality
Jumping into cutting the fretboard without a plan is how “awesome ideas” turn into firewood. Spend some time on paper first.
Step 1: Decide What You Need Functionally
Ask yourself:
-
Do you want standard markers (3, 5, 7, 9, 12, etc.)?
-
Do you play in low light often and need high contrast?
-
Are side dots enough, or do you really want face inlays for quick reference?
If you mostly play sitting in a bright room, you can get more artistic.
If you’re on dim stages, you’ll want something bold and easy to read.
Step 2: Sketch Your Ideas To Scale
Print or draw a full-scale fretboard outline and:
-
Mark out the frets and centerlines
-
Sketch dot sizes or block shapes
-
Experiment with symmetry vs. asymmetry (all the same or different per fret)
-
Test out small icons (stars, initials, symbols) at key frets like 12 and 24
👉👉Pro tip: Take a photo of your sketch and flip it to black-and-white. If the inlays still stand out with no color, you’ve likely got good contrast.
Step 3: Match Design To Your Skill Level
-
Beginner: pre-cut dots or small blocks in existing holes, maybe upsizing them
-
Intermediate: simple custom shapes (diamonds, offset blocks, crosses)
-
Advanced: logos, animals, or multi-piece designs with several materials
You can always start simple on your first guitar kit and get more ambitious on your next build.
3. Unique Techniques To Add Inlays To Your Fretboard
There are a few main ways to get inlays onto a kit neck, depending on how far you want to push things.
A. Using The Stock Inlays (And Just Making Them Pop)
If your kit already has dots installed, you don’t have to replace them. You can:
-
Darken the surrounding wood with a light stain to make white dots stand out
-
Add glow-in-the-dark side dots for low-light visibility
-
Lightly level and polish the existing inlays so they blend seamlessly with the board
This is the least risky path and still gives a noticeable upgrade.
B. Replacing Stock Dots With New Ones
This is a sweet spot between “factory” and “fully custom.”
-
Carefully drill out the old plastic dots
-
Drop in larger or nicer material dots (abalone, MOP, wood)
-
Level and re-crown the area until everything feels perfectly smooth
Because you’re still using round inlays and existing positions, layout is dead simple.
C. Routing For Custom Shapes
For more ambitious designs:
-
Stick the inlay blank to the fretboard area with double-sided tape
-
Trace around it with a sharp scribe or knife
-
Use a Dremel with an inlay router base to hog out most of the cavity
-
Clean the corners with a small chisel or knife
Then you glue the inlay in place, level it, and blend it into the fretboard.
D. Epoxy & Crushed Inlay Fills
You can also create shapes using:
-
Crushed shell or stone mixed with clear or tinted epoxy
-
Laser-cut or CNC-cut pockets (if you have access to those tools)
This method is more forgiving of small routing errors because the epoxy can fill tiny gaps and still look great.
4. Tools & Supplies That Make Inlay Work Easier
You don’t need a full luthier’s shop, but a few key tools will make life much easier:
-
Rotary tool (Dremel-style)
-
Inlay routing base or precision baseplate
-
Small brad-point or Forstner bits for dots
-
Sharp hobby knife / X-Acto
-
Mini chisels or micro-gouges
-
CA glue (thin and medium) and/or 2-part epoxy
-
Masking tape, layout ruler, and calipers
-
Sanding blocks and fine sandpaper (400–2000 grit)
👉👉Pro tip: Always mask off the fretboard around your work area.
It keeps accidental slips from leaving scars where you don’t want them.
5. Step-By-Step: Installing New Dot Or Block Inlays In A Kit Neck
Here’s a practical walkthrough you can follow on most electric guitar kit necks.
Step 1 – Inspect & Mark Your Layout
-
Check if your kit neck already has inlays installed
-
If so, decide which ones you’ll replace and which can stay
-
Use a straightedge and pencil to mark the centerline of the fretboard
-
Lightly mark your inlay positions (3, 5, 7, 9, 12, etc.)
👉👉Pro tip: Double-check everything before you drill.
A misplaced 12th fret inlay will drive you crazy forever.
Step 2 – Secure The Neck
-
Support the neck in a padded neck rest or caul
-
Clamp it gently but firmly to your bench
-
Make sure it can’t rock or slide while you drill or route
Step 3 – Remove Old Dots (If Needed)
-
Use a drill bit slightly smaller than the existing dot
-
Drill carefully until you’re just shy of the full depth
-
Pop out the remaining material with a small pick or awl
-
Clean the cavity walls with a knife or micro chisel
👉👉Pro tip: Wrap tape around your drill bit as a depth stop so you don’t blow through the fretboard.
Step 4 – Create New Cavities
For round dots:
-
Choose a bit that matches your new dot size
-
Drill straight down, staying centered on your layout marks
For blocks or custom shapes:
-
Trace your inlay on the fretboard with a sharp blade
-
Use a Dremel in an inlay base to route close to the line
-
Clean the edges with your knife until the inlay test-fits snugly
Step 5 – Dry-Fit Every Inlay
Before touching glue:
-
Drop each inlay into its cavity
-
Check for gaps, rocking, or high spots
-
Adjust slowly — it’s easier to remove material than to put it back
If you’re using shell or brittle material, take your time; it chips easily.
Step 6 – Glue The Inlays In Place
-
Mask off the area around each cavity
-
For dots: a drop of medium CA glue works well
-
For larger inlays or fills: use epoxy so it can fill micro gaps
-
Press the inlay in firmly and wipe away any squeeze-out
Let everything cure fully before moving on. Rushing this step can cause voids later.
Step 7 – Level & Blend
Once the glue is cured:
-
Use a flat sanding block with 320–400 grit over the inlay area
-
Carefully sand until the inlay is perfectly flush with the fretboard
-
Work through finer grits (600, 800, 1000+) to remove scratches
-
Clean dust out of the fret slots as you go
The goal is for your finger to glide over the inlay without feeling any edge at all.
Step 8 – Re-Clean & Condition The Fretboard
-
Blow or brush away dust
-
Wipe with a slightly damp cloth, then dry
-
Apply a small amount of fretboard conditioner (if appropriate for the wood)
-
Buff with a clean cloth to bring back the sheen
Now your fretboard should look like it came from a custom shop instead of a generic kit box.
6. Beyond Inlays: Other Custom Touches For Your Kit
Once you’ve dipped your toes into fretboard inlays, it’s hard to stop customizing. You can pair your new inlays with other upgrades:
-
Custom nut material to tune your tone and tuning stability
-
(See: How To Choose The Perfect Nut Material For Your Electric Guitar)
-
-
Pickup swaps and wiring mods to match the look with killer sound
-
(Try linking to your pages on pickups, tone pots, and pickup height.)
-
-
Headstock shapes and logos to complete the theme
-
Body finishes that echo your inlay colors (blue burst with abalone looks incredible)
These details all work together to make your kit feel like a guitar you designed, not just something you assembled.
7. Exploring The World Of Guitar Inlays (Inspiration For Your Next Build)
If you’re stuck on ideas, look around:
-
Classic Gibson blocks, Fender dots, and PRS birds
-
Minimalist “no inlay” boards with only side dots
-
Theme builds: nautical symbols, geometric patterns, initials, or even song motifs
-
Matching side dot colors to the main inlay material for a cohesive look
Start a folder on your phone or computer and save photos of inlays you love. Over time, you’ll notice patterns in what you’re drawn to — that’s the style you should lean into when designing your own.
Final Thoughts…
Upgrading a guitar kit with custom fretboard inlays takes patience, but it’s one of those projects that pays you back every time you pick up the instrument. You’re not just following assembly directions anymore — you’re building a unique instrument that reflects your taste, your skills, and your willingness to try something new.
If you’re brand-new to this:
-
Start with simple dot or block replacements
-
Learn to route and fit one small custom inlay
-
Then go bigger on your next build
Combine your new inlay skills with solid setup work (nut, fret leveling, pickup height, and intonation), and your “DIY kit guitar” will start feeling less like a kit and more like a custom shop piece you just happen to have built in your own workspace.
Keep experimenting, keep learning, and most importantly —
Keep building guitars you can’t wait to plug in and play. 🎸
👉 For an overview of fretboard inlay types and customization approaches,
see Guitar Fretboard Inlays Explained.
Ready to Start Adjusting Your Tone?
Check out our other guides:
If you’re new to guitar kits:
Start with Step-by-Step Guide To Building Your First Electric Guitar Kit and Essential Tools Every Electric Guitar Kit Builder Should Have.
If you already own a kit guitar:
Jump into How To Properly Set Up Your Electric Guitar Kit For Intonation or Fixing Common Problems: Buzzing And Dead Frets.
If you’re chasing better tone:
Head to Understanding Humbucker Vs Single Coil Pickups In Kits or Playing With Tone Controls: Tips For Electric Guitar Kits and start experimenting.
Your Guitar, Your Build, Your Sound
You don’t need a custom shop or a tech on speed dial.
All you need is a little guidance, some patience, and a place to go that shows you what to do next.
Come on man… You got this.
GuitarCrafts is here to help you along the way.
 Craft it. Play it. Own it!
Ready to take your guitar passion beyond the workbench?
See how I built GuitarCrafts.com using the training at Wealthy Affiliate — you can do the same.
Build Your First Website With Wealthy Affiliate (Free)

I really loved this guide—fretboard inlays are such a lovely way to turn a guitar into something personal and meaningful, not just functional. It’s fascinating to see how traditional dot and trapezoid markers evolved into intricate designs like Tree of Life, Celtic motifs, or even LED-lit options. The step-by-step outline—planning, routing, gluing, sanding, and finishing—is practical yet inspiring for anyone wanting to add character to their build.
It’s clear that while aesthetic appeal is key, playability shouldn’t take a back seat. Striking that balance ensures the fretboard enhances both your visual style and your performance.
I’d love to know—have you ever seen or worked on inlay designs that actually made playing harder, like overly intricate patterns that distracted rather than guided?
Thanks so much! I’m glad you enjoyed the guide. It’s always exciting to talk about how inlays can be both art and function. And yes, I have run into a few designs that looked amazing on paper but turned out to be a little too “busy” in practice. When the patterns are overly intricate or use too many contrasting colors, they can make it harder for players to quickly spot position markers, especially under stage lighting. That’s why I always suggest balancing creativity with clarity. You want the design to wow the eyes but still guide your hands without a second thought.
Thank you again,
~Wayne
Great read! I really like how you connected the history of inlays with modern customization options—it shows how much meaning and artistry can go into something as small as fret markers. The step-by-step breakdown of the installation process is especially helpful for anyone considering DIY work, since inlaying can seem intimidating at first.
Quick question: for someone new to guitar building, would you recommend starting with pre-cut inlay sets before attempting custom shapes, or is it worth jumping straight into designing your own?
Thanks so much! I’m glad you enjoyed the mix of history and modern options! You’re right, inlays might seem small, but they carry a lot of personality and artistry. As for your question: I usually recommend beginners start with pre-cut inlay sets. They take a lot of the pressure off since the pieces are uniform and ready to install, which helps you focus on learning the cutting, routing, and gluing steps. Once you’re comfortable with the process, moving on to custom shapes feels way less intimidating—and by then you’ll have a good sense of what designs you want to create.
It’s a nice progression from learning the craft to really making it your own.
Thanks again!
~Wayne
I enjoyed reading this because I am interested in customizing an electric guitar kit myself. The way you explained the different inlay options was very helpful. I didn’t know designs could be so personal, like vines, animals, or even glowing LED markers. That adds a modern twist while still keeping the guitar functional.
The installation steps also showed me how much patience and care it takes. It’s nice to see how small details can completely change an instrument.
I’m really glad you found the inlay section inspiring! You’re right… Custom designs can be a great way to make a kit feel truly personal, whether it’s something traditional like vines or something modern like LEDs. That blend of art and function is what makes inlays so fun to explore. And yes, patience is key! The process can be meticulous, but the reward is huge. Those small details really do transform a guitar into something one-of-a-kind.
If you end up customizing your kit, I’d love to hear what direction you go with the design!
Thank you so much!
~Wayne