Single-coil pickups are part of what makes a Stratocaster special.
They’re bright.
Clear.
Dynamic.
But they also hum.
If your Stratocaster guitar kit produces unwanted noise when you
turn up the gain or step away from your amp,
shielding the electronics is one of the most effective upgrades you can make.
The good news?
It’s simple, affordable, and completely doable for DIY builders.
Let’s walk through it.
Still choosing your Strat-style kit?
See my full breakdown here:
→ Best Stratocaster Guitar Kits – Why Solo Guitars Is My Top Pick
Why Strat Kits Are Prone To Noise
Traditional Strat-style kits use three single-coil pickups.
Single-coils naturally pick up electromagnetic interference from:
• Lights
• Computer screens
• Amps
• Power supplies
Without shielding, that interference enters your control cavity and wiring channels.
The result:
• Constant hum
• Buzz when you face certain directions
• Noise that increases with gain
Shielding reduces this interference significantly.
What You’ll Need
• Copper shielding tape (with conductive adhesive)
• Small scissors
• Screwdriver
• Optional: multimeter
Copper tape is preferred over aluminum because it’s easier to solder
and typically provides better conductivity.
Step 1: Remove The Pickguard Assembly
Loosen the strings and remove the pickguard.
Flip it over carefully.
Your pickups and wiring harness will still be attached.
Place it safely to the side.
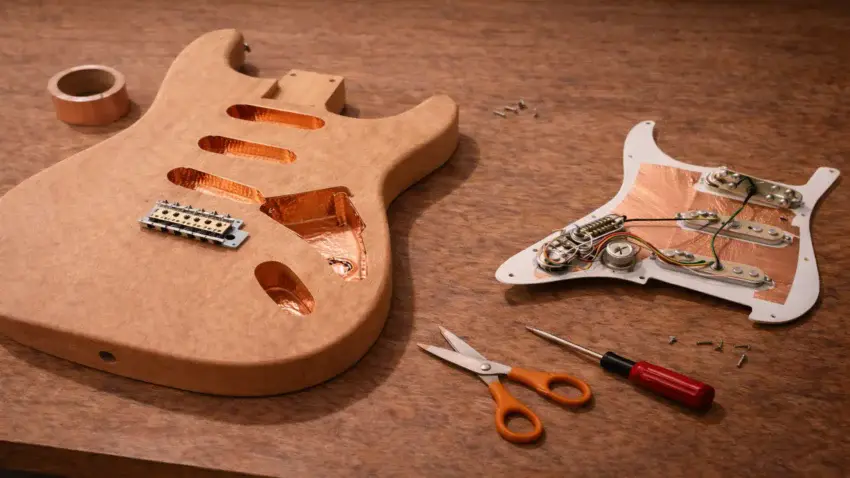
Step 2: Shield The Control Cavity
Line the inside of the control cavity with copper tape.
Important:
• Overlap tape sections
• Press firmly into corners
• Cover side walls and bottom
Make sure all pieces connect electrically.
If you’re unsure about continuity, check with a multimeter.
Step 3: Shield The Pickup Cavities
Repeat the process inside each pickup cavity.
Strat bodies typically have three separate routes for single-coils.
Cover:
• Bottom surface
• Side walls
Run a small strip connecting cavities if possible
so they share grounding contact.
Step 4: Shield The Back Of The Pickguard
Apply copper tape to the underside of the pickguard.
This creates a complete “Faraday cage”
when the pickguard is screwed back into place.
Be careful not to cover screw holes completely.
Step 5: Ground The Shielding
For shielding to work properly, it must connect to ground.
Usually:
• Solder a small wire from the cavity shielding to the back of a pot
OR
• Ensure shielding contacts grounded components when assembled
Without grounding, shielding does nothing.
Does Shielding Remove All Hum?
No.
Single-coil hum will never disappear completely.
But shielding:
• Reduces background noise
• Makes high-gain tones cleaner
• Improves recording quality
• Makes your Strat feel more “professional”
If you want even less hum, consider noiseless or humbucker options.
👉 Considering a pickup upgrade instead?
→ Best Pickups For A Stratocaster Guitar Kit (Upgrade Guide)
Setup Still Matters
Before blaming noise entirely on electronics, make sure your build is set up properly.
High action or fret buzz can sometimes be mistaken for electrical issues.
👉 Dial in your setup first.
→ How To Properly Set Up A Stratocaster Guitar Kit For Smooth Playability
👉 Still chasing down unwanted noise or strange vibrations?
→ How To Fix Buzzing Frets And Dead Notes On Your DIY Guitar Kit
Final Thoughts…
Shielding a Stratocaster guitar kit is one of the simplest upgrades with the biggest impact.
It doesn’t change your tone.
It protects it.
When you combine:
• Proper setup
• Quality pickups
• Clean wiring
• Solid shielding
You end up with a Strat build that feels refined, not “budget.”
And that’s the advantage of building your own.
You get to improve it step by step.
 Craft it. Play it. Own it!