Once parts are cut and shaped, fitting and finishing tools are what make everything
sit correctly, feel comfortable, and look intentional.
This stage isn’t about changing dimensions —
it’s about final alignment and readiness.
Small issues left unaddressed here often show up later as discomfort, cosmetic flaws,
or parts that never quite feel “right.”
This guide focuses specifically on fitting and finishing tools used during electric guitar kit builds,
what they’re used for, and where they fit in the cutting, shaping, and fitting workflow.
For a broader view of cutting, shaping, and fitting as a system, start with the main guide:
Cutting, Shaping, and Fitting Tools for Electric Guitar Kits.
Why Fitting Comes Last
Fitting is about confirmation, not correction.
If parts aren’t the right size, cutting comes first.
If surfaces feel rough or uneven, shaping comes next.
Fitting tools are used when everything is almost right —
and you want to make sure parts align, seat properly, and feel natural before moving on.
Common Fitting & Finishing Tools You’ll Use
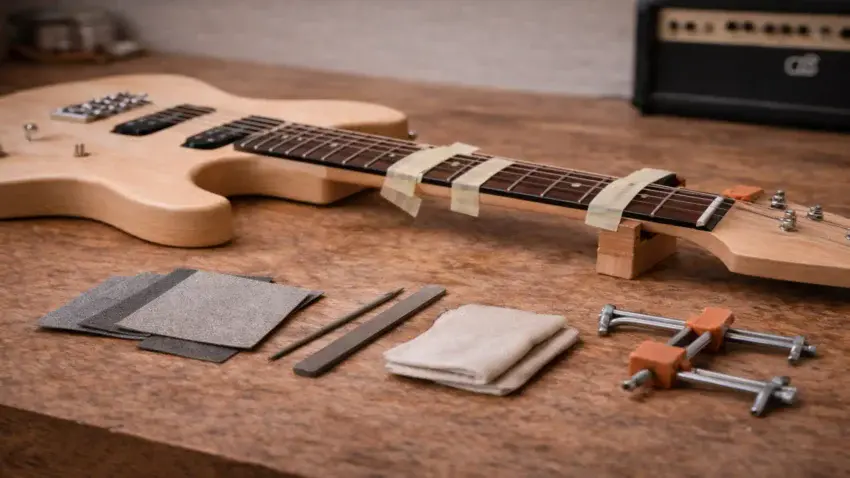
Dry-Fit Clamps or Light Clamping Aids
Light clamping is used to hold parts in place temporarily.
Common uses include:
-
Checking neck pocket alignment
-
Holding nuts or saddles in position
-
Verifying fit before permanent installation
This prevents committing to placement before confirming alignment.
Masking Tape and Protective Covers
Simple, but important.
Tape is often used to:
-
Protect finished surfaces during test fits
-
Mark alignment points
-
Prevent accidental scratches
Good fitting work avoids creating new problems.
Burnishing or Polishing Tools
Final touch tools help surfaces feel complete.
They’re commonly used for:
-
Polishing fret ends after shaping
-
Smoothing nut and saddle contact points
-
Blending transitions between surfaces
These tools don’t remove much material — they improve feel.
Fine Abrasives and Pads
Very fine abrasives are used during finishing stages.
They help with:
-
Removing light tool marks
-
Preparing surfaces for finish or sealing
-
Final smoothing before assembly
At this stage, less pressure matters more than grit choice.
When Fitting Happens in the Build
Fitting and finishing usually happen:
-
After all cutting and shaping is complete
-
Before permanent installation
-
Before finishing coats or final assembly
Skipping fitting checks often leads to rework later —
when changes are harder to make cleanly.
Fitting vs Finishing — Subtle but Important
Fitting confirms alignment and seating.
Finishing confirms feel and readiness.
Both are about restraint. If something requires force, it usually needs to go back a step.
Before moving on, stepping back to the fitting and finishing tools helps confirm
that every part sits correctly and feels right in hand.
Final Thoughts…
Fitting and finishing tools don’t make dramatic changes —
they confirm that the work you’ve already done is ready to move forward.
When parts sit cleanly, edges feel comfortable, and alignment checks out,
the rest of the build becomes straightforward instead of corrective.
This is where a guitar kit stops feeling like a project and starts feeling like an instrument.
Ready to Start Adjusting Your Tone?
Check out our other guides:
 If you’re new to guitar kits:
Start with Step-by-Step Guide To Building Your First Electric Guitar Kit and Essential Tools Every Electric Guitar Kit Builder Should Have.
If you already own a kit guitar:
Jump into How To Properly Set Up Your Electric Guitar Kit For Intonation or Fixing Common Problems: Buzzing And Dead Frets.
If you’re chasing better tone:
Head to Understanding Humbucker Vs Single Coil Pickups In Kits or Playing With Tone Controls: Tips For Electric Guitar Kits and start experimenting.
Your Guitar, Your Build, Your Sound
You don’t need a custom shop or a tech on speed dial.
All you need is a little guidance, some patience, and a place to go that shows you what to do next.
Come on man… You got this.
GuitarCrafts is here to help you along the way.
 Craft it. Play it. Own it!
Ready to take your guitar passion beyond the workbench?
See how I built GuitarCrafts.com using the training at Wealthy Affiliate — you can do the same.
Build Your First Website With Wealthy Affiliate (Free)
