If you’ve ever wondered what really gives
a semi-hollow kit its warmth, resonance, and
unmistakable character, this deep dive into
DIY semi-hollow guitar kit internal
chambers is exactly where the magic begins.
Chamber design isn’t just about
“cutting holes in wood” — it’s where tone, feel,
and craftsmanship collide.
Whether you’re chasing airy jazz cleans, punchy
blues grit, or a lightweight stage-friendly build,
understanding how these internal chambers are
shaped, placed, and reinforced will transform
the way you approach your next kit.
From center blocks to sound chambers to
hybrid cavities, we’re about to peel back the top
and look directly into the heartbeat
of a semi-hollow guitar.

🎯 Tools for Precision
Chamber Shaping
Before you start shaping internal chambers,
you’ll need a few precision tools that make the job
clean, safe, and repeatable.
Semi-hollow work isn’t about brute force —
it’s about control, accuracy, and getting those
cavity walls dialed in just right.
The three tools below are the exact kind of gear
that helps you cut smooth chambers, refine the
contours, and measure everything
down to the thousandth.
Let’s take a look at the essentials you’ll
want on your bench before
diving into the wood.
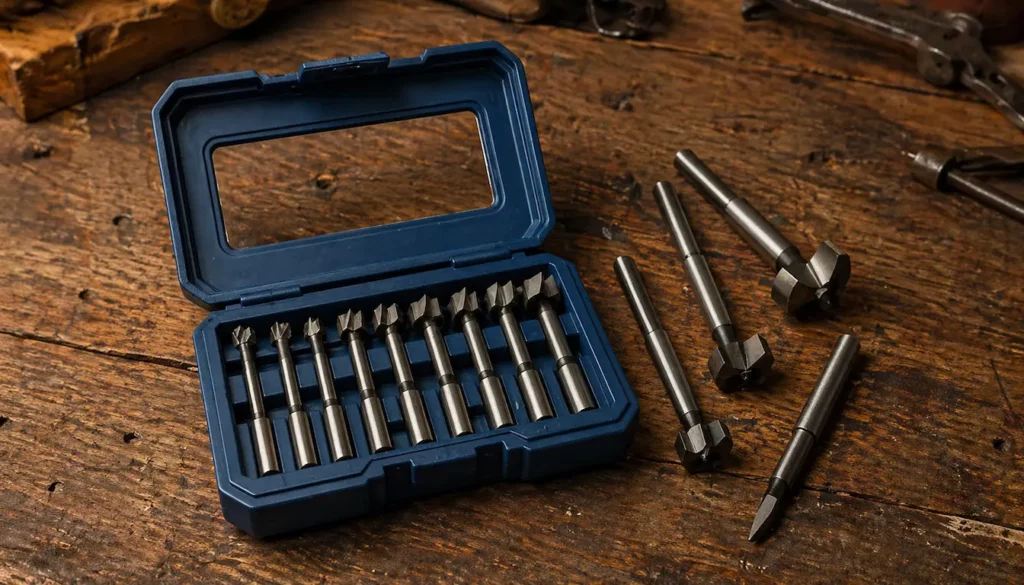
Irwin Tools IRWIN
Marples Forstner Bit Set
If you want clean, flat-bottomed cuts for shaping
your semi-hollow chambers, these IRWIN
Marples Forstner bits are the go-to choice.
They drill smooth, precise cavities without
burning the wood, giving you a perfect
starting point before refining the chamber
with your router.
🌟 Amazon Product Suggestion:
✔️ Irwin Tools IRWIN
Marples Forstner Bit
(8-Piece Set)
The Irwin Marples Forstner Bit Set
delivers clean, precise holes
with minimal tear-out.
Ideal for guitar work,
it cuts flat-bottom holes accurately
in hardwood and softwood.
Why it’s great:
✔️ Clean cuts — Flat-bottom holes, minimal tear-out
✔️ Versatile — Cavities, tuner holes, jigs
✔️ Accurate — Stays true in hardwoods
✔️ Durable — Long-lasting steel set
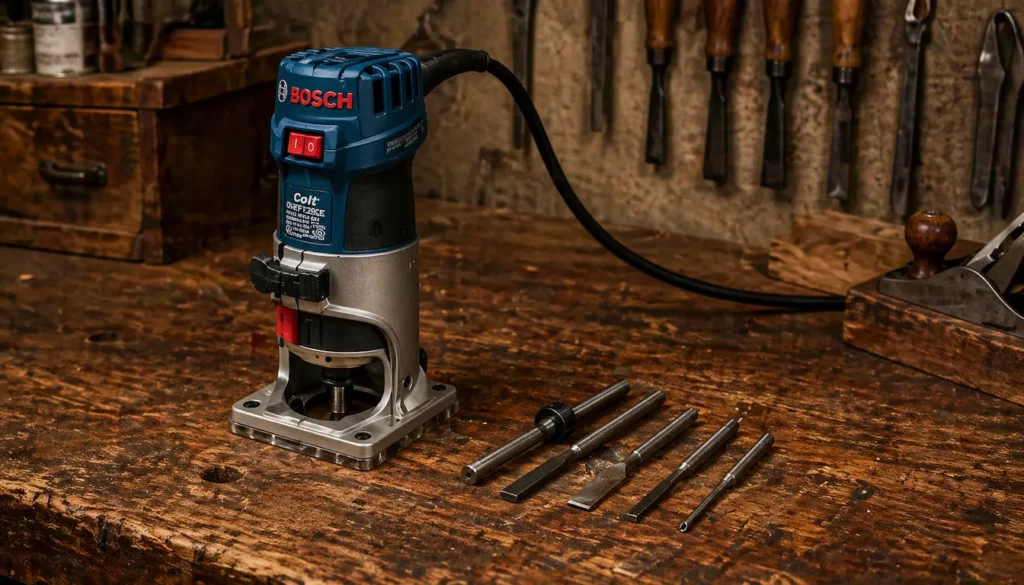
BOSCH PR20EVS
Colt Palm Router
The BOSCH Colt is the hero of
controlled chamber shaping.
With variable speed and a compact footprint,
it lets you carve, smooth, and fine-tune the
internal cavities without feeling like you’re
wrestling a full-size router.
It’s powerful, predictable,
and tailor-made for guitar work.
 Amazon Product Suggestion:
✔️ BOSCH PR20EVS
Colt 1.0 HP
(Palm Router)
The Bosch Colt PR20EVS
is a compact, precise router
ideal for guitar work.
Its variable speed and smooth
control make it perfect for
inlays, cavities, and detailed shaping.
Why it’s great:
✔️ Variable speed — Precise control
✔️ Smooth start — No sudden jumps
✔️ Stable base — Durable aluminum
✔️ Compact design — Perfect for detail work
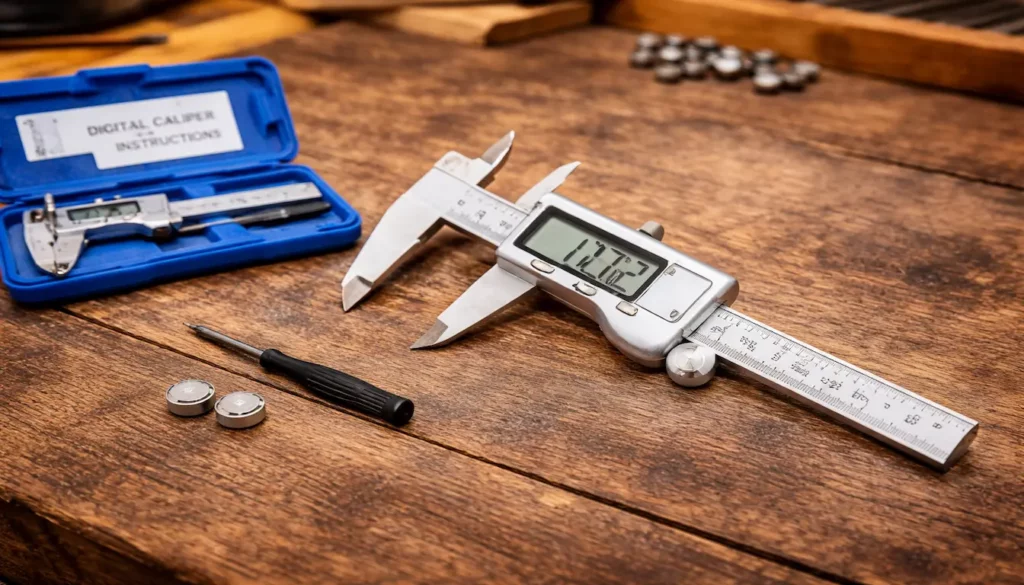
Jivarry Digital Caliper
When you’re cutting chambers,
accuracy is everything.
This Jivarry digital caliper helps you measure
top thickness, center block width, and cavity
spacing with confidence.
The big LCD screen keeps everything easy to
read while you dial in perfect tolerances.
Amazon Product Suggestion:
 Jivarry Digital Caliper
(Stainless Steel, Large LCD, 6-Inch)
The Jivarry Digital Caliper is an
accurate, easy-to-use measuring tool
for precise work.
It quickly switches between units
and helps you measure with confidence.
Why it’s great:
Clear display — Easy to read
Quick switch — Inches/mm/fractions
Accurate — Smooth, precise travel
Versatile — Inside, outside, depth measurements
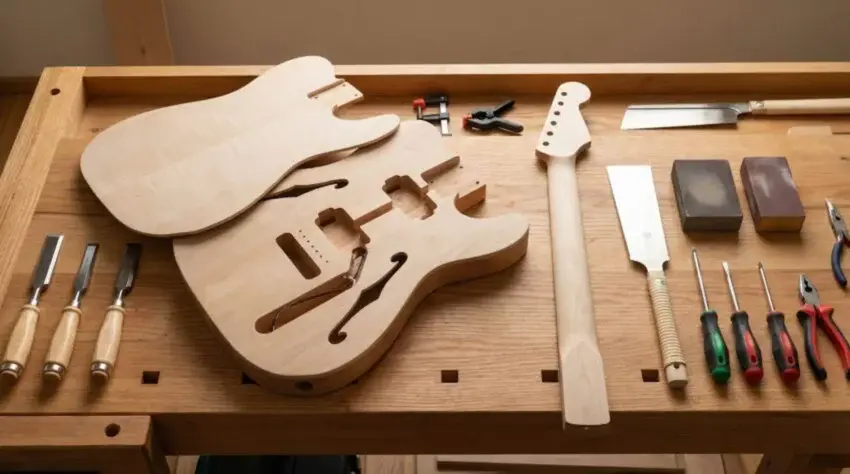
🔨 Step-By-Step Guide:
Understanding Semi-Hollow
Internal Chambers
1. Identify the Center Block
The center block is the backbone of a
semi-hollow guitar.
It runs down the middle and adds sustain
while helping control feedback.
Understanding its width and placement
sets the stage for everything else happening
inside the body.
👉 Pro Tip:
A narrower center block gives more
airy resonance, while a wider one
boosts sustain and reduces howl.
2. Locate the Primary Chambers
These are the large hollowed-out pockets
on each side of the center block.
Their size and shape affect weight,
resonance, and the “open” feel of the guitar.
👉 Pro Tip:
Bigger chambers = lighter weight and
warmer response, but too large can
reduce structural strength.
3. Check the Top Thickness
The top (soundboard) thickness determines
how much the guitar “breathes.”
Too thick and it acts like a solid guitar.
Too thin and you risk cracks or over-resonance.
👉 Pro Tip:
Ideal tops sit around 0.150–0.200 inches.
Always measure with calipers before
cutting or modifying.
4. Inspect the Chamber
Wall Depth
The deeper the walls of the chamber,
the more resonance you get —
but you also reduce rigidity.
Good kits keep the perimeter strong
while still giving the guitar a lively response.
👉 Pro Tip:
Aim to keep at least ¼ inch of solid material
around the outer edges for strength.
5. Study the Sound Hole
or F-Hole Placement
F-holes aren’t just cosmetics —
they control how air moves
inside the chambers.
Their size and placement affect
rojection, acoustic character, and how
the guitar reacts to picking dynamics.
👉 Pro Tip:
Symmetry matters.
Misaligned F-holes can cause uneven
resonance between the bass and treble sides.
6. Examine the Neck
Pocket Support
The neck pocket must remain reinforced,
even in semi-hollows.
Chambering too close to this area can
weaken the joint and affect tuning stability.
👉 Pro Tip:
Never route within ½ inch of the
neck pocket walls when modifying chambers.
7. Evaluate the Bridge
Mounting Area
Semi-hollow kits often leave extra wood
under the bridge for support.
This prevents the top from flexing
too much under string tension,
especially on tune-o-matic or
trem-equipped builds.
👉 Pro Tip:
If your bridge studs sink even slightly
during stringing, reinforce the
mounting block before finishing.
8. Look for Wiring Channels
Internal chambers should include pre-cut wiring
paths connecting pickups, pots, and switches.
Clean, well-designed paths make assembly
easier and reduce hum issues.
👉 Pro Tip:
If the wiring channel sits too close
to a chamber wall, reinforce that area
with thin CA to prevent accidental breakthroughs.
9. Check the Bass-Side
vs Treble-Side Balance
Some kits intentionally chamber the
bass side differently from the treble side.
This enhances low-end bloom while
keeping the treble tight and articulate.
👉 Pro Tip:
If one side sounds “boomier,”
lightly shaping the chamber walls can
balance the guitar’s response.
10. Map Out Resonance Zones
Every chambered guitar has hot spots —
areas that vibrate more strongly than others.
Knowing where these zones are helps you
predict the guitar’s final character and
even tailor mods to your playing style.
👉 Pro Tip:
Tap the top lightly with your knuckles.
Areas that ring or thump differently
reveal the chamber layout.
⭐ Final Thoughts…
Understanding the internal chamber design of
a semi-hollow guitar is one of the most powerful
ways to predict how a kit will feel, sound,
and respond once it’s built.
When you know what’s happening under the top
— where the center block sits, how the chambers
are shaped, how thick the top is,
and how the structural areas are reinforced —
You stop “hoping for a good build”
and start engineering one.
Whether you’re chasing warmth, sustain,
lighter weight, or a more expressive resonance,
the internal layout is the roadmap to achieving it.
And with the right tools on the bench and a
clear picture of how each chamber affects tone,
you’re not just building another guitar…
You’re crafting a semi-hollow that’s
tuned to your style from the inside out.
If you’re ready to jump into the next build
or explore more techniques,
you’ve already got the knowledge to
make your chambered guitar sing.
 Ready to Start?
Here’s your next step —
pick one and go:
 New to guitar kits?
Start with
Step-by-Step Guide To Building
Your First Electric Guitar Kit
and
Essential Tools Every Electric Guitar Kit
Builder Should Have.
Already built a kit?
Jump into
How To Properly Set Up Your
Electric Guitar Kit For Intonation
or
Fixing Common Problems:
Buzzing And Dead Frets.
Chasing better tone?
Head to
Understanding Humbucker
Vs Single Coil Pickups In Kits
or
Playing With Tone Controls:
Tips For Electric Guitar Kits
and start experimenting.
 Your Guitar, Your Build,
Your Sound
You don’t need a custom shop or a tech on speed dial.
All you need is a little guidance, some patience,
and a place to go that shows you what to do next.
Come on man… You got this.
GuitarCrafts
is here to help you along the way.
Craft it. Play it. Own it!
This was such a helpful read! I love how the guide breaks down statue repairs into simple, manageable steps that even a beginner could follow. The advice on using epoxy putty, waterproof glue, and weather-resistant paint was especially practical, and I appreciated the reminders about cleaning and sealing for long-lasting results. The section on restoring faded colours really inspired me to tackle a few worn-out pieces in my own garden. A clear, friendly, and encouraging guide—highly recommended for anyone looking to breathe new life into their garden décor!
Thank you for your thoughtful comment! It looks like it might have been meant for a different post, but I really appreciate your kind words. I’m glad you enjoy guides that break things down clearly—feedback like yours is always encouraging! ~Wayne
Your site continues to be an invaluable resource—truly a go-to for anyone diving into guitar kit builds. Every guide, including this walkthrough on crafting semi-hollow electric guitars with creative chamber designs, strikes the perfect balance between craftsmanship and inspiration. What resonates most here is how you make the technical approachable: explaining how internal chambers add resonance, warmth, and reduced weight without overwhelming readers with jargon. The care you take in outlining chamber placement, bracing, and finish options reflects real passion and a generous willingness to share insider know-how. This kind of informed creativity—where tone meets personal expression—is why your site stands out. Thanks for being such a rich well of practical guidance and inspiration for builders at all levels!
Wow! Thank you so much for such a thoughtful comment! I’m thrilled to hear that the semi-hollow guide resonated with you. Making technical concepts approachable while still diving into the details is exactly what I aim for, so it’s fantastic to know that came through.
It’s especially rewarding to hear that the tips on chamber placement, bracing, and finish options feel helpful rather than overwhelming. Those are the kinds of details that can really shape tone and playability, and I love sharing them with builders who want to experiment and get creative.
Comments like yours make putting these guides together all the more worthwhile. I really appreciate your support, and I can’t wait to share more insights for your next build!
Thank you again,
~Wayne