Skip to content
Electric Guitar Kits Logo
Menu
  • Home
  • Start Here
    • Build Your First Guitar Kit
    • Essential Tools Every Electric Guitar Kit Builder Should Have
    • Setting Up The Bridge And Neck On Your Electric Guitar Kit
    • Are DIY Guitar Kits Good For Beginners?
    • Mastering Tone Controls on Your Electric Guitar Kit (Beginner-Friendly Guide)
  • Fix & Setup
    • How To Adjust Truss Rod For Neck Relief In Guitar Kits
    • Adjusting Action On An Electric Guitar
    • How To Properly Set Up Your Electric Guitar Kit For Intonation
    • Fix Buzzing Frets & Dead Notes
    • Setting Up The Bridge And Neck On Your Electric Guitar Kit
  • Pickups & Wiring
    • Understanding Humbucker Vs Single Coil Pickups In Kits
    • How Pickup Height Affects Electric Guitar Tone
    • How To Adjust Pickup Height On Electric Guitar
    • Guide To Wiring Your Electric Guitar Kit For Optimal Performance
    • How To Shield Your Guitar’s Electronics For Noise Reduction
  • Tone & Upgrades
    • How Tone Pots Shape Feel and Control on Your Guitar
    • How Guitar Electronics Shape Tone Beyond Pickups
    • Does Guitar Wood REALLY Affect Tone? (What Builders Notice First)
    • Best Pickups for Guitar Kits (Budget to Pro Tone Upgrades)
    • How To Choose The Perfect Nut Material For Your Electric Guitar
  • Mods & Custom Builds
    • D.I.Y. Fretboard Inlays For Guitar Kits (Creative Upgrade Guide)
    • D.I.Y. Custom Guitar Inlays (Step-By-Step Guide)
    • How To Choose Between Neck-Through And Bolt-On Necks In Kits
    • String Changing Techniques To Protect Your Guitar
    • Electric Guitar Customization & Mods Guide
Menu
Raw tonewood progressing through the major stages of acoustic guitar construction on a rustic luthier’s workbench, from braced soundboard to nearly finished guitar.

The Acoustic Guitar Building Process: From Raw Wood to First Chord

Posted on July 5, 2026 by Wayne

Building an acoustic guitar can look overwhelming when you see the finished instrument and try to imagine everything that happened before the strings went on.
But the process becomes much easier to understand when you break it into a series of smaller, carefully connected stages.

From choosing and preparing the wood to building the body, fitting the neck, applying the finish, and finally hearing that first chord, every step builds on the one before it.

This guide walks through the entire acoustic guitar building process so you can see the road ahead before you ever make the first cut.


👉 Wondering how much time all of this actually takes?
Read How Long Does It Take to Build an Acoustic Guitar? for a realistic look at the timeline from your first day at the workbench to the final setup.


🪵 Step 1: Choose and Prepare the Tonewood

Every acoustic guitar begins with the wood.
The soundboard, back, sides, neck, fingerboard, and bridge each have different jobs, so the wood for each part must be chosen and prepared with care.

Before construction begins, the wood needs to be properly dried, stable, and brought into the workshop environment.
The pieces are then inspected, measured, joined where necessary, and brought closer to their final thickness.

This is where the pile of raw wood begins its transformation.

Nothing looks much like a guitar yet — but every decision made here affects everything that comes next.


🪚 Step 2: Build and Brace the Soundboard

The soundboard is the vibrating heart of an acoustic guitar.
After the two halves are joined and brought to the proper thickness, the soundhole is cut and the rosette is installed.

Braces are then shaped, fitted, and glued to the inside of the top.
These small pieces of wood must provide enough strength to resist string tension while still allowing the soundboard to move freely.

This is one of the most important balancing acts in the entire build.

The soundboard must be strong enough to survive — but light enough to sing.


🌀 Step 3: Bend the Sides Into Shape

The flat side pieces must be carefully bent into the curves that give the acoustic guitar its familiar shape.
Heat and moisture make the wood flexible enough to bend, but the process still requires patience and control.

Once bent, the sides are placed into a mold to hold their shape.
The neck and tail blocks are then fitted and glued in place, creating the basic framework of the guitar body.

This is one of the first moments when the project truly begins to look like an instrument.

Flat pieces of wood are becoming the outline of a guitar.


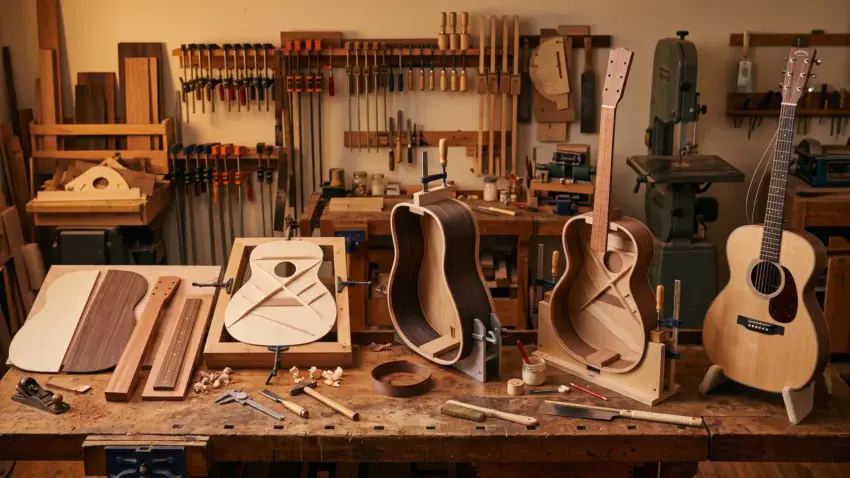
🧱 Step 4: Build the Guitar Body

With the sides held securely in the mold, kerfing is added along the inside edges to create a larger gluing surface for the top and back.
The body structure is carefully leveled and prepared so every part fits together cleanly.

The braced soundboard and back are then glued to the rim assembly, closing the body and creating the guitar’s soundbox.
Once the glue has cured, the excess wood is trimmed away and the edges are cleaned up.

This is a major turning point in the build.

For the first time, you are no longer looking at separate parts — you are holding the body of an acoustic guitar.


🎸 Building the Acoustic Guitar Body


Acoustic guitar body under construction in a mold with a braced soundboard, back, clamps, and hand tools on a rustic workbench.
The build reaches a major turning point when the sides, soundboard, and back come together to form the guitar body.

🎀 Step 5: Add the Binding and Decorative Details

Binding protects the edges of the guitar body while also giving the instrument a clean, finished appearance.
Narrow channels are carefully routed around the top and back before the binding strips are bent, fitted, and glued into place.

This is also where decorative details such as purfling can be added.
The work is precise, and small gaps or uneven joints can be difficult to hide later.

The guitar may still be unfinished, but its personality is beginning to appear.

These small details are where craftsmanship starts becoming character.


🪵 Step 6: Build and Shape the Neck

The neck begins as a solid piece of wood that must be shaped into one of the most important parts of the guitar.
The headstock is formed, the truss rod is installed, and the heel is carefully shaped to fit the body.

The fingerboard is prepared separately before being attached to the neck.
Once everything is joined, the back of the neck is carved and refined until it feels comfortable in the hand.

This stage requires patience because the neck affects both how the guitar plays and how it feels.

A beautiful guitar may catch your eye — but the neck is where your hands decide whether they love it.


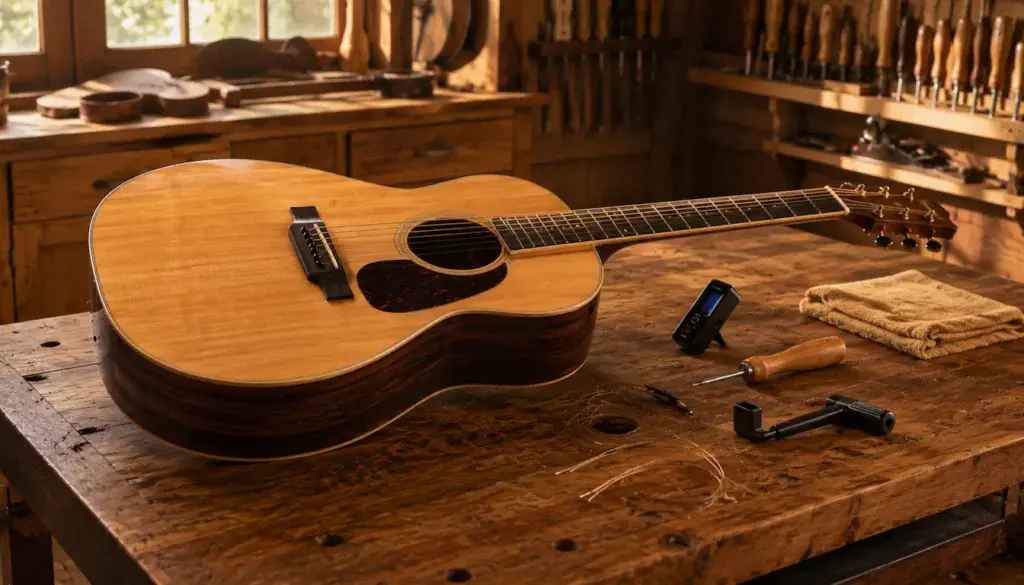
📏 Step 7: Fit the Neck to the Body

The neck must meet the guitar body at exactly the right angle.
Even a small error here can create problems with string height, bridge placement, and the final setup.

The neck joint is carefully fitted and adjusted until the centerline, alignment, and angle are correct.
This may take several rounds of fitting, checking, and removing tiny amounts of wood.

This is not a stage to rush.

A perfectly finished guitar will never play its best if the neck geometry is wrong.


🔨 Step 8: Install and Level the Frets

The frets are installed into the slots in the fingerboard and seated carefully so each one is secure.
Once installed, the fret ends are trimmed and shaped before the entire fretboard is checked for high or uneven spots.

The frets are then leveled, crowned, and polished to create a smooth playing surface.
Precision matters here because even one high fret can cause buzzing or make the finished guitar frustrating to play.

This is where careful woodworking begins turning into careful setup work.

The better the fretwork, the better the guitar will feel when that first chord is finally played.


🌉 Step 9: Make and Position the Bridge

The bridge transfers the vibration of the strings into the soundboard, so its size, shape, and position all matter.
It must be carefully made, fitted to the curve of the guitar top, and located with precise measurements.

Even a small positioning error can affect the guitar’s intonation.
Before the bridge is glued down, the scale length and centerline are checked again and again.

This small piece of wood carries an enormous responsibility.

The bridge is where string energy finally meets the soundboard — and the guitar begins to come alive.


🎨 Step 10: Sand and Finish the Guitar

Before any finish is applied, the entire guitar must be carefully sanded and inspected.
Scratches, glue marks, uneven surfaces, and tiny imperfections that seem harmless now can become much more obvious once the finish goes on.

The finish is then applied in thin, controlled layers and allowed to dry between coats.
Depending on the finishing method, the guitar may need days or even weeks to cure before it can be polished and handled safely.

This is where the raw wood finally reveals its full beauty.

The guitar may look finished — but patience is still part of the building process.


🔧 Step 11: Install the Hardware and Complete the Final Setup

Once the finish has fully cured, the tuners, nut, saddle, bridge pins, and other final hardware can be installed.
The guitar is finally ready for strings — but the build is not quite finished yet.

The nut and saddle are carefully adjusted, the neck relief is checked, and the string height is dialed in until the guitar plays comfortably. Intonation, fret buzz, and overall feel are checked before the setup is complete.

This is where months of woodworking finally become a playable instrument.

The guitar is no longer a project on the workbench — it is ready to make music.


🎶 Step 12: String It Up and Play the First Chord

The strings go on, the guitar is brought carefully up to pitch, and everything you have built is finally placed under real tension.
The neck, bridge, soundboard, and body begin working together for the first time.

There may still be small adjustments to make as the guitar settles in.
But eventually, the moment arrives when you wrap your hand around the neck and play the first chord.

That sound is more than six strings vibrating — it is raw wood, careful work, patience, mistakes, and hundreds of small decisions finally becoming a guitar.


🎸 The Finished Acoustic Guitar


Newly completed handmade acoustic guitar resting on a rustic luthier’s workbench after being strung and set up.
After every cut, joint, adjustment, and hour of waiting, the finished guitar is finally ready for its first chord.

🧭 The Process Is Easier When You See the Whole Road

Looking at a finished acoustic guitar can make the build seem impossibly complicated.
But once you understand the order of the major stages, the project becomes a series of smaller jobs that lead naturally into one another.

You do not need to master every step before you begin.
You only need to understand what comes next, prepare for it, and give that stage the attention it deserves.

  • One piece of wood becomes one part.
  • One part joins another.

And eventually, the pile of raw materials on your workbench becomes an instrument you can actually play.


🛠️ You Will Not Build Every Guitar the Same Way

The exact order of some steps can change depending on the guitar, the neck joint, the finishing method, and whether you are working from a kit or starting with raw wood.
Different builders also develop their own preferred methods as they gain experience.

That does not mean the process is random.

The major stages remain connected, and each one prepares the guitar for what comes next.

Your first build teaches you the process.
Every guitar after that teaches you how to make the process your own.

A kit and a scratch build follow the same basic road — but they do not start at the same place.


👉 Not Sure Which Building Path Fits You Best?
Read Acoustic Guitar Kit or Scratch Build: Which Should You Choose? to see which approach makes the most sense for your first guitar.


🏁 Final Thoughts…

The acoustic guitar building process looks enormous when you see it as one project.
Break it into individual stages, and it becomes a clear path from choosing the first piece of wood to hearing the first chord.

You will measure, cut, shape, glue, sand, wait, adjust, and probably fix a few mistakes along the way.
But every stage moves the guitar closer to becoming something real.

  • Start with the wood in front of you.
  • Build the next part carefully.
  • Then build the next one.

Eventually, you will look down and realize you are holding an acoustic guitar you made with your own hands.


🎸 Your Guitar, Your Build, Your Sound

You don’t need a custom shop or a tech on speed dial.
All you need is a little guidance, some patience, and a place to go that shows you what to do next.

Come on man… You got this.

GuitarCrafts is here to help you along the way.


🎸Craft it. Play it. Own it! 🎸


Leave a Reply Cancel reply

Your email address will not be published. Required fields are marked *

  • Facebook
  • Pinterest
  • YouTube

© 2026 Guitar Crafts | Privacy Policy

© 2026 My Electric Guitar Kits Site | Powered by Superbs Personal Blog theme