Building your first guitar kit is exciting—
until you hit your first
“What the hell do I do now?” moment.
This guide walks you through the
entire build step-by-step,
so, you can go from a box of parts to a
guitar you’re proud to play.
Whether you’ve never touched a soldering iron
or just want a clean, no-stress build process—
this guide keeps things simple and easy to follow.
By the end, you’ll have a
fully playable guitar you built yourself—
and the confidence to keep improving it.
And yeah—
there’s nothing like that first strum on a
guitar you built yourself.
This step-by-step guide walks you through
everything you need to build your first
electric guitar kit—from start to finish.
Here’s what you’ll learn:
- How to prepare your workspace and tools
- How to assemble the body, neck, and hardware
- Basic wiring and electronics
(without getting overwhelmed) - How to set up your guitar so it plays properly
- Common mistakes—and how to avoid them
If you’ve never built a guitar before,
you’re in the right place.
👉 If you’re brand new and wondering
how people even learn this stuff —
this is the platform I used to get started.
👉 This guide is part of my
Electric Guitar Build Guides,
where I walk through the
entire process step-by-step.

🧰 Essential Beginner Tools For Your First Build
Before you start assembling your guitar kit,
having the right tools makes everything easier—
and prevents mistakes.
You don’t need a full workshop to get started.
Just a few reliable tools will make your first build
smoother, faster, and way less frustrating.
These beginner-friendly tools will help you
get it done right the first time.
Skip these — and you’ll feel it during the build.
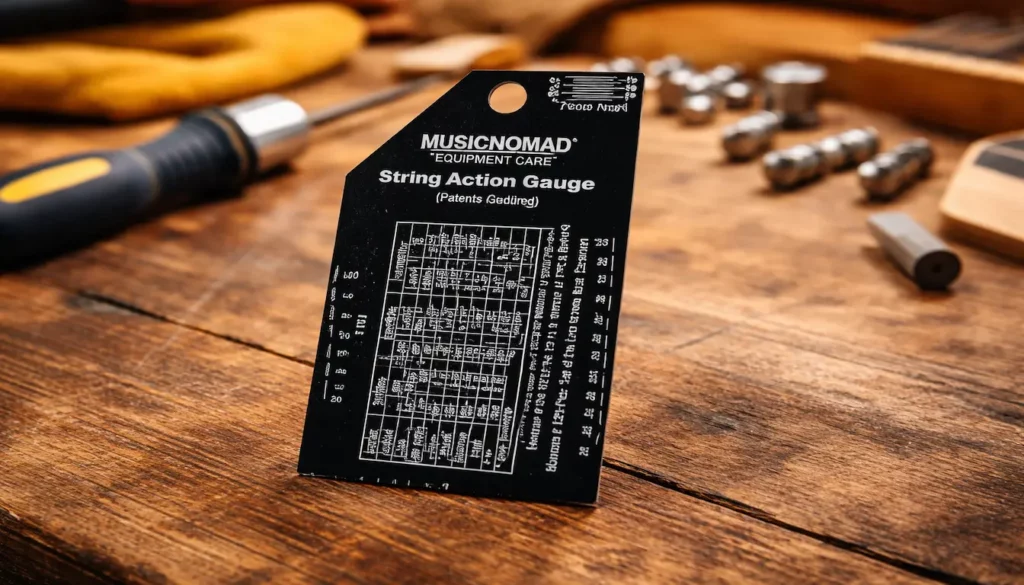
MusicNomad Precision String Action Gauge
A simple but precise tool for
setting your string height correctly.
It helps you dial in your action so your
guitar plays clean, feels comfortable,
and stays consistent across the fretboard.
 Amazon Product Suggestion:
 MusicNomad Precision String Action Gauge Ruler
for String Height- Metric, SAE, 64ths
(MN602)
The MusicNomad MN602 is a simple, accurate tool
for setting your string height correctly.
It takes the guesswork out of action setup
so your guitar plays clean and feels right.
Why It’s Great:
Easy-to-read measurements —
(no guessing)
Works on electric, acoustic, and bass
Built-in setup charts for quick adjustments
Durable stainless steel design
Jivarry Digital Caliper
A precise measuring tool that helps you check
spacing, fit, and alignment throughout your build.
It keeps everything accurate, so parts fit right
the first time.
Amazon Product Suggestion:
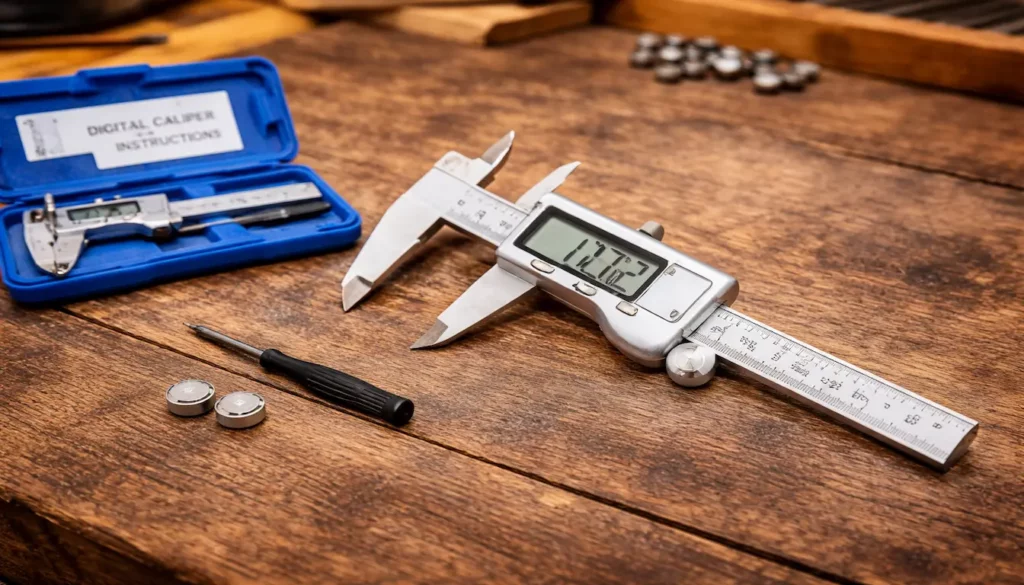
Jivarry Digital Caliper
(Stainless Steel, Large LCD, 6-Inch)
The Jivarry Digital Caliper gives you
quick, accurate measurements for parts
that need to fit just right.
Switching between units makes it easy to work
with different specs during your build.
Why it’s great:
Accurate digital measurements
Easy-to-read LCD display
Measures inside, outside, and depth
Great for precise guitar work
IRWIN QUICK-GRIP 6” One-Handed Mini Bar Clamp Set
A simple tool that holds your parts steady
while you work —
so nothing shifts, slips, or gets misaligned.
Amazon Product Suggestion:
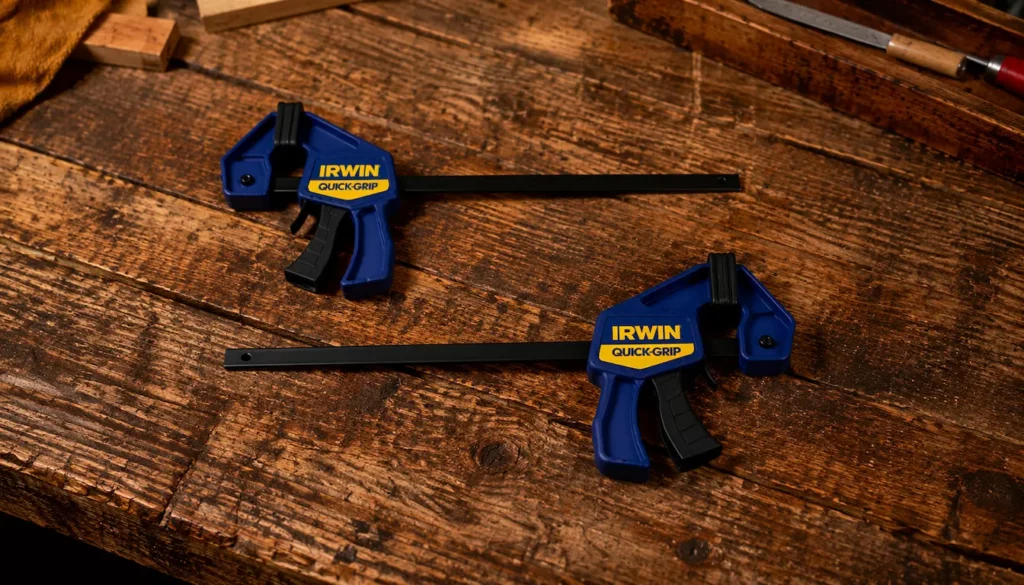
IRWIN QUICK-GRIP 6” One-Handed Mini Bar Clamp Set
(4-Pack)
These IRWIN Quick-Grip clamps make it easy to
secure parts during glue-ups and assembly without needing extra hands.
Quick one-handed operation keeps everything in place while you work.
Why it’s great:
Easy one-handed operation
Strong grip for bodies, necks, and glue-ups
Non-marring pads protect your wood
Compact and easy to use
🔧 Step-by-Step Process for Building Your First Guitar Kit
Now that you’ve got your tools ready,
let’s walk through the build step-by-step.
These are the exact steps I use
when building a new guitar kit—
simple, clean, and beginner-friendly.
🔟 The 10-Step Build Process
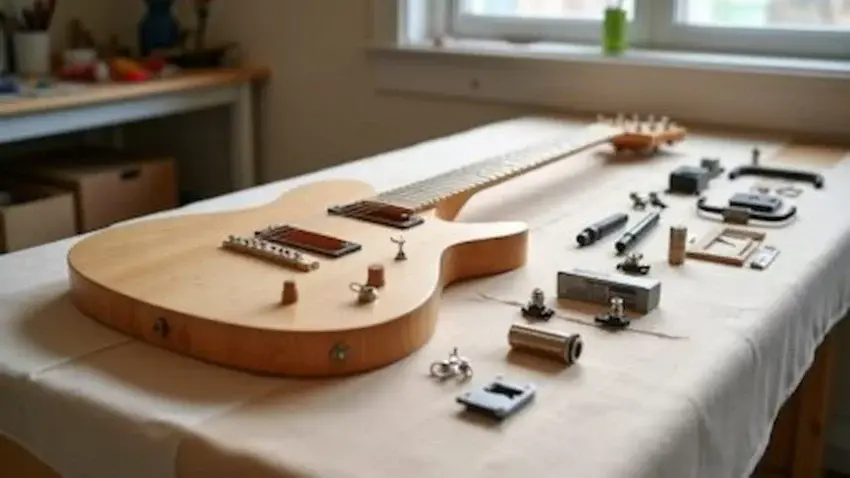
1️⃣ Unbox and Inspect Every Piece
Lay everything out and
check for missing parts or damage.
Catching issues now saves headaches later.
2️⃣ Test-Fit the Neck to the Body
Check how the neck sits
before sanding or finishing.
Fixing a bad fit now is way easier
than later.
3️⃣ Sand the Body (Your First Real Work Session)
Start with 180–220 grit and work up to 400.
Your finish will only look as good as your sanding.
4️⃣ Prep and Finish the Body
Apply thin coats and let each layer fully dry.
Rushing this step causes most finish problems.
5️⃣ Install the Tuning Machines
Install tuners once the neck is ready.
Snug them down — don’t overtighten.
6️⃣ Mount the Bridge
Align it carefully using your scale length.
Bad placement = tuning and intonation problems.
7️⃣ Install the Electronics
Follow your wiring diagram and keep joints clean.
Neat wiring makes future fixes much easier.
8️⃣ Attach the Neck
Tighten screws evenly in a cross pattern.
If it shifts, loosen and realign before finishing.
9️⃣ Add the Pickguard/Hardware and String It Up
Install pickups, bridge parts, and hardware.
Then add your first set of strings.
🔟 Complete the Full Setup
Adjust truss rod, string height, and intonation.
This is where your guitar really comes alive.
🤘 Pro Tips (From the Bench)
👉👉 Measure everything twice
before drilling or soldering.
Mistakes don’t undo easily.
👉👉 Dry-fit all parts
before installing them —
you’ll catch problems way early.
👉👉 Use painter’s tape on the body
when drilling or installing screws to prevent chips.
👉👉 Let finishes cure fully — not just dry.
This makes them harder and more durable.
👉👉 A fresh set of strings
when setting up—it reveals issues more clearly.
👉👉 If the neck fights you during tuning,
loosen the strings and reset the seating.
👉👉 Use calipers often —
spacing mistakes are the #1 beginner issue.
👉👉 Don’t overtighten tuner nuts —
they should be snug, not crushing.
👉👉 Keep your wiring neat —
messy wires create grounding hum.
👉👉 Check intonation last,
after everything else is stable.
👉 Many beginners choose Tele-style kits
for their first build because of their
simple bolt-on neck design and
straightforward electronics.
Learn more in our
Telecaster Style Guitar Guide For DIY Builders.

Final Thoughts…
Building your first electric guitar kit
isn’t just a project—
it’s the moment you go from
someone who plays guitar
to someone who actually builds them.
Once you finish your first build,
you’ll understand your instrument
on a completely different level—
and yeah…
you’ll probably be hooked.
And remember:
every mistake you make now becomes
a skill you keep forever.
Welcome to the luthier’s club. 🤘🎸
What Do You Want To Do Next?
Here’s where to go next:
 If you’re new to guitar kits:
Start with
Essential Tools Every Electric Guitar
Kit Builder Should Have.
If you already own a kit guitar:
Jump into
How To Properly Set Up Your
Electric Guitar Kit For Intonation
or
Fixing Common Problems:
Buzzing And Dead Frets.
If you want to improve your tone:
Head to
Understanding Humbucker
Vs Single Coil Pickups In Kits
or
Playing With Tone Controls:
Tips For Electric Guitar Kits
and start experimenting.
Your Guitar, Your Build, Your Sound
You don’t need a custom shop or a tech on speed dial.
All you need is a little guidance, some patience,
and a place to go that shows you what to do next.
Come on man… You got this.
 Craft it. Play it. Own it!
What a fantastic and encouraging walkthrough! Your step-by-step guide truly demystifies the process of building your first electric guitar kit. I love how you break it down into clear, approachable stages—from understanding what comes in the kit, to adding your own creative finishing touches, to soldering the electronics, and finally dialing in the setup. The honesty about costs is refreshing, too—you highlight that the real value lies in learning new skills and building a guitar you’ll cherish, not just saving money. It’s also great that you emphasize the importance of patience—especially during sanding and setup—to ensure the final instrument looks and plays beautifully. I’d love to ask: for someone who’s never done any woodworking or soldering, which step do you think beginners most often underestimate in terms of time or effort?
Thanks so much for the kind words! I’m glad the guide made the process feel a bit less intimidating.
It’s all about breaking it down into manageable steps.
For absolute beginners, the step that’s most often underestimated is the finishing process, especially sanding. It seems straightforward at first—just smooth things out and move on—but getting that perfect surface takes way more patience than most expect. Rushing here can lead to visible scratches, uneven stain, or a finish that doesn’t quite “pop.” I always tell people: the sanding stage is where you set the stage for everything else. Take your time, and your guitar will thank you every time you pick it up.
Thanks again,
~Wayne
This is such a clear and encouraging guide! I like how you break the whole process into manageable steps and reassure beginners that patience is key, especially with sanding, wiring, and setup. It really takes the intimidation factor out of building a first guitar kit.
Quick question: if you were recommending a first build for an absolute beginner, would you suggest starting with the simplest bolt-on style kit, or is it worth tackling a slightly more advanced set-neck kit right away for the experience?
Thank you! I’m glad the guide helped make the process feel more approachable. For an absolute beginner, I usually recommend starting with a simple bolt-on style kit. It’s easier to assemble, troubleshoot, and get playable quickly. A set-neck kit can be rewarding, but it’s more challenging and leaves less room for mistakes, which can be frustrating for a first build.
Starting simple builds confidence and skills, and once you’re comfortable, moving on to a set-neck kit becomes a much more enjoyable experience.
Thanks again,
~Wayne
The look on the face of the person who is given a hand built guitar is priceless, it’s a gift that can last a lifetime as can the memory. It is reward for all the hard work!
Thanks, Barry.
You’re absolutely right.
A hand-built guitar carries a lot more than just strings and wood —
it carries the time, patience, and pride that went into making it.
Seeing someone light up when they receive one makes all the effort worth it.
That’s part of what makes building guitars so rewarding. 🎸
Thanks again,
~ Wayne