
If you’re thinking about building an electric guitar from a kit, having the right tools will save you a lot of frustration and help you enjoy the process more. A solid set of tools doesn’t just make things easier; it helps you get much better results. In this guide on the Essential Tools Needed For Building An Electric Guitar Kit, I’ll walk you through the gear you’ll want on hand for assembling, setting up, and finishing your first electric guitar build.

Understanding What Goes into Building an Electric Guitar Kit
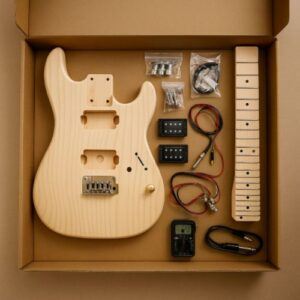
Building an electric guitar kit is a hands-on project that brings together woodworking, electronics, and plenty of patience. Each kit is a little different, but most require you to attach the neck, connect pickups and electronics, add the hardware, and set it up for smooth playability. Some kits need a good amount of sanding and finishing before the actual assembly. This means the tool list covers a wide range, from basic screwdrivers to soldering irons and sandpaper.
You’ll want to get familiar with terms like “action,” which is how high the strings are off the fretboard, and “intonation,” which has to do with playing in tune up and down the neck. Understanding these early can make picking your tools a lot easier and help with setup down the line.
** Here’s a little transparency: Our website contains affiliate links. This means if you click and make a purchase, we may receive a small commission. Don’t worry, there’s no extra cost to you. It’s a simple way you can support our mission to bring you quality content.**
As an Amazon Associate, I earn from qualifying purchases.
Basic Tools Needed for Building an Electric Guitar Kit
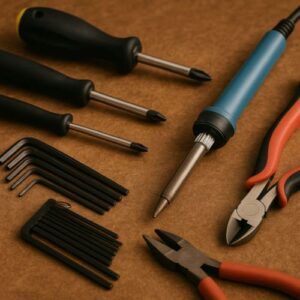
The essential tools can be split into a few main categories: tools for assembly, tools for wiring, and tools for final setup and adjustment once everything is put together. Here’s a breakdown of each group, along with why each tool matters:
- Screwdrivers (Phillips and flathead): Needed for pretty much every step, from mounting tuners to securing the pickguard and adjusting hardware.
- Allen (hex) wrenches: Used for adjusting truss rods and sometimes bridge pieces. Most guitar kits specify the size needed.
- Wire cutters/strippers: Used for dealing with pickup wires and electronics neatly. Clean wiring leads to fewer issues later on.
- Soldering iron and solder: Most kits ask you to connect pickups, pots, and switches, and a solid soldering iron makes the job much tidier and more reliable.
- Small adjustable wrench: Handy for tightening nuts on tuning machines, output jacks, and sometimes bridge posts.
- Sandpaper (various grits): Great for smoothing rough edges and prepping the body and neck or prepping for a finish.
- Clamps (optional but helpful): Useful if your neck needs gluing and to hold work securely while sanding or adjusting parts.
- Measuring tape and ruler: These help get pickup placement, bridge mounting, and neck settings just right, which is key for playability and sound.
- Painters or masking tape: Useful for protecting areas while finishing or keeping components organized during the build.
Extra Tools for a Cleaner Build

While the basic gear will get you through most jobs, a few extra tools are worth having for a more polished finish or to handle tricky steps without frustration. Here’s what I keep nearby for every build:
- Nut files or needle files: These shape the nut slots for smooth tuning and eliminate annoying string buzz. Guitar specific nut files work best, but needle files are a budget option for beginners.
- Fret crowning tool and fret rocker: If your kit comes with rough or uneven frets, these tools help level, crown, and smooth them out for clean playability.
- Multimeter: This is super useful for checking solder joints, making sure pickups work, and tracking down electrical gremlins before they drive you crazy later.
- Small brush or vacuum: Keeps sawdust and debris off electronics and helps maintain a clean workspace.
- Drill (with bits): Some kits require new holes for mounting hardware or strap buttons. Drilling pilot holes helps keep wood from splitting.
Tools Needed for Electric Guitar Setup
Building a guitar is only half the process. Making it play and sound good calls for a proper setup. Guitar setup tools overlap with the building tools, but here are the key ones you’ll use:
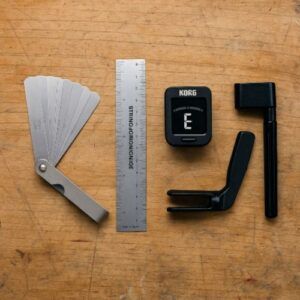
- Feeler gauges: Useful for checking and adjusting string height (action) and truss rod relief.
- String action gauge: Measuring string height is super easy at different points on the fretboard with one of these.
- String winder and wire cutters: Changing and adjusting strings goes much faster thanks to these helpers.
- Electronic tuner: Keeping things in tune during all the adjustments is essential.
- Luthiers’ straightedge: Lets you check and set neck relief and fret levelness for proper playability.
- Nut lubricant or graphite: Use these on nut slots and string trees to give a boost to tuning stability.
What Equipment Do You Need for an Electric Guitar?
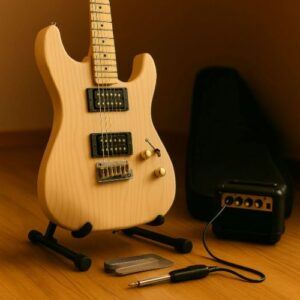
Once your kit is built and set up, there’s some other equipment that will make playing and maintaining your guitar much more fun:
- Guitar amp: Even basic practice amps get you going. Headphones can be plugged into some amps for quiet practice at home.
- Cable: A simple instrument cable lets you plug in and play. Pick a shielded one to avoid unwanted buzz.
- Guitar stand or wall hanger: Great for keeping your guitar safe between sessions; helps prevent accidents.
- Carry case or gig bag: Best for bringing your guitar places or storing it when not in use.
- Extra strings and picks: Strings break and picks always seem to disappear, so it’s handy to have extras.
- Polishing cloth: Helps keep your instrument looking sharp after finishing and every time you play.
Is It Cheaper to Build Your Own Electric Guitar?
This is a big question for most beginners. If you already own the tools or plan to build more guitars, building from a kit can be an affordable way to get a custom instrument. The base cost of a guitar kit is usually less than buying a finished guitar of similar quality. But once you add in tools, finishing supplies (such as paint or lacquer), and any upgrades, it can balance out.
The rewarding part is how much you learn about your instrument along the way, and you get to make every decision, from color and finish to pickups and hardware. Most builders find that, especially for their first project, the value comes in the experience, not just in money saved. If you like DIY projects and are careful about spending, you can absolutely build a solid electric guitar on a tight budget.
Common Challenges (And Handy Solutions) When Building Guitar Kits

No project goes perfectly smooth, especially the first one. Here are a few real-world things you might run into, along with some advice on solving them:
- Tuning or action problems: Check neck installation and bridge placement with accurate rulers and tape measures. Always take your time with setup tools and measurements.
- Electronics not working: A multimeter can spot loose solder points quickly. Always keep an eye out for cold solder joints and loose wires — fixing these early makes life easier.
- Finish issues (drips, bumps): Sandpaper, a tack cloth, and plenty of patience fix most problems. Build color and clear coats slowly for best results.
- Hardware mix-ups: I always store small parts in labeled containers during each build phase, so nothing gets lost.
Advanced Tips for a Slicker Build

After you’ve tackled your first few kits, you’ll probably want your next guitars to play even smoother—like something straight off the rack at your favorite music shop. Some extra steps and skills can really take your builds up a notch:
- Shielding paint or copper tape: Adding this inside control cavities and pickup areas cuts down on noise and hum — huge for quiet, clear tone.
- Polishing frets: Use superfine steel wool or a polish attachment on your Dremel (with the fretboard taped for protection) for smoother bends and slides.
- Custom inlays or decals: Personalize your guitar with stick-on inlays or water slide decals on the headstock or fretboard — this can really make your guitar stand out.
- Experiment with electronics: Swapping pots, capacitors, and pickups lets you tailor your sound exactly how you want.
Frequently Asked Questions About Guitar Kit Tools & Building
What tools do I need to build an electric guitar?
Screwdrivers, Allen wrenches, wire cutters and strippers, a soldering iron, sandpaper, wrench, drill, and clamps cover most builders’ needs. Nut files, fret tools, and feeler gauges help with advanced setup.
What tools do you need to set up an electric guitar?
A string action gauge, feeler gauges, Allen wrenches, screwdrivers, tuner, and string winder are helpful for setup after assembly.
What equipment do I need for an electric guitar?
Besides the guitar itself, you’ll want an amp, cable, stand, gig bag, extra strings, picks, and a polishing cloth for a smoother experience.
Is it cheaper to build your own electric guitar?
If you already have (or can borrow) the tools, building one can be smart and a fun learning adventure. Just be sure to count all costs—kit, finishing supplies, and any extra parts—so you’re not caught by surprise.
Final thoughts…
Building an electric guitar kit is one of those projects where the right tools don’t just make the job easier — they make the whole experience more enjoyable and the final result more rewarding. With a solid toolkit, some patience, and a willingness to learn as you go, you’ll not only end up with a playable guitar, but also the confidence to tackle future upgrades like adding a tremolo system to your electric guitar kit or using tone pots and capacitors to sculpt your sound. And if you’re aiming for that perfect playability, knowing how to properly set up your electric guitar kit for intonation will ensure your build feels and sounds just right. At the end of the day, the tools are an investment in both your instrument and your growth as a builder, helping you create a guitar that truly feels like your own.

There are 100’s of ways you can build a business around your passion for guitar building.
Check it out…

This is such a clear and practical guide to assembling the essential toolkit for building an electric guitar from a kit. What stands out most is how you strike a balance between must-have basics—like a soldering iron, drill or screwdriver, clamps, and a saw—and the optional upgrades that can streamline the build, such as precision rulers, steel straightedges, or cozy workspace setups. I especially liked how you emphasize the value of accuracy and protecting the hardware during installation—those small touches can make setup smoother and the final product feel truly polished. Your tips feel approachable for anyone taking on their first build. I’d be curious—what tool have you found newcomers tend to underestimate in its importance, only to wish they’d had it on hand later?
Thanks so much! I’m really glad the guide came across as approachable. Getting the right tools from the start can make the whole process feel a lot less intimidating.
One tool I’ve seen many first-time builders underestimate is a good set of feeler gauges. They’re inexpensive, but they make a world of difference when it comes to dialing in neck relief, string height, and even pickup clearance. Without them, you’re mostly eyeballing adjustments—and that can lead to chasing your tail trying to fix action or buzzing issues later. Once builders try them, they usually say, “I can’t believe I didn’t get these sooner!”
The article “Essential Tools Needed For Building An Electric Guitar Kit” is a highly practical and useful guide for beginners. It goes beyond simply listing tools and provides a logical breakdown of what is needed for each stage of the build, from basic assembly to the final setup. The explanations of key terms like “action” and “intonation” are especially helpful, as they empower the reader with the knowledge required to not just build, but also properly set up their instrument. The guide successfully manages to be both comprehensive and encouraging, which is crucial for a project that can seem daunting to a first-timer.
Beyond the tools, are there any specific types of glue, clamps, or finishes that you have found to be particularly effective for working with guitar kit materials, and why?
Thank you so much! I’m glad the guide came across as both practical and encouraging. Building a guitar kit for the first time can definitely feel intimidating. Regarding glue, clamps, and finishes: for most kit builds, Titebond Original wood glue works great for assembling wood components because it’s strong, dries clear, and is easy to clean up. Spring clamps and small bar clamps are ideal for holding parts together without crushing delicate pieces. For finishes, nitrocellulose lacquer gives that classic look and feel, while water-based poly is easier for beginners and less fussy to apply.
Each choice balances ease of use with professional results, depending on your comfort level and desired final look.
Thanks again,
~Wayne