
If you’re putting serious mileage on your axe, chances are you’ve wondered whether your frets can keep up. Refretting your electric guitar kit: when and how to do it isn’t just a question of maintenance—it’s a vital part of protecting your tone, tuning, and playability. Whether you’re dealing with fret buzz, deep grooves, or tuning issues that just won’t quit, this guide will walk you through how to spot fret issues, when to dress vs. refret, and exactly how to do it right at home.

Identifying the Need: When Should You Refret Your Electric Guitar?
Before you break out the fret pullers, it’s essential to determine whether your guitar really needs a full refret. Here are the most common signs:
1. Fret Buzz That Won’t Go Away
Even after adjusting your truss rod for neck relief or pickup height, if buzz persists across multiple frets, it may be due to worn frets that no longer maintain even height or shape.

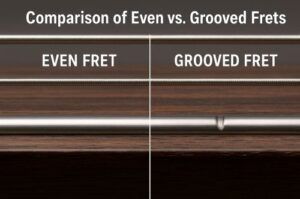
2. Visible Wear and Grooving
Inspect your fretboard under good lighting. Deep indentations—especially under the G and B strings—can cause uneven contact, leading to dull notes and poor sustain.
3. Compromised Tuning Stability
When frets are flattened or misshapen, the strings don’t land where they should. This can subtly affect intonation and make accurate tuning harder to maintain.

** Here’s a little transparency: Our website contains affiliate links. This means if you click and make a purchase, we may receive a small commission. Don’t worry, there’s no extra cost to you. It’s a simple way you can support our mission to bring you quality content. **
As an Amazon Associate, I earn from qualifying purchases.
Understanding Your Playing Style and Fret Longevity
Are you a heavy-handed bender? Do you grip the neck like it owes you money? Your playing habits play a big role in fret wear. Aggressive styles wear out frets faster, especially if you frequently bend strings or play higher up the neck.

Fret Material Matters
Stainless steel frets last longer than traditional nickel-silver, but they’re harder to work with. If you’re building your own electric guitar kit, your fret material choice could save you years of maintenance down the road.

Gauging Fret Health: When Is Dressing the Right Option?
What Is Fret Dressing?
Fret dressing is the process of leveling, crowning, and polishing your existing frets. It’s ideal for minor wear and early signs of grooving. Think of it as a tune-up, not an overhaul.

When to Dress vs. Refret
You can get away with dressing if:
- The grooves are shallow
- Buzz is limited to a few frets
- There’s still enough fret height left to re-shape
If frets are too flat or worn down to crown effectively, a full refret is the smarter move.
The Role of Fret Leveling
Fret leveling can extend the life of your fretboard significantly. By filing down high frets and re-crowning them, you restore uniform height and playability. For best results, incorporate fret leveling into your routine setup process.
A DIY Guide: Essential Tools for Refretting Your Guitar
Refretting isn’t a job for a butter knife and duct tape. Here’s what you need:
Must-Have Refretting Tools:
- Fret pullers (flush ground for clean removal)
- Fret slot cleaning tool
- Radius gauge
- Fret press or hammer
- Leveling beam
- Crowning file
- Sandpaper (various grits)
- Fret end dressing file
- Masking tape and fretboard guards

Using Tools Safely and Precisely
Take your time. Use essential luthier tools like a leveling beam to ensure accuracy. Avoid rushing fret removal to prevent chip-out on the fretboard wood.

Why Quality Tools Matter
Cheap tools can damage your neck or leave you with uneven frets. Investing in a solid tool kit will also serve you well for other tasks like pickup installation and wiring.
Step-by-Step Process: How to Replace Worn-Out Frets
Ready to dive in? Follow these steps to bring your fretboard back to life:
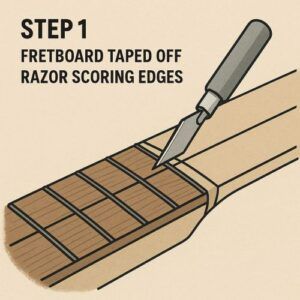
1. Prep and Protect
- Remove the strings and tape off the fretboard
- Score the edges of each fret with a razor to prevent chip-out
- Heat the frets slightly with a soldering iron to loosen glue
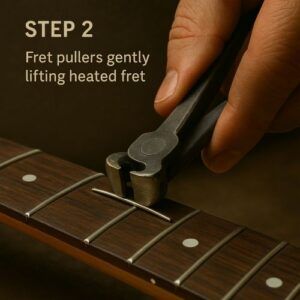
2. Remove Old Frets
- Use fret pullers to gently rock the frets out
- Clean the fret slots thoroughly
3. Install New Frets
- Cut new fretwire to length and pre-bend to match fretboard radius
- Tap or press them in securely
- Use thin superglue or wood glue if needed for extra hold

4. Level and Crown
- Use a leveling beam to file all frets flat
- Re-crown using a dedicated file to restore rounded tops
- Sand and polish to a mirror finish

5. Final Setup
- Reinstall strings
- Adjust truss rod, bridge, and nut height
- Check intonation and tuning

Knowledge is Power: Regular Maintenance and Care Tips
Once your frets are shiny and smooth, keep them that way with regular care:
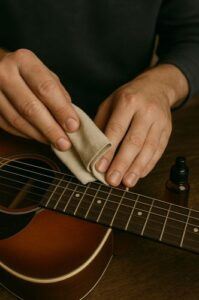
Preventative Maintenance
- Wipe down your strings after each session
- Avoid storing your guitar in high humidity or direct sunlight
- Do a basic setup every few months
Spot Trouble Early
Watch for string indentations, buzzing, or changes in action height. Catching issues early can mean the difference between a quick dress and a full-blown refret.

Smart Playing and Gear Choices
Use coated or lighter-gauge strings to reduce wear. If you’re customizing your kit, consider pairing a tone-friendly wood with medium jumbo or stainless steel frets for added longevity.

Final Thoughts…
Refretting your electric guitar kit is a rewarding challenge that puts you in control of your instrument’s tone and playability. Whether you’re fixing up your first build or reviving a road-worn favorite, knowing when and how to refret can save your guitar—and your fingers—from a frustrating fate.

For more DIY guides and guitar-building know-how, check out our complete guitar kit assembly section and keep that fretboard fresh!
There are 100’s of ways you can build a business around your passion for guitar building.
Check it out…

What a valuable and detailed guide! It’s clear that knowing when to dress versus refret your guitar makes a world of difference in both sound and playability. I appreciate how you highlight the key signs—persistent fret buzz even after adjusting the truss rod, visible grooves under commonly used strings like G and B, and tuning instability due to flattened fret heights. And calling out that playing style makes a real impact—those who bend aggressively or dig in hard can burn through frets faster, especially if the material is nickel-silver rather than longer-lasting stainless. Your explanation really clarifies why a simple fret dressing isn’t always enough, and when a full refret becomes the smarter long-term choice.
Thanks so much! I’m really glad the guide helped make that distinction clearer, because a lot of players don’t realize how much those small fret issues can snowball into bigger playability problems. Playing style is definitely a huge factor, and I’ve seen plenty of cases where aggressive bending or heavy picking just eats through frets faster than people expect. That’s why keeping an eye on both the feel and the sound is so important. It’s not just about getting rid of buzz but about keeping your guitar responsive and fun to play for years to come.
Thank you again,
~Wayne
The fret wear checklist—especially the “buzzing past the 12th fret” test—saves beginners from unnecessary refrets. Your nickel vs. stainless steel comparison explains why some players swear by the extra cost.
The soldering tip for lifting fretboard binding is clutch. Have you found certain fretwire brands (like Jescar or Dunlop) more forgiving for first-timers? The step on leveling before crowning proves why this isn’t just a swap but a precision job.
Thanks! I’m glad the checklist and tips came in handy—those simple tests can really save a lot of time and frustration.
As for fretwire, Jescar tends to be a bit more beginner-friendly since it’s slightly softer and easier to work with when leveling and crowning, while Dunlop stainless is tougher and holds up longer but can be a bit less forgiving for first-timers. Either way, taking the time to level and crown properly makes a huge difference.
It’s definitely more of a precision job than just swapping in new wire.
Thanks again,
~Wayne