
If you’re building your first electric guitar kit, getting the wiring right is a game-changer for tone, noise reduction, and the life of your gear. I remember my first guitar build — it looked cool, but major hum and weak output made me realize how much wiring affects the final result. Whether you’re totally new or just want to do things the right way this time, this guide to wiring your electric guitar kit for optimal performance brings together everything I’ve learned and researched to help you get the best possible sound from your build.
Understanding Your Electric Guitar Kit: What’s in the Box?
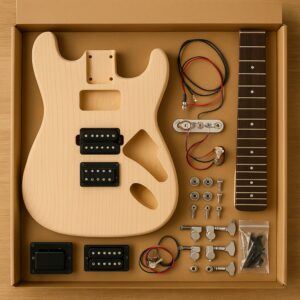
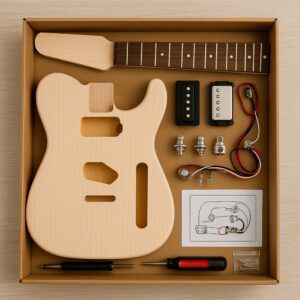
Every electric guitar kit varies a bit, but most come with a body, neck, pickups, tuners, bridge hardware, and a simple wiring harness or bag of electronic components. Expect to see:
- Pickups: These are the heart of your guitar’s voice. They’ll usually be single coil, humbucker, or a mix.
For help picking the right style, see our Best Pickups For Your Electric Guitar Kit: Choosing The Right Tone.
- Pots (Potentiometers): Control your volume and tone.
For more on dialing in tone, explore Using Tone Pots And Capacitors To Sculpt Your Sound.
- Capacitors: Affect how your tone control cuts highs.
- Switches: Let you choose which pickups are active.
- Jack: Where your cable plugs in to reach the amp.
- Wires & Screws: For all your crucial (but tiny) connections.
I always check my kit contents before starting. Sometimes small items get missed at the factory. Comparing the pieces on hand with the kit manual or website helps spot any missing parts early so you’re not stuck halfway through.
** Here’s a little transparency: Our website contains affiliate links. This means if you click and make a purchase, we may receive a small commission. Don’t worry, there’s no extra cost to you. It’s a simple way you can support our mission to bring you quality content.**
As an Amazon Associate, I earn from qualifying purchases.
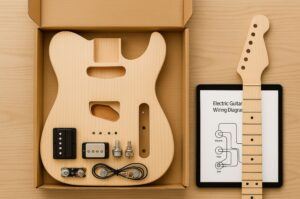
Electric Guitar Wiring Diagrams: Why You Really Need One
A guitar wiring diagram is basically a roadmap for connecting all those wires, pots, and pickups. If you’re doing this for the first time, diagrams save you a ton of confusion. Popular wiring styles like Strat, Tele, or Les Paul have their own diagrams. I always start by searching “[Model Name] guitar wiring diagram.” For custom setups, websites like Seymour Duncan and Guitar Electronics offer all kinds of layouts.
If you’re unsure which style best fits your pickups, check out Understanding Humbucker Vs Single Coil Pickups In Kits.
Going by the diagram, double-check the locations for each solder joint and the type of wire needed. Print out your chosen diagram or keep it on a tablet nearby as you work. It’s way easier than flipping through your phone with messy hands.
Electric Guitar Setup Guide: Tools You’ll Want Close By
Wiring a guitar isn’t that tough, but having the right tools makes it way less frustrating. Here’s what I use every time:
- Soldering iron: A 30–40 watt one does the trick for most jobs.
- Solder (rosin core): Don’t use plumbing solder. It adds noise and corrosion.
- Wire strippers and cutters: For prepping the wires.
- Small Phillips screwdriver: For pickguard screws and electronics cavities.
- Small flathead screwdriver: Sometimes handy for switches.
- Multimeter (optional but pretty handy): Helps test continuity if things don’t work first try.
These tools are all pretty affordable and are also useful for future guitar adjustments. For a full breakdown, see Essential Tools Every Electric Guitar Kit Builder Should Have.
The All-in-One Guitar Setup Guide: Wiring Steps from Start to Finish
Here’s how I’ve learned to wire up a guitar kit for awesome results. Don’t rush, and be patient with each step. Mistakes are super common, even for experienced builders.
1. Dry Fit Everything
Before soldering anything, test fit all parts in your guitar body. That includes pickups, pots, jack, and switches. Make sure everything fits without binding or stress. This also helps map out where your wires will run so you don’t cut anything too short.

2. Mount the Hardware
Install the pots, switch, and jack into their holes. I like to do this first because it stabilizes everything when it’s time to solder.

3. Lay Out Your Wires
Most kits come with precut wires, but I’ve found it’s better to custom cut lengths as you go. Measure the distance from each connection and cut with about an extra inch for wiggle room. Strip about 1/8 inch of the insulation from the end of each wire for clean solder joints.

4. Solder Connections
Carefully follow your wiring diagram, soldering each wire to its post or lug. A few tips that help me avoid frustration:
- Tin each wire first by melting a small amount of solder onto it before attaching to a lug.
- Heat both the lug and the wire, then apply the solder to the connection (not straight to your iron).
- Take breaks, so you don’t cook your pots or switches.
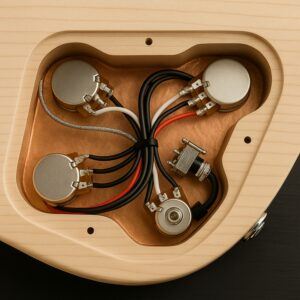
5. Ground Everything
Good grounding keeps hum to a minimum. Usually, you’ll run a ground wire from the volume pot casing to the output jack sleeve and the bridge. Check that all backings of the pots are connected with a bare wire or solder. Some folks also line their electronics cavity with copper tape for extra shielding if you want to go the extra mile.

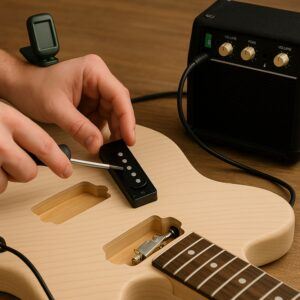
6. Test Your Wiring
Before putting strings on, plug the guitar into an amp and gently tap each pickup pole piece with a metal object (like a screwdriver) while switching through all positions. You should hear a little pop each time the pickup is selected. If nothing works, double-check your wiring against the diagram and look for any cold solder joints or missed grounds.
7. Final Assembly
Once everything’s working, secure wires inside, install any shielding covers or backplates, and tidy up any loose bits with a zip tie or tape if needed. Now you’re set to string up and move to final setup.
How to Set Up an Electric Guitar for Beginners
Good wiring is key, but proper setup gives your guitar that professional feel. Setting up a guitar isn’t just for guitar techs, either — most folks can do it with a little patience. Here are the main steps I always follow:
- Install and stretch new strings: Tune up and gently pull each string to remove slack.
- Adjust the truss rod: Small tweaks affect neck relief, which helps keep the guitar comfortable to play. Turn slowly and check often.
Our How To Adjust Truss Rod For Neck Relief In Guitar Kits guide can help.
- Set your action: Use the bridge saddles or tune-o-matic posts to adjust string height so it’s comfy without buzzing.
See How To Properly Set Up Your Electric Guitar Kit For Intonation.
- Intonate the bridge: This keeps notes in tune up and down the neck. Use an electronic tuner and match the 12th fret harmonic to the fretted 12th note.
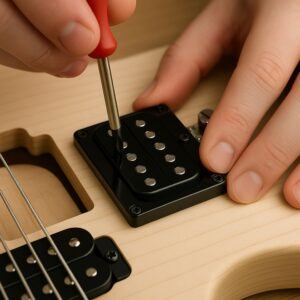
- Set pickup height: Try starting at 1/8 inch from the bottom of the string to the top of the pickup, then adjust for your taste in tone and output.
Learn more in Adjusting Pickup Height For Optimal Sound On Your Guitar.
This general setup works for most electric guitars, but your kit instructions or model diagram might have specific suggestions, especially around bridge types.
Using Guitar Wiring Diagrams: A Quick Reference
Wiring diagrams for popular models make guitar projects approachable, even for total beginners. If you’re curious about expanding your wiring options later, check out my picks for beginner friendly diagrams:
- Stratocaster SSS: Three single coils, five-way switch. Super classic, very versatile.
- Telecaster SS: Two single coil pickups with a three-way switch. Great if you like twang or country sounds.
- Les Paul HH: Two humbuckers with a three-way toggle. Warm, powerful tone, especially good for rock.
- HSH or HSS: Hybrid options for players who like a bit of everything.
Websites like Seymour Duncan have a library of diagrams for more advanced or unique combinations if you want to mod or upgrade later.
How to Set Up Electric Guitar with Amp
After your wiring and setup are done, it’s time to plug in and start playing. Here’s my full speed checklist for that classic first plugin moment:
- Make sure your volume and tone knobs are up, and amp volume is low.
- Check for hum and buzz with your hands off, then on the strings (grounding works if the noise quiets when you touch the strings).
- Test each pickup and switch position to hear the difference.
- Tweak your amp and pedals, then dial back your guitar’s volume knob for cleaner tones or roll it up for crunch. Tone controls help you shape highs and lows for your room or track.
Guitar Setup for Beginners: Troubleshooting and Tips
Sometimes things don’t work the first time. A few checks make problem-solving easier:
- All solder joints look shiny and are free of blobs or bridges.
- Ground wires are attached to the back of pots, jack sleeve, and bridge.
- Switch positions feel crisp and aren’t scratchy.
- Volume and tone controls work smoothly without static or popping. For more tone-shaping advice, see Playing With Tone Controls: Tips For Electric Guitar Kits.
- An annoying buzz could mean a ground loop. Double-check all grounds and look for loose wire ends.

If you get stuck, searching model specific forums is super useful. A lot of guitar builders share their fixes and mods for trickier kits, and sometimes even post step-by-step photos. Reading other people’s solutions can save you hours of frustration, and sometimes you stumble upon tweaks you would have never thought of. If you’re still having issues, don’t hesitate to ask for advice in these communities.
Our Troubleshooting Common Issues During Electric Guitar Kit Assembly will walk you through fixes step by step.
Frequently Asked Questions About Electric Guitar Kit Wiring
Q: Can I wire my guitar without soldering?
A: Some kits use push connectors now, but soldering gives you the best results and reliability long term.
If you’re considering it, see Tools Needed For Building An Electric Guitar Kit.
Q: What gauge wire should I use?
A: 22gauge stranded wire is standard for most electric guitars, and it’s flexible enough to fit easily in tight spots.
Q: Why is my guitar buzzing after wiring?
A: Check your grounds and make sure no wires are touching where they shouldn’t be. Adding shielding paint or copper tape can help.
Wrapping it up…
Building an electric guitar is all about attention to detail but also enjoying the process. Each step you take — especially proper wiring — pays off every time you play or tweak your tone. There’s a lot to learn. With a wiring diagram, a few basic tools, and a little patience, you can make a guitar you’re really proud of. Whether it’s your first guitar or your fifth, don’t be afraid to experiment and check out new wiring ideas. That’s half the fun and it helps you grow as a builder and a musician.

There are 100’s of ways you can build a business around your passion for guitar building.
Check it out…

Hey a great post you have here!
Though I currently do not own a guitar, I have been wanting to purchase one for a while. I had look at a few that tickle my fancy but not acted on it since I am not totally aware of the types of guitars as well as how they work, unlike a piano.
This post of yours provides a great detail about electric guitars.
Thanks again and have a great day!
Thanks so much for the kind words! I’m glad the post gave you a clearer picture of electric guitars and how they work. It’s always exciting when you’re at that “thinking about getting one” stage—there’s a whole world of sounds and styles waiting to be explored. Whether you go for your first guitar tomorrow or down the road, the more you learn now, the more confident you’ll feel when you pick the right one. Wishing you all the best on your guitar journey!
~Wayne
This guide is absolutely invaluable—getting the wiring right truly is the difference between just a guitar that looks good and one that sounds incredible and plays like it. I especially appreciate how you emphasize not just the technical side (clean solder joints, solid grounding, following wiring diagrams), but also the tonal benefits—like minimizing hum, preserving signal strength, and enhancing overall clarity. It’s clear that wiring is as central to performance as pickups or finish. Your writing always hits the perfect balance between friendly encouragement and experienced insight, which is why I keep coming back. For builders curious about advanced wiring down the road, do you find it’s easier to plan for options like coil-splitting or phase switching upfront, or wait and retrofit later as needs evolve? And have you noticed any particular part of the wiring process that seems simple but most beginners tend to overlook?
I really appreciate your kind words! You’re absolutely right, wiring can be the make-or-break difference between a guitar that just looks nice and one that really sings when you plug it in.
For the advanced stuff like coil-splitting or phase switching, I usually recommend planning for it upfront if you can. Even if you don’t add those features right away, picking parts that support them means you’re set up for an easy upgrade later without having to tear everything apart. Retrofitting is fine, but it can turn into more of a project than you expect.
One thing I see beginners overlook all the time is simple wire management. Keeping wires neat, trimmed to the right length, and secured so they don’t move around makes a huge difference. It not only keeps noise down but also makes future upgrades or repairs way less of a headache.