
Electric guitars are more than just tools for making music — they’re canvases for self-expression. If you’re looking to make your instrument truly your own, customizing your electric guitar kit with unique fretboard inlays is a powerful way to combine artistry with functionality. From simple dot markers to elaborate designs that reflect your personal style, fretboard inlays can enhance both the visual appeal and playability of your guitar. In this post, we’ll explore the fundamentals of fretboard inlays, how to plan and execute custom designs, and how these small details can transform your guitar into a one-of-a-kind instrument.

** Here’s a little transparency: Our website contains affiliate links. This means if you click and make a purchase, we may receive a small commission. Don’t worry, there’s no extra cost to you. It’s a simple way you can support our mission to bring you quality content.**
As an Amazon Associate, I earn from qualifying purchases.
Understanding Electric Guitar Fretboard Inlays
Definition and Purpose of Fretboard Inlays
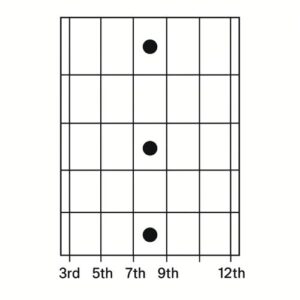
Fretboard inlays are markers embedded into the fretboard, typically at key positions like the 3rd, 5th, 7th, 9th, and 12th frets. Their primary role is to guide players visually, helping with navigation during performances or practice — especially under stage lights or during fast movements.
Historical Significance in Guitar Design
Inlays have been a part of guitar design for over a century. Initially used purely for utility, they evolved into stylistic elements. Brands like Fender, Gibson, and PRS helped popularize inlay styles such as dots, trapezoids, and intricate motifs that now serve as visual trademarks.
Common Materials Used for Inlays
Materials commonly used for fretboard inlays include:
- Pearloid – A synthetic material mimicking mother-of-pearl.
- Abalone – A natural shell with iridescent quality.
- Mother-of-Pearl – Elegant and widely used on higher-end instruments.
- Acrylic and Plastic – Used on budget-friendly guitars.
- Metal or Wood – Often seen in boutique or handmade guitars.

Standard vs. Custom Inlays
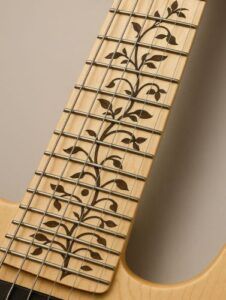
Most guitars feature standard dot or block inlays, but the sky’s the limit when customizing. Whether it’s vines, animals, or personal symbols, custom inlays provide the perfect way to inject personality into your build.
Planning Your Custom Inlays: Where Art Meets Functionality
Aesthetics vs. Functionality
When designing inlays, it’s important to strike a balance between beauty and practicality. Elaborate designs can sometimes distract or obscure key fret markers — so ensure your final layout supports smooth playing as well as aesthetics.
Popular Inlay Designs and Trends
Modern builders and players gravitate toward:
- Tree of Life motifs
- Celtic or Tribal patterns
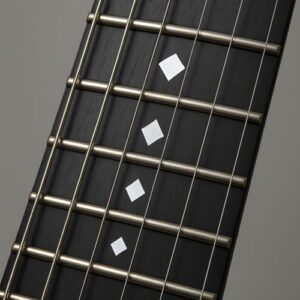
- Minimalist geometric symbols
- Glow-in-the-dark or LED fret markers

These trends reflect everything from spiritual identity to sci-fi fandoms.
Working With Templates and Design Software
Vector programs like Adobe Illustrator or CAD tools help visualize inlays before you commit. You can also use laser-cut templates or downloadable stencils for precise routing.
Considering Playability and Personal Style
Think about how the design complements your music and playing technique. If you play live often, high-contrast markers might make more sense. If you’re a collector, you might lean more toward artistry than utility.
Unique Techniques to Add Inlays to Your Fretboard
Step-by-Step Installation Process

Here’s a simplified workflow:
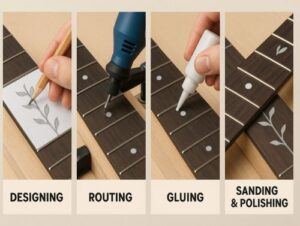
- Plan & Design – Sketch your layout on paper or digital software.
- Route the Cavities – Use a Dremel tool or router base to carve precise inlay pockets.
- Shape the Inlays – Cut your material with a jeweler’s saw or laser cutter.
- Glue & Set – Secure with super glue or epoxy.
- Sand Flush – Level the surface until smooth.
- Finish – Polish the fretboard and optionally refinish it.
Tools & Materials for DIY Inlays
- Rotary tool or Dremel with routing bits
- Calipers and straightedges
- Inlay material (shell, wood, plastic)
- Fine files and sandpaper
- Safety goggles and dust mask
CNC vs. Handcrafted Inlays
Handmade inlays offer uniqueness and charm, but CNC routers provide unmatched precision—especially for complex or repetitive patterns. Many modern builders use both methods depending on the design.
Protecting the Fretboard
Avoid cutting too deep or wide. Use a sharp bit and secure the fretboard to prevent slipping. Always wear safety gear and work slowly to preserve the integrity of your instrument.
Beyond Inlays: Making Your Guitar Truly Unique
Other Customization Options
Your fretboard is just the beginning. Other customization ideas include:
- Paint & Finish Work – Add a burst, sunburst, or metallic sheen.
- Custom Pickguards – Swap in unique shapes or engraved graphics.
- Hardware Swaps – Choose gold, black, or aged finishes for a distinct look.
Coordinating With Other Design Elements
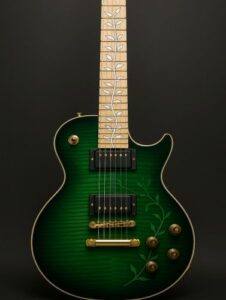
Think of your guitar as a complete visual package. A vine inlay design could pair beautifully with a green burst finish and aged brass knobs for a nature-themed build.
Personalized Touches
You might add:
- Your initials or band logo
- Symbols from your heritage
- Favorite song lyrics etched along the fretboard edge
Technology Meets Craft
Some modern guitars now include LED fret markers, programmable RGB lighting, or even touch-sensitive sensors. These upgrades marry aesthetics with futuristic functionality.
Exploring the World of Guitar Inlays

Types of Inlays
- Dots – The most common; simple and effective.
- Blocks – Seen on many Gibson and jazz guitars.
- Trapezoids – A classic Les Paul aesthetic.
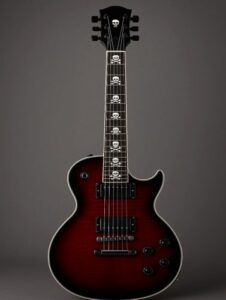
- Custom Shapes – Moons, birds, skulls, or personal artwork.
Cultural Significance
In some genres and cultures, inlays reflect deeper meanings:
- Floral motifs for classical or flamenco influences
- Runic or tribal designs for metal players
- Birds or wings as symbols of freedom or inspiration
Luthier Insights
Modern luthiers consider inlay work a sacred craft. It blends fine woodworking with visual storytelling. Many say that once you begin personalizing your fretboard, you’re no longer just building an instrument — you’re crafting art.
The Player Experience
A guitar with meaningful inlays often feels more connected to its player. Those subtle visual cues and emotional details can even influence performance and inspire creativity on stage or in the studio.
Final Thoughts…
Customizing your electric guitar kit with unique fretboard inlays is one of the most satisfying ways to turn a standard build into something personal and powerful. Whether you’re adding basic dots or an elaborate Tree of Life, the process enhances both the form and function of your instrument.
If you’re already diving into other aspects of your guitar build, like Installing Pickups In Your Electric Guitar Kit or Setting Up The Bridge And Neck, this is a great next step. For even more inspiration, check out our Step-by-Step Guide To Building Your First Electric Guitar Kit and push your project to the next level.
Rock on, and choose wisely.
There are 100’s of ways you can build a business around your passion for guitar building.
Check it out…

I really loved this guide—fretboard inlays are such a lovely way to turn a guitar into something personal and meaningful, not just functional. It’s fascinating to see how traditional dot and trapezoid markers evolved into intricate designs like Tree of Life, Celtic motifs, or even LED-lit options. The step-by-step outline—planning, routing, gluing, sanding, and finishing—is practical yet inspiring for anyone wanting to add character to their build.
It’s clear that while aesthetic appeal is key, playability shouldn’t take a back seat. Striking that balance ensures the fretboard enhances both your visual style and your performance.
I’d love to know—have you ever seen or worked on inlay designs that actually made playing harder, like overly intricate patterns that distracted rather than guided?
Thanks so much! I’m glad you enjoyed the guide. It’s always exciting to talk about how inlays can be both art and function. And yes, I have run into a few designs that looked amazing on paper but turned out to be a little too “busy” in practice. When the patterns are overly intricate or use too many contrasting colors, they can make it harder for players to quickly spot position markers, especially under stage lighting. That’s why I always suggest balancing creativity with clarity. You want the design to wow the eyes but still guide your hands without a second thought.
Thank you again,
~Wayne
Great read! I really like how you connected the history of inlays with modern customization options—it shows how much meaning and artistry can go into something as small as fret markers. The step-by-step breakdown of the installation process is especially helpful for anyone considering DIY work, since inlaying can seem intimidating at first.
Quick question: for someone new to guitar building, would you recommend starting with pre-cut inlay sets before attempting custom shapes, or is it worth jumping straight into designing your own?
Thanks so much! I’m glad you enjoyed the mix of history and modern options! You’re right, inlays might seem small, but they carry a lot of personality and artistry. As for your question: I usually recommend beginners start with pre-cut inlay sets. They take a lot of the pressure off since the pieces are uniform and ready to install, which helps you focus on learning the cutting, routing, and gluing steps. Once you’re comfortable with the process, moving on to custom shapes feels way less intimidating—and by then you’ll have a good sense of what designs you want to create.
It’s a nice progression from learning the craft to really making it your own.
Thanks again!
~Wayne
I enjoyed reading this because I am interested in customizing an electric guitar kit myself. The way you explained the different inlay options was very helpful. I didn’t know designs could be so personal, like vines, animals, or even glowing LED markers. That adds a modern twist while still keeping the guitar functional.
The installation steps also showed me how much patience and care it takes. It’s nice to see how small details can completely change an instrument.
I’m really glad you found the inlay section inspiring! You’re right… Custom designs can be a great way to make a kit feel truly personal, whether it’s something traditional like vines or something modern like LEDs. That blend of art and function is what makes inlays so fun to explore. And yes, patience is key! The process can be meticulous, but the reward is huge. Those small details really do transform a guitar into something one-of-a-kind.
If you end up customizing your kit, I’d love to hear what direction you go with the design!
Thank you so much!
~Wayne