When it comes to electric guitar tone, the spotlight often shines on pickups, pedals, and amps—but if you’re overlooking tone pots and capacitors, you’re missing a massive piece of the sonic puzzle. That’s where Using Tone Pots And Capacitors To Sculpt Your Sound becomes essential: it’s one of the most underappreciated yet powerful ways to fine-tune your guitar’s voice. Whether you’re chasing glassy highs, warm mids, or a darker jazz vibe, understanding how these small components shape your signal path is crucial. This guide breaks down the science, the sound, and the strategy behind tone pots and capacitors so you can master your own unique tonal fingerprint.
Introduction to Tone Pots and Capacitors: Sculpting the Perfect Sound
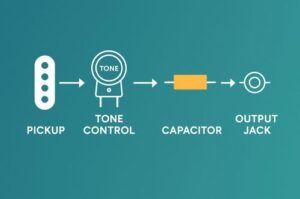
To start, let’s demystify the duo at the heart of this topic. Tone pots (short for potentiometers) and capacitors are small electronic components wired into your electric guitar’s tone control circuit. Their job? To shape your sound before it ever hits your amp.
Tone pots adjust how much of the high frequencies get sent to ground, effectively shaping the brightness or darkness of your tone. Capacitors, on the other hand, act like gatekeepers, determining which frequencies get rolled off when the tone pot is turned. Think of this combo as a sculptor’s chisel: one shapes broadly, the other adds nuance and detail.
Why does this matter? Because the ability to control high-end roll-off lets musicians tailor their instruments to different genres, venues, and personal styles. Whether you’re building from scratch or modding an existing guitar, understanding these elements is key to unlocking your sound.
** Here’s a little transparency: Our website contains affiliate links. This means if you click and make a purchase, we may receive a small commission. Don’t worry, there’s no extra cost to you. It’s a simple way you can support our mission to bring you quality content.**
As an Amazon Associate, I earn from qualifying purchases.
How Capacitors Alter Your Sonic Landscape
Let’s zoom in on the capacitor, the subtle powerhouse in your tone circuit. In simple terms, a capacitor in a tone pot circuit “bleeds off” high frequencies—sending them to ground so they don’t reach your amp. The result? A warmer, rounder sound as the treble diminishes.
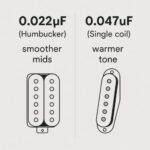
The value of the capacitor, measured in microfarads (µF), directly influences how much high-end gets removed. A 0.022µF cap, for example, is commonly used in guitars with humbuckers and results in a smooth, mid-focused roll-off. A 0.047µF cap, often paired with single-coils, cuts even more treble, producing a rounder tone.
So, what do capacitors do to sound? They act as frequency filters. By adjusting their values, you can control how bright or dark your guitar sounds, even before it hits any pedals or amps. It’s a deceptively simple mod with profound results.
Potentiometer Capacitors: The Architects of Your Tone
The potentiometer capacitor pairing is one of the most influential relationships in your guitar’s wiring. While capacitors set the threshold for frequency roll-off, the potentiometer (usually 250k or 500k) controls how quickly and how much of that frequency roll-off happens.
- 250k pots retain less treble, often used with single-coil pickups for a more vintage, mellow sound.
- 500k pots retain more treble, perfect for humbuckers or anyone wanting extra sparkle.
Different capacitor types (ceramic disc, film, paper-in-oil, etc.) can also introduce subtle colorations. While some purists swear by vintage oil caps for their “mojo,” modern film caps are consistent, affordable, and reliable.
So, what is the purpose of a potentiometer capacitor? It’s not just about treble bleed—it’s about dynamic control. Together, they determine how your tone control reacts and responds, making them essential tools for shaping your tone palette.

Tone Pots: Do They Really Make a Difference?
Absolutely, and here’s why. Tone pots don’t just adjust treble—they change the way your entire signal feels and behaves. A well-chosen tone pot can tighten up muddy distortion, add warmth to a piercing lead, or even simulate the tone of a different pickup.
Take, for instance, a Strat player who adds a tone cap with a push-pull pot mod—suddenly that bridge pickup doesn’t sound so thin. Or a Les Paul modded with a treble-bleed circuit that keeps highs intact as the volume rolls off. These real-world examples prove that tone pots absolutely make a difference—especially when you dial in exactly what you want.
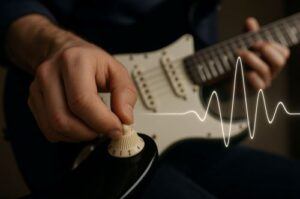
Still skeptical? Try this: play your guitar with the tone wide open. Now roll it down to 5 or 6. Notice the difference? That’s your tone pot shaping your signal in real time. Once you measure your preferences and start experimenting, you’ll find endless tonal flexibility in this often-overlooked control.
Selecting and Modifying Tone Systems for Personal Signature Sound
Now that you understand the “why” and “how,” let’s talk about customization. Choosing the right tone pots and capacitors depends on your guitar’s pickups, genre, and your personal sonic goals.
- For bright single-coils, try a 250k pot with a 0.047µF cap to tame harsh highs.
- For warm humbuckers, use a 500k pot and a 0.022µF cap to retain clarity and sparkle.
- For modern versatility, consider adding a no-load tone pot or installing push-pull switches for cap switching options on the fly.
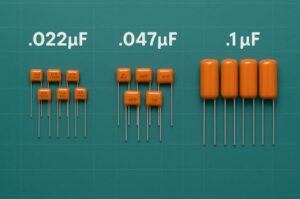
If you’re a tinkerer, it’s worth investing in a capacitor variety pack and experimenting. Small tweaks lead to big tonal changes—even swapping one capacitor can make your tone sing in a new way.
Final Thoughts: Shaping Your Sound Beyond Pickups and Pedals
Tone pots and capacitors might not be glamorous, but they’re foundational in shaping your guitar’s voice. Whether you’re a beginner curious about your kit or a seasoned player looking to refine your rig, understanding how to use these components unlocks a new layer of expression. It’s not just about what you play—it’s how your instrument responds to your touch.

Want to dive deeper into dialing in your perfect tone? Check out our guides on How Pickup Position Affects Electric Guitar Tone In Kits, Best Pickups For Your Electric Guitar Kit: Choosing The Right Tone, and How To Choose The Perfect Nut Material For Your Electric Guitar for more tools to customize your sound from the ground up.
There are 100’s of ways you can build a business around your passion for guitar building.
Check it out…



This guide is a real ear-opener—tone pots and capacitors are often overlooked, yet they’re fundamental in shaping your guitar’s voice. I love how you explain that tone pots determine how much high-end gets sent to ground, while capacitors decide exactly which frequencies get rolled off. That simple sculpting combo can produce everything from warm, vintage-style tones to crisp, modern clarity. The practical advice—like choosing a 250k pot with a .047µF cap for mellow single-coil tones or a 500k pot with a .022µF cap for keeping humbuckers sparkly—is especially helpful. And your examples, including tone cap mods and treble-bleed circuits, really prove how subtle tweaks can make a world of difference. Do you find that changing the capacitor value has a more noticeable effect in certain musical styles—like jazz versus rock—or does the genre really come down to how the mod is applied?
Thanks so much! I’m glad the guide helped make tone pots and caps feel less mysterious.
They’re small components but hugely powerful for shaping sound.
Changing capacitor values definitely has a more noticeable effect depending on style. For example, jazz players often prefer slightly higher-capacitance values to roll off highs gently for a warmer, smoother tone, while rock or metal players might stick with lower values to keep their humbuckers bright and punchy. That said, it really comes down to how you apply the mod—your playing style, pickup type, and amp settings all interact with the cap choice, so experimenting is key to dialing in your ideal voice.
Thanks again,
~Wayne
This is a solid explanation of how tone pots and capacitors interact—I especially liked the practical tip about how even small adjustments to the tone knob can reveal hidden nuances in pickups that usually get overlooked when it’s cranked to 10.
One angle to consider: The article’s point about treble bleed circuits preserving clarity at lower volumes could also apply to bright single-coils in dark-sounding amps—sometimes a subtle high-end retention keeps chords from turning muddy.
You mentioned that capacitor values affect how aggressively highs are rolled off—for someone using a vintage-style pot (250k vs. 500k), would the capacitor’s impact feel more pronounced, or does the pot’s resistance play a bigger role in the overall taper?
Really appreciate your thoughtful comment! You’ve hit on a great point about treble bleed circuits and how they can be especially useful for balancing brighter single-coils with darker amps. That subtle high-end retention can make a big difference in keeping chords articulate instead of muddy.
As for your question: both the pot value and the capacitor work together, but they shape the tone in slightly different ways. The pot’s resistance (250k vs. 500k) mostly sets the overall “brightness window”—a 250k pot naturally shaves off a bit more treble, which is why it’s common with single-coils, while 500k leaves things brighter and more open, often paired with humbuckers. The capacitor value then determines how much of the treble gets bled to ground when you actually roll the tone knob down. So, if you’re on a 250k pot, the starting point is already a little darker, but the cap will still control how aggressively those highs are rolled off as you adjust. In short: the pot sets the baseline, and the cap fine-tunes the sweep.
Thank you so much!
~Wayne