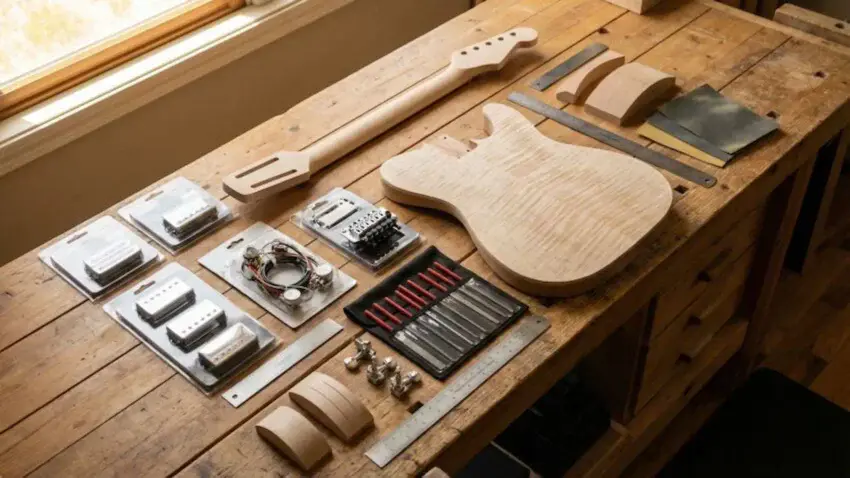
Building a premium instrument starts long before the first string ever goes on, and that’s exactly what this Best Pro-level Electric Guitar Kit Build Guide is designed to help you master.
Whether you’re leveling up from beginner kits or stepping straight into high-end components, this guide walks you through every step of the process — planning, prep work, tools, techniques, and pro-grade finishing methods — so you can build a guitar that looks, feels, and sounds like a true custom shop piece.

🛠️ Recommended Tools for a Pro-Level Build
When you’re stepping into a higher-end kit, the right tools make all the difference.
These are the exact precision tools I rely on for accurate measurements, clean nut work, proper action setup, and a flawless final build. If you want pro-quality results from your kit, these five essentials will get you there.
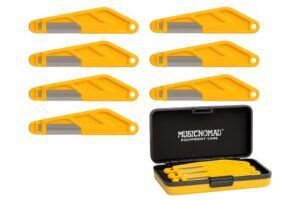
⭐ MusicNomad Precision String Action Gauge Ruler
If you want dead-accurate action setup on your pro-level kit, this gauge takes all the guesswork out. Perfect for dialing in your build during final setup.
 Amazon Product Suggestion:
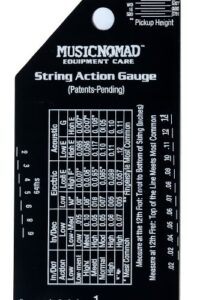
 MusicNomad Precision String Action Gauge Ruler
for String Height- Metric, SAE, 64ths
(MN602)
The MusicNomad MN602 String Action Gauge is a precision stainless-steel ruler designed to help you dial in perfect string height on electric, acoustic, and bass guitars. With easy-to-read etched markings in metric, SAE, and 64ths, it takes the guesswork out of action setup and ensures repeatable, pro-level results every time.
Why It’s Great:
Ultra-precise etched measurements — no fading, no guessing
Works for all guitars — electric, acoustic, and bass
Includes action charts for fast, reliable setup targets
Black-on-white contrast makes numbers easy to see under shop lighting
Pocket-size stainless steel design is durable for life
Perfect for accurate 12th-fret action checks on every setup you do
⭐ Jivarrry Digital Caliper (Stainless Steel, Large LCD, 6-Inch)
This is the same style of caliper you rely on every day — perfect for checking nut width, fret wire, saddle height, and hardware dimensions with absolute precision.
Amazon Product Suggestion:
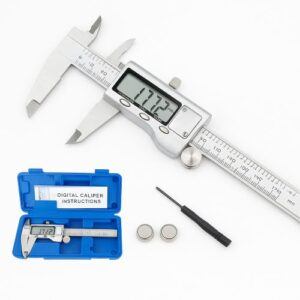
Jivarry Digital Caliper
(Stainless Steel, Large LCD, 6-Inch)
The Jivarry Digital Caliper is an affordable, accurate measuring tool that every woodworker should keep in their shop. With a smooth stainless-steel slide, a large easy-to-read LCD, and instant switching between inches, millimeters, and fractions, it makes precise measuring fast and frustration-free.
Perfect for checking board thickness, inside/outside dimensions, dowels, hardware sizing, and fine adjustments during joinery work.
Why it’s great:
Large, clear digital display
Switch between inch/mm/fractions instantly
Stainless steel body for smooth, accurate travel
Measures inside, outside, depth & step values
Perfect for tight-tolerance woodworking and tool setup
Comes with case, batteries & mini screwdriver
⭐ 25Pcs Guitar Repairing Tools Setup Kit (with Carry Bag)
A complete all-in-one setup kit — perfect for fretwork, adjustments, truss rod tweaks, and final build tuning without hunting for individual tools.
Amazon Product Suggestion:
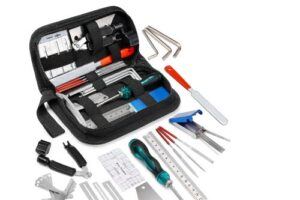
25Pcs Guitar Repairing Tools Kit Setup Kit
(with Carry Bag)
This 25-piece guitar repair and setup kit gives you all the essential tools needed for adjusting action, filing frets, setting intonation, and performing basic maintenance on electric, acoustic, bass, or ukulele. Compact, organized, and ideal for beginners or experienced DIY guitar techs.
Why It’s Great:
All-in-one setup kit — Includes files, gauges, rulers, hex keys, and more
Perfect for pickup, nut, and bridge adjustments
Great for electric and acoustic guitar maintenance
Comes in a compact, padded carry case — keeps everything organized
Affordable starter option for DIY luthiers
⭐ 4. MusicNomad Precision Nut Files
If you want clean, buzz-free nut slots on a pro-level build, these files deliver the accuracy and smooth cutting action that cheap sets can’t touch.
Amazon Product Suggestion:
MusicNomad 6-pc Diamond Nut File Set
A pro-level set of diamond-coated nut files that cut clean, precise slots every time. Each file is matched to common light/medium string gauges, giving you accurate sizing without overcutting. Comfortable handles and a sturdy storage case make this a killer upgrade for any setup bench.
Why It’s Great:
Diamond-coated for smooth, controlled cutting
Six gauges for perfect nut-slot sizing
Comfortable grip handles
Tough storage case included
⭐ Hosco Nut Slotting Gauge
A must-have companion tool for nut work, this gauge helps you measure and set the exact string spacing and slot depth before you ever touch a file.
Amazon Product Suggestion:

StewMac Digital Nut Slotting Gauge
(Digital Nut Action Gauge)
This digital gauge gives you pinpoint nut slot accuracy down to 0.001″ / 0.01mm. The brass base sits solid on the fretboard while the digital plunger shows your exact string height in real time. Perfect for cutting smooth, buzz-free nut slots with pro-level precision.
Why it’s great:
Ultra-precise 0.001″/0.01mm accuracy for perfect nut slot height
Digital readout makes measurements fast, clear, and repeatable
Solid brass base sits flat and stable on the fretboard
Ideal for pro-level nut cutting with buzz-free, low-action results
🎸 What Makes a Pro-Level Guitar Kit?
Not all guitar kits are built the same, and once you step into the pro-level category, the difference becomes obvious fast. These kits use better woods, tighter tolerances, and higher-grade components that let you build an instrument worthy of real stage time — not just a fun weekend project.
If you’ve only worked with beginner kits before, here’s what sets the premium ones apart:
• Higher-Quality Tonewoods
Pro kits use mahogany, alder, ash, and figured maple tops with more consistency in weight, grain, and density.
That means better sustain, richer tone, and a cleaner final finish.
• Cleaner Routing & Better Fitment
The cavities, neck pockets, and hardware routes are far more precise.
Parts line up the way they should, which saves you from having to “fix the kit before you build it.”
• Upgraded Hardware Out of the Box
Bridges, tuners, pots, switches, and jacks are noticeably higher quality.
Even if you upgrade later, you start from a stronger foundation.
• More Reliable Neck Construction
Straighter neck blanks, smoother fret ends, tighter joints, and more consistent radius work.
This means WAY less fret dressing and fewer surprises during setup.
• Finish-Ready Surfaces
Pro-level kits can take dye, stain, oil, or a full gloss finish much better.
The grain is cleaner, the sanding is more consistent, and the tops (especially maple) are often stunning.
• Built with Upgrades in Mind
These kits expect you to swap pickups, nuts, caps, and hardware —
So, they’re made to handle those changes without extra mods.
• The Price Reflects the Potential
You’re paying for better materials, precision, consistency, and tone.
And the truth is simple:
A pro-level kit gives you a real chance to build a guitar that feels and sounds like something straight out of a custom shop.
🪚 Step-By-Step: How to Build a Pro-Level Guitar Kit
Putting together a premium kit isn’t just about following instructions — it’s about taking your time, working with precision, and treating every stage like you’re building a custom-shop instrument.
Here’s the full process I use when I’m shooting for the best results possible.
1. Unbox, Inspect, and Test-Fit Everything
Lay out all parts and check the body, neck, routing, and hardware.
Look for cracks, gaps, rough spots, or anything that needs attention before you begin.
Fit the neck into the pocket, line up the bridge, and make sure everything sits where it should.
2. Evaluate the Fretwork
Even good kits need fret attention.
Check for high spots using a fret rocker, feel for sharp edges, and sight down the neck to see if there’s any twist or bow.
Make note of any frets that need leveling.
3. Sanding: The Foundation of a Clean Build
Start with 180–220 grit depending on the roughness.
Sand with the grain, keep edges crisp, and work your way up through the finer grits.
This stage determines how good your finish will look, so don’t rush it.
4. Grain Fill (If Needed)
Open-grain woods like mahogany, ash, and walnut require grain filler for a smooth finish.
Apply, scrape, sand back, and repeat until the surface is flat.
This step alone can take your build from “DIY kit” to “custom shop.”
5. Neck Prep and Refinement
Smooth the back of the neck, soften the edges if you prefer a broken-in feel, and polish the fretboard. Mask off the frets if you’re planning any fretwork later.
6. Fret Leveling, Crowning & Polishing
Use your leveling beam to establish an even playing field.
Re-crown each fret with a precision file, then polish them to a mirror shine.
Good fretwork makes more difference than any pickup upgrade.
7. Apply Your Finish (Stain, Dye, Oil, Poly, Nitro)
This is where your guitar’s personality comes out.
Whether you’re going for a natural oil finish, a full gloss, or a burst, take your time with the coats and curing.
Thin coats always look better than heavy ones.
8. Shielding the Cavities
Line the control and pickup cavities with copper shielding tape.
This step reduces hum and noise.
This step is especially important for single-coil builds or high-gain players.
9. Wiring & Electronics
Install the pots, switch, jack, and pickups. Keep your solder joints clean and shiny.
Use heat-shrink tubing on exposed leads, and route the wiring neatly to avoid noise issues later.
10. Final Assembly
Install the tuners, bridge, pickguard, and all remaining hardware.
Mount the neck and make sure it’s aligned perfectly with the centerline of the guitar before tightening things down.
11. Setup: Action, Relief, Intonation, and Pickup Height
Adjust the truss rod for proper neck relief, set your string height using your action gauge, set intonation, and dial in pickup height.
This is where your build “comes alive.”
12. Play-Test and Fine-Tune
Plug in, check for buzzes, dead spots, grounding issues, or scratchy pots.
Make small tweaks until everything feels and sounds right.
A pro-quality guitar always gets a final pass before calling it done.
🎸Looking for a Reliable Pro-Level Kit to Start With?
If you want consistent routing, quality tonewoods, and kits that truly respond to advanced build techniques, Solo Guitars is the brand I trust the most.
👇 Check out my full Solo Guitars DIY kit guide:

🎯 Final Thoughts
Building a pro-level electric guitar kit isn’t just another DIY project — it’s a chance to create a personalized instrument with the look, feel, and tone of a true custom-shop guitar.
When you take your time with the prep work, use the right tools, and follow a structured build process, the results can be better than many factory-built guitars on the market.
Whether you’re dialing in your fretwork, experimenting with finishes, or upgrading hardware along the way, each step brings you closer to a guitar that’s uniquely yours.
And if you decide to start with a higher-quality kit, your build experience gets smoother, your results get cleaner, and your finished instrument becomes something you’ll be proud to play every day.
Take your time, trust the process, and enjoy the build.
That’s where the real magic happens.
Ready to Start Adjusting Your Tone?
Check out our other guides:
 If you’re new to guitar kits:
Start with Step-by-Step Guide To Building Your First Electric Guitar Kit and Essential Tools Every Electric Guitar Kit Builder Should Have.
If you already own a kit guitar:
Jump into How To Properly Set Up Your Electric Guitar Kit For Intonation or Fixing Common Problems: Buzzing And Dead Frets.
If you’re chasing better tone:
Head to Understanding Humbucker Vs Single Coil Pickups In Kits or Playing With Tone Controls: Tips For Electric Guitar Kits and start experimenting.
Your Guitar, Your Build, Your Sound
You don’t need a custom shop or a tech on speed dial.
All you need is a little guidance, some patience, and a place to go that shows you what to do next.
Come on man… You got this.
GuitarCrafts is here to help you along the way.
Craft it. Play it. Own it! 
Ready to take your guitar passion beyond the workbench?
See how I built GuitarCrafts.com using the training at Wealthy Affiliate — you can do the same.
Build Your First Website With Wealthy Affiliate (Free)
