
When you’re building or setting up an electric guitar kit, one of the most critical steps for achieving smooth playability and great tone is learning how to adjust the truss rod for neck relief. This process helps you fine-tune the curvature of the neck, reducing fret buzz and optimizing string action. In this guide, we’ll walk you through everything you need to know — from diagnosing neck bow to making safe adjustments — so your guitar kit feels and sounds just right.

Understanding the Basics of Guitar Neck Relief
Before we dive into tools and turn directions, let’s cover what neck relief actually is — and why it matters.
What Is Neck Relief?
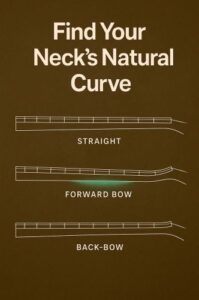
Neck relief is the slight concave bow in your guitar neck that allows the strings to vibrate freely without buzzing against the frets. It’s not the same as action (the string height), but the two are closely connected. Too little relief and your strings may buzz. Too much, and your guitar may feel stiff and unresponsive.
What Does a Truss Rod Do?
The truss rod is a metal rod embedded in the neck of your guitar. It counters the tension of the strings, which naturally try to pull the neck forward. By adjusting the truss rod, you can increase or decrease the neck’s bow, or relief.
There are two main types of truss rods:
- Single-action rods, which can either reduce relief (flatten the neck) or leave it as-is.
- Dual-action rods, which can both reduce and increase relief by turning in opposite directions.

Most modern electric guitar kits come with a dual-action truss rod for better adjustability.
How Do You Know If Your Neck Needs Relief Adjustment?
Some telltale signs include:
- Buzzing frets around the middle of the neck (typically frets 5–9).
- Strings feel too high even after adjusting the action at the bridge.
- A visible forward or back bow when sighting down the neck from the headstock.
Getting this right ensures better sustain, better tone, and a much smoother playing experience.
** Here’s a little transparency: Our website contains affiliate links. This means if you click and make a purchase, we may receive a small commission. Don’t worry, there’s no extra cost to you. It’s a simple way you can support our mission to bring you quality content. **
As an Amazon Associate, I earn from qualifying purchases.
Determining When and How to Adjust Your Truss Rod
Knowing when and how to adjust your truss rod can save you a trip to the luthier and help you understand your guitar more deeply.
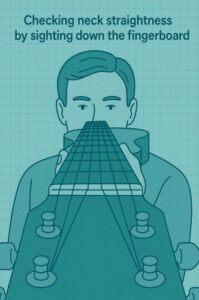
Step 1: Visually Inspect the Neck
Hold the guitar at eye level and sight down the edge of the fingerboard. A straight neck will look like a flat line; a bowed neck will show a curve — either forward (more relief) or backward (back-bow).
Step 2: Measure Neck Relief
Use a capo on the first fret and press the low E string down at the last fret. Then, measure the gap between the bottom of the string and the top of the 7th or 8th fret using a feeler gauge. A typical relief measurement ranges from 0.006” to 0.012” depending on your playing style and string gauge.
Step 3: Know Which Way to Turn
Here’s the basic rule:
- To reduce relief (flatten the neck or correct forward bow) – turn the truss rod clockwise (tighten).
- To add relief (increase forward bow) – turn the truss rod counterclockwise (loosen).
Just remember: Righty tighty = less relief. Lefty loosey = more relief.
Tools You’ll Need:
- Allen wrench or nut driver (check your kit’s specs)
- Feeler gauges
- Capo
- Ruler (optional, for overall action height)

Adjusting the Truss Rod: The Technique
Once you’ve determined the direction and degree of change needed, it’s time to get hands-on.
Step-by-Step Truss Rod Adjustment
- Loosen the strings slightly to reduce tension before making adjustments.
- Insert the appropriate wrench into the truss rod nut (usually located at the headstock or heel).
- Turn slowly—no more than 1/8 to 1/4 of a turn at a time.

- Let the neck settle for a few minutes after each adjustment.
- Retune your guitar and recheck the neck relief.
- Repeat as needed, being careful not to force anything.
Does Tightening a Truss Rod Add Relief?
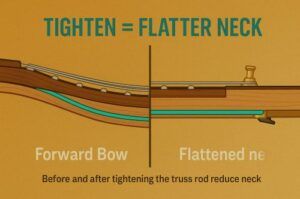
This is a common misconception. Tightening the truss rod actually reduces relief by pulling the neck flatter. If your neck is too bowed forward, tightening will bring it back in line. If it’s back-bowed (strings buzz when played open or near the nut), you’ll need to loosen it.
Avoiding Common Mistakes
- Don’t over-tighten. If it feels stuck, stop and reassess.
- Always make small adjustments.
- Give the neck time to respond between turns.
- Use proper tools to avoid stripping the nut.

Finding the Best Truss Rod Relief: An Expert’s Guide
There’s no single “perfect” relief setting for every player—but there are solid starting points.
What’s the Best Neck Relief?
- Strummers and rhythm players may prefer more relief (around 0.010″–0.012″) for a looser feel and reduced buzz.
- Lead players and shredders often like lower relief (closer to 0.006″) for fast, low-action playability.

Factors That Affect Truss Rod Settings
- String gauge: Heavier strings exert more tension and may require more relief.
- Playing style: Aggressive players may need more room for string movement.
- Tuning: Lower tunings require more careful relief management.
Can You Add Relief Without Turning the Truss Rod?
To a degree, yes. You can try using lighter strings or tuning down, which puts less tension on the neck. But if your guitar neck is too straight or has a back-bow, a truss rod adjustment is the safest and most reliable solution.
Fine-Tuning Your Setup
After adjusting relief, always check your string action at the 12th fret and intonation. Your goal is to balance comfort with clean tone across all frets. Relief is only one part of the setup puzzle, but it’s foundational.
Achieving and Maintaining Optimal Guitar Kit Setup
Adjusting the truss rod is not a one-time job—it’s part of a healthy maintenance routine.
When Should You Recheck Neck Relief?
- After changing string gauge
- When seasons shift (humidity and temperature affect wood)
- If you notice sudden buzzing or high action
Integrating Truss Rod Adjustments Into Maintenance
Every few months, especially with a new build, sight down the neck and check relief. Small seasonal tweaks keep your guitar playing like new.
Environmental Impact on Neck Relief
Dry winter air can cause a back-bow. Humid summers may increase forward bow. Use a guitar humidifier if needed to maintain stable neck conditions.

When to Call a Pro
If the truss rod won’t turn, turns too easily with no effect, or you’re not confident in your adjustments — bring it to a guitar tech. It’s better to spend a few bucks than risk damaging your neck.

Final Thoughts…
Adjusting the truss rod for proper neck relief is one of the most rewarding steps in building or customizing your electric guitar kit. It’s where woodworking meets precision setup — and it makes all the difference in how your guitar feels and sounds.

If you’re diving into more setup techniques, check out these helpful guides on guitarcrafts.com:
- Adjusting Pickup Height For Optimal Sound On Your Guitar
- Using Tone Pots And Capacitors To Sculpt Your Sound
- Essential Tools Every Electric Guitar Kit Builder Should Have
There are 100’s of ways you can build a business around your passion for guitar building.
Check it out…

This is why I enjoy reading blogs’ especially on topics I know nothing about. My daughter got a guitar for her birthday years ago and I didn’t even know what a pick was. Now I know what that and a truss rod is. 🙂 Thank you so much for your guidance. I’ll bookmark this for future needs! It’s really resourceful!
I love hearing that! It’s always fun when something new clicks, especially with guitar stuff. It’s like learning a new language, but way more fun. A pick and a truss rod might seem small, but they make a huge difference in how a guitar feels and plays. Who knows, maybe you’ll be adjusting that truss rod yourself someday. Glad you found it helpful, and I’m happy it earned a spot in your bookmarks!
Thank you so much,
~Wayne
You’ve done it again—another outstanding guide on something that often confuses first-time builders: adjusting the truss rod for perfect neck relief. Your clear breakdown of when to loosen versus tighten, checking relief with a straightedge or feeler gauge, and planning for small, gradual turns takes the mystery—and the stress—right out of the process.
This site continues to be such an invaluable resource. Every time I visit, I’m met with guides that are both authoritative and approachable—perfect for building confidence and craftsmanship. I’ll definitely be heading back whenever I need trustworthy, hands-on advice for my next build. Thank you for the thoughtful insight!
Thank you so much for the kind words! I know truss rod adjustments can feel intimidating the first time you try them, so I’m glad the step-by-step approach helped take the pressure off. Once you get the hang of those small, careful turns and learn to read the neck’s response, it really does become second nature.
It means a lot to hear that you find the guides both trustworthy and approachable—that’s exactly the balance I aim for. I want every builder, no matter their experience level, to feel confident tackling these kinds of adjustments.
Appreciate you stopping by, and I look forward to hearing about your next build when the time comes!
Thanks again,
~Wayne