
Setting up the bridge and neck on your electric guitar kit is one of the most important steps in the building process. These two adjustments decide how comfortable your guitar feels in your hands and how cleanly each note rings out.
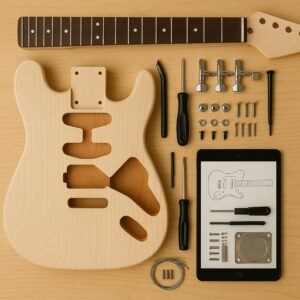
When you open a kit for the first time, it can feel like a puzzle of body parts, electronics, and hardware. But with the right approach, you’ll discover it’s less about mystery and more about precision. The bridge and neck work together like the foundation and spine of your instrument—get them right, and you’ll enjoy smooth fretting, easy chords, and reliable intonation.
Before you dive in, gather a few simple tools: a screwdriver, a tuner, and a healthy dose of patience. With these in hand, you’ll be ready to line everything up, make careful adjustments, and transform a box of parts into a playable guitar that actually feels good under your fingers.
Affiliate Note
Our website contains affiliate links, meaning we may earn a small commission if you purchase through them. As an Amazon Associate, I earn from qualifying purchases. There’s no extra cost to you — it’s simply a way to support GuitarCrafts.com while we keep bringing you step-by-step guides.
As an Amazon Associate, I earn from qualifying purchases.
🎸 Mastering the Bridge and Neck Setup
Setting up the bridge and neck is where your guitar kit starts to feel like a real instrument. The bridge controls string height (action) and helps set intonation, while the neck’s truss rod keeps everything aligned for smooth playability. Get these two elements balanced, and you’ll avoid buzzing, sore fingers, and tuning frustrations.
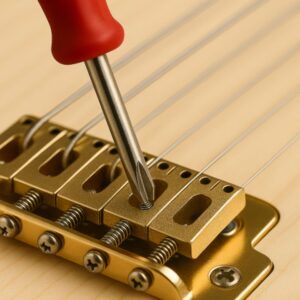
Step 1: Adjust the Bridge Height
-
Use a screwdriver or Allen wrench to raise or lower the bridge saddles.
-
Too high? Playing feels stiff, and chords require extra pressure.
-
Too low? You’ll hear buzzing against the frets.
-
Aim for comfortable action: around 1.6–2.0 mm on the high E and 2.0–2.4 mm on the low E measured at the 12th fret.
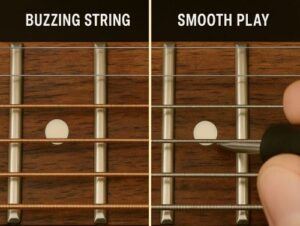
Step 2: Check Neck Relief with the Truss Rod
The neck isn’t meant to be perfectly straight — a slight forward curve (relief) prevents string buzz.
-
Hold down the first fret and the last fret on the low E string at the same time.
-
Look at the gap around the 7th or 8th fret.
-
You should see a small space — about the thickness of a business card.
-
If the gap is too big, tighten the truss rod (clockwise). If it’s flat or back-bowed, loosen it (counterclockwise). Always make adjustments in ¼-turn increments and re-check.

Step 3: Test Playability
Strum a few open chords and play scales across the neck. Listen for:
-
Buzzing notes
-
Uneven volume
-
Strings that feel unusually stiff or loose

If issues persist, go back and tweak bridge height or neck relief until everything feels balanced.
🪛 Pro Tip: Don’t rush. Small adjustments and frequent testing give you better results than big changes all at once.
🔊 Amplify Your Sound: Setting Up with an Amp
Once your bridge and neck are adjusted, it’s time to hear the results. Plugging into an amp is where your guitar kit comes to life — every tweak you made to action and relief now translates into sound.

Step 1: Connect Your Guitar
-
Use a standard ¼-inch instrument cable and plug it into your guitar’s output jack, then into the amp’s input.
-
Turn the amp’s volume all the way down before switching it on to avoid sudden blasts of sound.
Step 2: Dial in the Basics
Most practice amps have the same core controls:
-
Volume – overall loudness
-
Gain – adds grit and distortion
-
Bass, Mid, Treble (EQ) – shape the tone
-
Master Volume (on some amps) – controls the final output level
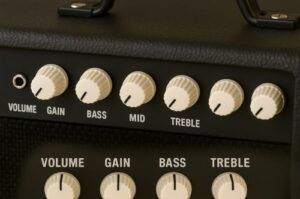
Start with EQ knobs at 12 o’clock (neutral). Slowly raise the volume and gain until you get a clean, even sound.
Step 3: Experiment with Tone
-
Raise bass for a heavier, fuller sound.
-
Add mids for punch and clarity in chords.
-
Boost treble for bright leads that cut through the mix.
Play simple chords (like G major or D major) and single-note riffs as you adjust, so you can hear how each setting affects your guitar’s new setup.
Step 4: Manage Feedback & Noise
-
Keep a little distance between yourself and the amp.
-
Lower the gain if you hear squealing or constant hum.
-
Use the guitar’s volume and tone knobs for fine control — they interact with the amp more than many beginners realize.
🎶 Pro Tip: After setting up your guitar’s action and neck, try playing clean tones first. If your guitar sounds balanced unplugged, it should sound even better through the amp.
🎼 Your Complete Guide to Perfect Guitar Setup
With your bridge and neck adjusted and your amp dialed in, there’s one more step to lock in a professional feel: intonation. Intonation ensures that your guitar plays in tune all the way up the fretboard, not just on open strings.
Step 4: Set Your Intonation
-
Tune your guitar accurately using a tuner.
-
Play the open string and check it against the 12th fret harmonic — they should match.
-
Now play the 12th fret fretted note.
-
If the fretted note is sharp, move the saddle backward (away from the neck).
-
If the fretted note is flat, move the saddle forward (toward the neck).
-

Retune the string after every adjustment and repeat until open, harmonic, and fretted notes are all in agreement.
Getting intonation right takes patience, but it transforms your guitar from “close enough” to stage-ready accurate.
Maintenance & Troubleshooting
Your setup isn’t a one-and-done job — it evolves with your guitar:
-
Check tuning and intonation regularly. Strings stretch, wood shifts, and seasons change. A quick tune-up before playing makes a big difference.
-
Clean your guitar after each session. A soft cloth on strings and body prevents grime build-up and prolongs hardware life.
-
Watch for common issues.
-
Buzzing strings? Recheck neck relief or bridge height.
-
Stiff action? Lower the bridge slightly.
-
Notes out of tune up the neck? Double-check intonation.
-
If you run into stubborn problems, don’t hesitate to lean on local guitar shops, online forums, or step-by-step video tutorials. Even pros troubleshoot often — it’s part of the craft.
🎯 Conclusion: From Kit to Playable Guitar
Setting up the bridge and neck on your electric guitar kit is where everything comes together. With proper action, balanced neck relief, and accurate intonation, you’ve transformed a box of parts into an instrument that feels comfortable and sounds clear.
But the journey doesn’t stop here. To keep improving your build:
-
Fine-tune your sound with our guide on How To Properly Set Up Your Electric Guitar Kit For Intonation.
-
Learn the next step in wiring with Guide To Wiring Your Electric Guitar Kit For Optimal Performance.
-
Explore pickup options in Best Pickups For Your Electric Guitar Kit: Choosing The Right Tone.
Each adjustment makes your guitar more personal and more playable. That’s the real reward — not just building a guitar but crafting your own tone.

Build a Business Around Your Passion
There are 100’s of ways you can build a business around your passion for the guitars.
 Check it out here with Wealthy Affiliate

This post is a fantastic deep dive into one of the trickiest parts of building an electric guitar kit—setting up the bridge and neck just right. I love how it breaks down the steps clearly and emphasizes how these adjustments impact playability and tone. It’s great to see detailed tips on intonation and neck relief, which can be intimidating for beginners but are so crucial for getting that perfect feel. A couple of questions: Do you have any favorite tools or gadgets that make neck and bridge setup easier or more precise for DIY builders? How often do you recommend checking and adjusting the setup once the guitar is in regular use?
Thanks for sharing such a thorough guide! ~Leahrae
Thanks so much, Leahrae! I’m really glad the post helped break things down… Neck and bridge setup can definitely feel overwhelming at first, but once you understand how it all works together, it gets a lot more approachable. Great questions, too! I’d say a good, notched straightedge and fret rocker are must-haves for precision, and I’m a big fan of digital string action gauges. They take the guesswork out of measurements. As for ongoing maintenance, I usually recommend checking the setup every few months, especially with seasonal humidity changes or after lots of playing. A small tweak here and there can keep everything feeling dialed in.
Thanks again!
What a great guide! Setting up the bridge and neck really is the heart of getting an electric guitar kit to feel like a real instrument instead of just parts bolted together. I like how you broke it down into approachable steps and emphasized patience — that’s key, since rushing adjustments usually leads to buzzing strings or awkward action. The way you compared setup to a dance party made it fun and relatable too. I also appreciate the reminder that a little relief in the neck is normal; so many beginners chase a perfectly straight neck without realizing it can make playability worse. Pairing the setup with amp exploration is a nice touch, since tone and feel go hand in hand. Overall, this makes the process less intimidating and encourages players to learn their instrument inside out. Inspiring stuff!
Thank you so much! I’m thrilled to hear the guide made the bridge and neck setup feel approachable. Patience really is everything, and rushing almost always leads to headaches. I’m glad the “dance party” analogy landed! It makes the process a little more fun, right? You’re spot-on about neck relief; a bit of natural bow is actually great for playability. Pairing setup with amp exploration is one of my favorite ways to connect feel and tone, so I’m glad that resonated.
I really appreciate you taking the time to share your thoughts!
~Wayne
Wow, this post is great for beginners. I never knew that setting the neck and bridge is so important. The way you explain string height and neck relief is easy to understand. Glad you talked about using small tools and being careful! Playing a chord should feel smooth, and your tips help with that. I also like the part about using an amp to find good sound. I feel ready to try building a guitar now.
Thanks so much for your kind words! I’m glad the explanations on neck and bridge setup, string height, and neck relief made things easier to understand. Taking it slow and using the right tools really does make a huge difference, especially when you’re just starting out. It’s awesome that you found the tip about testing with an amp helpful. Hearing how adjustments affect tone in real time is a game changer.
I’m excited for you to start building your guitar! Enjoy the process and have fun experimenting!
Thanks again!
~Wayne