Building an electric guitar from a kit can be a rewarding and creative experience. It’s a project that mixes woodworking, basic electronics, and a healthy dose of patience. While most kits are designed to be approachable, you’ll probably run into some hiccups along the way. That’s why I’ve put together Troubleshooting Common Issues During Electric Guitar Kit Assembly — a guide to help you spot and solve the most frequent problems, avoid common pitfalls, and know what to do if you hit a roadblock.

Understanding the Basics of Electric Guitar Kit Assembly
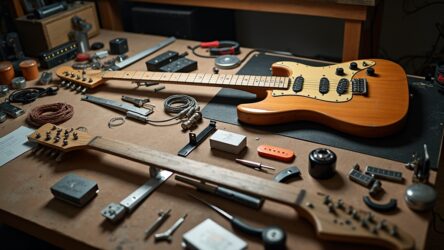
Electric guitar kits come with the body, neck, hardware, and electronics all ready to go, but there’s still a lot to figure out. Each kit usually includes instructions, but sometimes these are vague or assume you already know a bit. Most issues that pop up fall into a few main areas: the fit and finish, wiring trouble, hardware setup, and neck alignment.
Even if you’ve never built a guitar before, most kits are doable with a bit of patience and a willingness to learn. Guitar assembly does take some care and attention. The trickiest parts usually involve soldering the electronics and getting a comfortable action on the strings, which is super important if you want the guitar to play well and hold its tuning. You’ll want to take your time, read up on each step, and make sure you’re set with the right tools. Mistakes made in the early steps can show up later when you’re getting ready to play, so it’s worth working slowly and double-checking as you go.
** Here’s a little transparency: Our website contains affiliate links. This means if you click and make a purchase, we may receive a small commission. Don’t worry, there’s no extra cost to you. It’s a simple way you can support our mission to bring you quality content.**
As an Amazon Associate, I earn from qualifying purchases.
Common Issues When Assembling a Guitar Kit
During the build, some issues show up a lot more often than others. Here’s a breakdown of what usually gives people trouble:
- Wiring Problems: Solder joints may be weak, wires can touch where they shouldn’t (causing shorts or noise), or components could get mixed up.

- Neck Alignment: The neck pocket might feel too tight or too loose, and sometimes it just doesn’t line up with the bridge. Bad alignment makes the guitar play and sound poorly.

- Bridge and Saddle Setup: If the bridge height isn’t right or the saddles don’t line up, tuning and intonation can be tough.

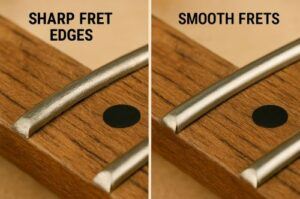
- Fretwork: Sharp fret edges and uneven frets make playing uncomfortable and could even hurt your fingers.
- Finishing Mistakes: Applying paint, stain, or clear coat can sometimes go wrong — think dust, streaks, runs, or uneven color.

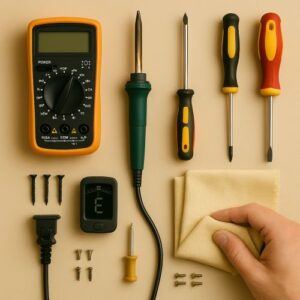
Wiring: How to Check If Guitar Wiring Is Working
Most first-time builders worry about the electronics — and for good reason. The wiring is a tricky business with lots of wires squeezed into a small space. Here’s a simple way to test your wiring before you close everything up:
- Plug the guitar into an amp, but don’t put the backplate or pickguard on yet.
- Turn the amp’s volume down low—just to be safe.
- Touch the other end of a guitar cable to the guitar’s output jack, then flip the pickup switch and turn the knobs.
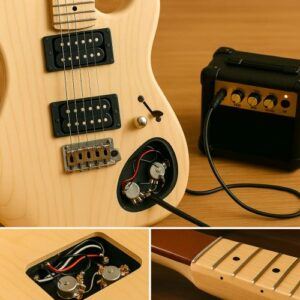
If you get a buzz or pop through the amp when you tap on the pickups with something metallic (like a screwdriver), it means your wiring is completing the circuit. If you have no sound or everything is noisy, check the solder joints. Cold or broken joints are often the root cause, so reflow any that look “crusty” or dull. Also, look out for any wires touching where they shouldn’t be — short circuits are frequent and can usually be spotted with some careful inspection.

How Hard Is It to Assemble an Electric Guitar?
Electric guitar kits are usually meant for hobbyists, but that doesn’t always mean the build process is smooth sailing. The woodworking and finishing steps tend to take the most time. The wiring is what most first-timers find tricky. Following instructions closely, watching a few video tutorials, and taking your time with each step helps a lot. For someone with no experience at all, expect to spend several hours (or even a few days if you want to do a nice finish) on your build. The more careful you are with things like the neck fit, fret dressing, and wiring, the better your final result will feel and sound. It’s definitely doable at nearly any skill level — just requires patience and a bit of research along the way.
Preventing Mistakes: Things to Avoid When Buying a Guitar Kit
Buying the right kit makes the whole process way less stressful. Here are a few things I always keep in mind, especially for first builds:
- Cheap Electronics: Super low budget kits sometimes include pickups, switches, and pots that don’t sound great or break quickly. Saving up for a kit with decent hardware can be absolutely worth it.
- Poorly Fitting Necks: If reviews mention neck pockets being loose, think twice before buying. Gaps lead to bad playability and tuning issues.
- Missing or Vague Instructions: Some kits come with barely any guidance. Checking for kits with clear instructions or even video tutorials makes a big difference.
- Hard to Finish Woods: Some body woods can be tough to paint or stain. Basswood and alder are fairly easy — woods like mahogany or ash can be more work if you’re new to finishing.
I always research carefully, check customer reviews, and look for builders who’ve posted their results online. This makes it easier to avoid surprises and make sure you’ll have the right support if you hit a wall. Don’t forget to check what finishing materials you’ll need or what tools aren’t included in the box, as missing key supplies is an easy way for first-timers to get stuck.
Troubleshooting Wiring Issues and Short Circuits
How to Fix a Guitar Short Circuit
A short circuit in a guitar typically means a bare wire or connection in the controls is touching something it shouldn’t be. This can cut the sound, or create constant buzzing and noise. Fixing it is usually straightforward:
- Open up the control cavity (backplate or pickguard) to see all the wiring.
- Look for loose, stray, or bare wires that could be touching metal parts or other wires. Sometimes, a solder blob melts onto something and connects it where it shouldn’t.
- If you have a multimeter, use it to test continuity. Signal should only flow where you want it to.
- Cover any exposed wires with heat shrink tubing or electrical tape.
- Carefully resolder or move any wires that cross over or touch other connections.

After fixing any problems, plug the guitar back in and test again. Keeping the wiring tidy and soldering with care helps avoid most shorts. If you’re new to soldering, practicing on spare wire before working inside the guitar helps lift your confidence. Don’t rush this step — clean, organized wiring means fewer headaches down the road.
Setting Up Your Guitar for Playability
After assembly, there’s still the setup to handle—adjusting the neck, action, and intonation for the best playability. I usually do this in a few steps:
- Set the neck relief by tweaking the truss rod so the neck is just slightly bowed.
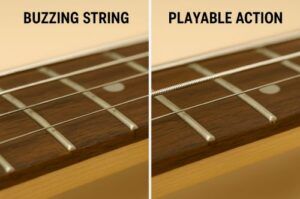
- Adjust the bridge and saddles for string height. Too high and playing feels like a workout, too low and the strings buzz.
- Check intonation by comparing open notes to 12th fret notes. Adjust saddles as needed.
Tuning stability and comfortable action don’t happen automatically, especially with kit guitars. Taking time to get these things right makes a huge difference in how enjoyable your finished guitar is to play. It’s not a bad idea to read up on basic guitar setup — there are plenty of videos and guides out there if this part is new to you. Getting string height, neck bow, and intonation sorted takes a bit of patience but really pays off long term.
Quick List: What to Double-Check Before Closing Up
- Make sure all grounding wires are securely soldered. Bad grounding is the biggest reason for humming and buzzing.
- Check that electronics work with the control cavities open before screwing down covers or pickguards.
- Test neck alignment with a long straightedge — it should point straight at the bridge saddles.
- Spin all the tuning machines to ensure smooth movement and tight mounting.
- Go over every screw before stringing up. Loose hardware rattles, but overtightened screws can crack the wood.
Frequently Asked Questions
Here are some quick answers to questions people often have when tackling their first kit:
How can I tell if my guitar’s wiring works?
Plug into an amp and tap the pickups or flip the controls — if you hear any changes in sound, your wiring is probably good. Silence or buzzing tends to mean a loose wire or a short circuit.
How hard is it to assemble an electric guitar?
It can be a challenge, especially for those new to woodworking or soldering, but with patience and research, it’s quite doable. Expect to spend at least several hours — and longer if finishing from bare wood or aiming for a perfect result.
What should I avoid when buying a kit?
Watch out for low quality electronics, poorly fitting necks, bad reviews about unclear instructions, and woods that are especially tough to finish if you’re inexperienced.
How do I fix a short circuit in my guitar?
Open the control cavity, look for wires touching where they shouldn’t, add insulation (tape or tubing), and clean up any messy solder joints. Testing with a multimeter can really help if you have one.
Final Thoughts…
Building an electric guitar kit is a truly satisfying project that teaches you a lot about how guitars work. Most issues that crop up can be sorted out with some patience, research, and careful troubleshooting. Basic tools, a soldering iron, and a multimeter will handle almost everything you need—see Tools Needed For Building An Electric Guitar Kit for a full checklist. Each build is a chance to learn and gives you a playable instrument at the end—check out our Step-by-Step Guide To Building Your First Electric Guitar Kit if you’re just getting started. If you get stuck, online forums and video tutorials are packed with advice from other builders. Keep at it, and you’ll have an instrument you’ll be proud to call your own.

There are 100’s of ways you can build a business around your passion for guitar building.
Check it out…

This troubleshooting guide is fantastic—it’s one of the most practical and reassuring breakdowns I’ve seen for anyone building their first electric guitar kit. I appreciate how clearly you outline the common pain points: everything from weak solder joints and wiring shorts to neck alignment woes, bridge setup challenges, fretwork discomfort, and finishing mishaps. Your advice on testing wiring early—by plugging in and tapping pickups before sealing everything—feels like a real lifesaver. Emphasizing patience, verification at each stage, and tidy wiring as keys to avoiding later headaches shows how even small steps can make a huge difference in playability and sound.
If you were to highlight one issue that builders consistently underestimate—something that seems simple but often causes major headaches—which one do you think deserves more attention?
Thank you so much! I’m glad the guide resonated! It’s always rewarding to hear that builders feel more confident tackling their first kit.
One issue that often gets underestimated is neck alignment and relief checks. It might seem simple, but even a slightly misaligned neck or overlooked truss rod adjustment can cause buzzing, dead frets, or action issues that feel much more complicated to fix later. Another small but commonly overlooked step is testing the wiring before sealing the cavity—catching a cold joint or reversed connection early can save a ton of frustration.
Those “minor” details really do make a huge difference in the final playability and tone of a kit, and paying attention to them early helps keep the build enjoyable and stress-free.
Thanks again,
~Wayne
This article is an excellent and practical guide for anyone attempting to build an electric guitar from a kit. Breaking down the troubleshooting process into specific sections like wiring, neck alignment, and fretwork makes the information digestible and highly useful for beginners. The emphasis on patience and research is also a great piece of advice. The article could be even more helpful by including photos or diagrams for each troubleshooting section, particularly for the wiring and fretwork issues, as these can be difficult to visualize from text alone.
What are some of the most overlooked or counterintuitive steps in the final setup of a guitar (neck relief, string height, intonation) that can make a big difference in playability?
Thanks so much for the thoughtful feedback! You’re absolutely right—photos and diagrams would really help bring the troubleshooting steps to life, especially for wiring and fretwork. That’s something I plan to add in future updates.
As for overlooked steps in the final setup, a couple really stand out:
Neck relief adjustments – Many beginners either skip this or over-tighten the truss rod. A touch too much bow or back-bow can drastically affect how comfortable the guitar feels.
Nut slot height – This is often missed, but even if everything else is perfect, nut slots that are too high make the first few frets hard to play cleanly, while too low leads to buzzing.
Pickup height – People tend to set them too close to the strings. Backing them off slightly can actually open up the tone and balance volume between strings.
Intonation check under playing conditions – Adjusting intonation with the guitar laying flat is common, but standing and playing in your normal position sometimes reveals subtle differences worth dialing in.
Little details like these make the guitar feel far more “finished” and rewarding to play.
Thanks again,
~Wayne